This post looks at Bakasana (crane/crow pose) from an Iyengar yoga perspective. It breaks the pose down into preparatory stages that can be beneficial when practiced in isolation, or as part of a step-by-step progression towards the full pose.
Benefits of Bakasana
Bakasana, also known as crane or crow pose, is a challenging yoga pose that requires balancing on the hands with the knees resting on the upper arms. It strengthens the wrists, arms, and abdominal muscles while opening and toning the inner groins. Regular practice of Bakasana builds inner strength, resilience, and improves overall posture.
To acquire the techniques covered in this article through an on-demand video class, simply scroll to the bottom of this page and access our free instructional video called “How To Do Bakasana (Crane/Crow Pose).”
Explore a World of Online Yoga. Unlimited Access to All Classes and Courses.
Try it Free for 14 days. Cancel Anytime.
How To Do Bakasana Step-By-Step

Stage 1
Begin in uttanasana with your feet together. (Note that if you are working with a stiffer body it may help to start with your feet hip width apart and bring your feet together as you lift off; ideally feet start together)
- Bend your knees and place your hands to the floor, shoulder width apart.
- Ensure that your arms have come in between your knees.
- Slide your triceps down your shins so that the halfway point of the triceps aligns with the halfway point of the shins. To bring about this alignment your elbows need to bend to touch your toes.

Stage 2
- Without your triceps sliding higher up the shinbones, walk your hands closer to your feet.
- As you do this your upper arms will become more firmly wedged into your shins.
- Ensure that the pose is compact from the sides towards the centre, from the front towards the back, and from the back towards the front.

Stage 3
You are now ready to elevate your pelvis:
- In order to elevate your pelvis, raise your heels and come onto the tips of your toes.
- Press the tops of your toes firmly into the floor.
- Squeeze your inner shins against your upper arms. Resist your upper arms against your shins.
- Don’t wait until your feet have left the floor to find your balance. At this point use your arms to support your body weight and stabilise the pose.
- Keep your head still.
- Focus your gaze to the floor in front.

Stage 4
- Without disturbing the remainder of the body lift one foot off the floor.
- As the foot comes off the floor bring the heel closer to the buttock.
- Ensure that you hips stay level as the foot comes off the floor.
- Maintain firm contact with the remaining toes as they press into the floor.

Stage 5
You are now ready to come to the final position:
- Without disturbing the remainder of the pose, raise the second foot to meet the first foot.
- Now that both feet are off the floor, lengthen your shin bones towards the ankles and raise your heels towards your buttocks.
- As your heels lift towards your buttocks raise your buttocks away from your heels.
- Broaden your upper back away from your spine.
- Now straighten your elbows.
- Squeeze your inner shins against your arms whilst lengthening from inner knee to inner heel.
- Project inner heels and big toe bases away from your knees. Ensure that your feet stay firmly together.
- Press your fingers down and bring weight away from the heels of your hands, lifting your wrist bones up.
A common question
Students commonly ask: “Do you need to tense your abdominal muscles?”
- You will feel the muscles in this area gripping, but allow this grip to be a natural consequence of the other actions described above.
- Do not attempt to directly contract the abdomen. Any grip you experience in this region should not block the freedom of your breath.

Stage 6
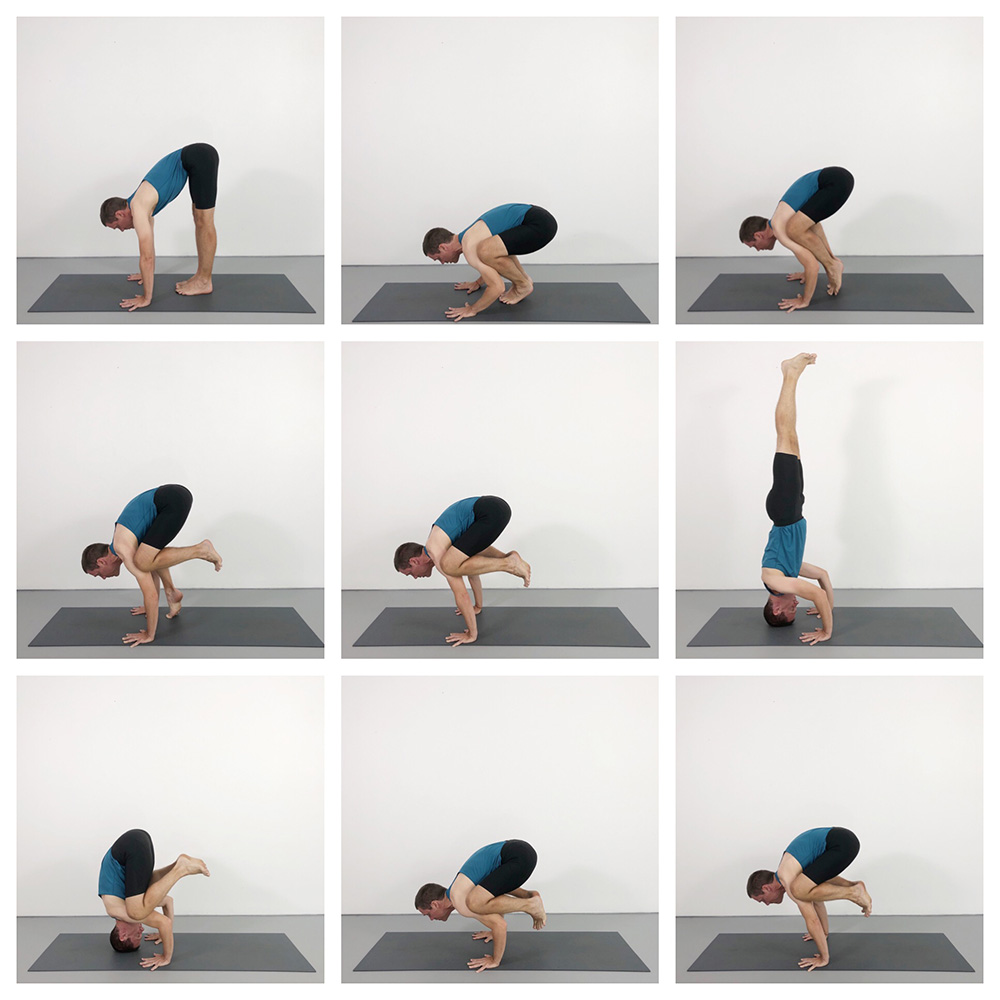
Another way of entering bakasana is via sirsasana II (three point head balance). The ability to confidently free balance in this pose is a prerequisite for this method. You will need space for your head to eventually lift upwards and forwards, so it will not be possible to practice this sequence of movements balancing against a wall. Set up either in the middle of an open space, or with the back of your skull around half a metre from a wall.
- Fold your mat so that you have sufficient padding for the top of your head. Be aware that your hands will need to assist your balance. For this reason it may be helpful to have your hands underneath the folded mat (as pictured) so that you have a firmer surface to press down onto.
- Place the top of your head to the floor and position your hands shoulder width apart.
- Position your hands so that your forearms are perpendicular to the floor.
- Spread your fingers wide apart.
- Now lift up to sirsasana II either with straight legs together, or bent knees together.
- Once fully in the pose; press the heels of your hands down; resist your elbow joints towards your shoulders; and lift your shoulders upwards towards the ceiling.

Stage 7
Now start to lower your legs.
- Keeping your legs straight lower your legs to hip height.
- Once your legs reach hip height, start to bend your knees bringing your shins onto your upper arms.
- One leg at a time shuffle your knees closer to your shoulders so that the centre of your triceps align with the centre of each shin bone.
- Squeeze your shins against your upper arms and resist your upper arms against your against your shins.

Stage 8
Now your hips are brought back and down so that your head is able to lift off the floor. This is a subtle movement that uses balance more than strength. For many people this stage will need to be repeatedly practiced before progress is made.
- Firmly squeeze your shins against your upper arms.
- Maintaining this action, allow your hips to lower further back and down towards the floor: allow the backs of your wrists to slightly descend; and allow the contact of your head with the floor to change from the top of the head to the region nearer the forehead.
- The above adjustments are subtle and need to be practiced and refined. Too much movement and the feet come crashing to the floor. Not enough movement and the head will be unable to lift up.
- Keep your shins clamping your upper arms throughout.

Stage 9 – Bakasana Final Pose
You are now ready to lift up to bakasana.
- Lean your hips back to the point where the contact of your head to the floor becomes light.
- Keeping your elbows bent for the moment, lift your head completely off the floor.
- Once your balance is stable start to straighten your elbows and lift your body higher.
- Extend from inner knees to inner heels.
- Extend your inner knees and inner heels away from your knees.
- Broaden your upper back.
- Under control, re-bend your elbows and place your head lightly back to the floor.
- Raise back up to sirsasana II, and then lower your legs back down and release from the pose.
Conclusion
This post explores some fundamental methods and techniques for learning the arm balancing pose bakasana. It breaks the pose down into preparatory stages that teach you how to practice from a standing position, and eventually from the inversion sirsasana II. The pose is beneficial for building both physical and mental strength and is an excellent pose to include in your regular home practice.
Enhance your understanding of Bakasana (Crane/Crow Pose) by watching our comprehensive and free instructional video:
Access Specialised Yoga Courses at Yoga Selection
To access similar and related material to this Bakasana article simply visit yogaselection.com. As a member of Yoga Selection, you’ll have access to a wealth of specialised yoga courses. Explore our extensive video library, which offers over 650 on-demand classes, including courses, classes and articles that focus on specific aspects of authentic yoga practice.
Become a Yoga Selection member and enjoy the freedom of unlimited access to our diverse range of courses. With two new videos released every week, you’ll always have fresh content to explore and incorporate into your practice. For a more personalised experience, join live classes in real time, where you can receive guidance and support from experienced instructors.
Explore a World of Online Yoga. Unlimited Access to All Classes and Courses.
Try it Free for 14 days. Cancel Anytime.
Share:
See Related Blog Posts: