This post demonstrates how to use a chair to learn dwi pada viparita dandasana and eka pada vipartita dandasana. These two poses illustrate common techniques and approaches used in the Iyengar method. Chair backbends are supported poses that allow you to practice both actively and passively. The passive approach will be well suited to times of lower energy and more restorative sessions. When working more actively you are able to use the support of the chair to stay longer, and penetrate more deeply into the poses. Try the free video at the bottom of this post.
Explore a World of Online Yoga. Unlimited Access to All Classes and Courses.
Try it Free for 14 days. Cancel Anytime.
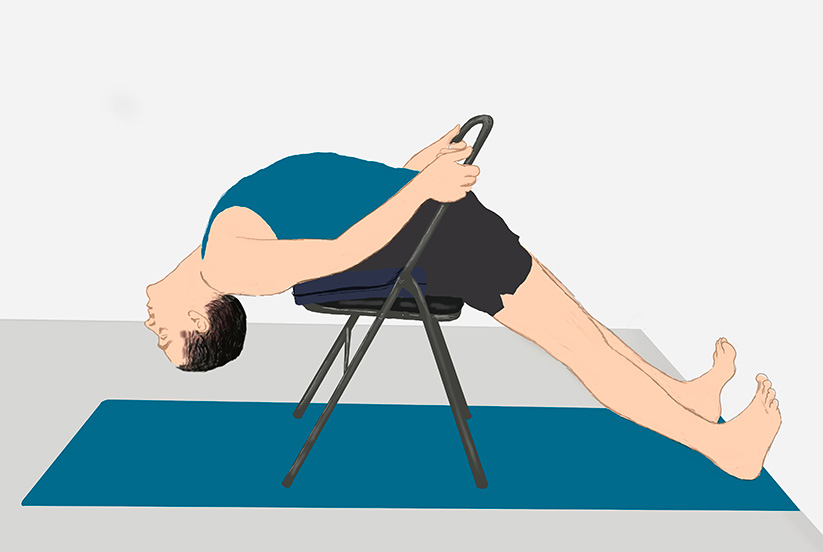
STAGE 1

This pose is an ideal starting point for anyone new to chair backbends. The chair is not to be used as something to passively lie over. Instead it is used as a support for your elbows to press against. Pressing your elbows down lifts your chest and upper back upwards. This action is important as it helps to spread the work load of the backbend evenly along the spine, without putting strain on the lower back.
- Sit reverse on your chair with both legs through the back frame of the chair.
- Lie back so that the bottom edge of your shoulder blades (the part nearest the mid back) comes just off the seat of the chair. Allow your head to hang back.
- Hold the back frame of the chair with your hands and position your elbows on the seat of the chair beside your ribcage.
- Press your elbows down into the chair, and lift your back ribs and chest up.
- Keep your legs bent with your ankles under your knees.
- Have your feet apart hip width. Knees apart hip width.
- Press your feet firmly to the floor.
- As your chest lifts up allow your navel to release down.
- Breathe evenly.
- To come up… keep your head hanging back. Lead up with your chest and bring your head up last.
STAGE 2

This second stage is similar to the first but now you straighten your legs. Your chair needs to be near a wall so that the balls of your feet can press into the wall.
- Place your chair approximately one metre away from the wall.
- With your legs bent lie back and reproduce the previous stage with your chest lifting.
- Maintaining the lift in your chest start to straighten your legs and bring the balls of your feet in contact with the wall.
- Keep your heels in contact with the floor as your feet reach the wall.
- Pressing your big toe bases into the wall, straighten the backs of your knees… and lift your chest up.
- Pressing your big toe bases into the wall, press the fronts of your thighs down… and lift your chest up.
- Maintain the action of pressing your elbows into the chair so that your chest stays lifted.
STAGE 3

This pose builds on the previous position by bringing your arms away from the chair and extending them over your head.
- Before taking your arms away from the chair you need to first of all check that your legs are capable of maintaining the chest lift created in the previous chair backbends.
- With your legs engaged, loosen the grip of your hands on the frame of the chair. As you do this observe the position of your chest, ensuring that it does not drop in the slightest.
- To progress further bring your hands away from the chair, straighten your elbows and extend your arms back and over your head.
- At this stage have your palms parallel to one another with your thumbs pointing downwards. This hand position helps you to turn the outer armpits away from the floor thus broadening the shoulder region and creating space for the arm extension.
- Once your arms have fully straightened, turn your arms so that your palms face upwards towards the ceiling.
- Keep your fingertips hovering off the floor.
- Move your armpits and the palms of your hands away from your pelvis. Simultaneously, suck your shoulder sockets back towards your pelvis.
STAGE 4

This next stage brings you one step closer to dwi pada viparita dandasana. The addition of a bolster helps to prepare you for taking your head all the way to the floor. Blocks under your feet prepare you for walking your feet higher up the wall.
- Place the blocks against the wall on their side edges. Have the blocks hip width apart.
- Position the bolster so that it is on the floor directly underneath where your head will be placed.
- Lie back over the chair and with straight legs place your heels up onto the blocks.
- Whilst lying back hold the back frame of the chair with your hands.
- In order for your head to come all the way to the bolster your shoulder blades may need to be slightly further off the chair.
- Allow your head to hang back and place the top of your skull onto the bolster.
- As your head presses down into the bolster lift your shoulder blades up and off your neck.
- Bring your hands away from the back frame of the chair and extend your arms back over your head with your palms facing upwards.
STAGE 5

This stage brings your head completely down to the floor. Your feet come up the wall so that your legs are parallel to the floor, and your hands come into the three point head balance position.
- Position your chair so that the centre of the seat is a legs length distance from the wall.
- Lie back over the chair and place your shoulder blades just off the edge of the chair.
- Instead of letting your head hang back, lift your head and look towards the wall where your feet will go.
- Step both feet up the wall so that your ankles are the same height as the seat of the chair.
- Ensure that you are holding the back frame of the chair with your hands.
- Keep holding the frame of your chair with your hands as you slide back bringing your head back and down to the floor.
- It is important here that your body slides whilst the chair stays fixed in position.
- Once you head is to the floor, bring your hands back to the floor into the 3 point position.
- Place your hands a shoulders width distance apart.
- Position your elbows directly over your wrists so that your forearms are perpendicular to the floor.
- Contain your elbows to shoulder width.
- Press the heels of your hands down… resist the elbows towards the shoulders…lift your shoulders upwards towards the ceiling.
- Lift your shoulder blades up and off your neck.
STAGE 6

This position can follow directly from the previous stage without coming up. You now change the position of the hands so that they come into the sirsasana (headstand) grip with your fingers interlocked behind your head.
- As you lie back and place your head to the floor stay in as close as possible to the chair.
- Before switching from the three point hand position to the sirsasana hand position, ensure that your shoulder blades are lifting up and off your neck
- Maintaining this lift bring your hands one at a time behind your head and interlock your fingers.
- Squeeze your elbows towards one another until they are shoulder width apart.
- Once your elbows are shoulder width, press them down towards the floor (into the floor if possible).
- Pressing your elbows down enables you to lift your shoulder sockets up.
- As you press your elbows down, turn your outer armpits forwards so that your shoulders spread outwards as they lift upwards.
STAGE 7

Now that you have learnt how to bring your head to the floor with your fingers interlocked behind your head, you are ready to bring your feet back to the floor. If you are tall it is common to need to build the height of the chair up by adding additional blankets to the seat of the chair. This will help to create space for your shoulders. Shorter people may find that their feet lift off the floor when their heads comes down. If this is the case try placing height (folded blankets) under your head. If still your feet lift up then blocks can be placed under your feet. A well balanced pose will have the navel region facing directly up to the ceiling.
- Sit through the chair with your legs bent and feet hip width apart.
- Check that your feet are straight. Ensure that your feet remain straight as you lie back.
- Lie back over the chair and bring your head to the floor. Keep your head as close to the chair as possible.
- Check the contact of the top of the head. Start on the crown of the head. In this pose eventually the floor contact is slightly closer to the forehead region of the skull. Ensure that you are not leaning towards the back of the skull. The tip of your nose will move a little toward the floor. This alignment becomes more important once you are learning to drop back into this position from headstand.
- Bring your hands into the interlocked head balance position behind your skull and repeat the instructions from the previous pose… draw your elbows towards one another… once they are shoulder width press them down in order to lift your shoulders up.
STAGE 8

This next stage can follow on directly from the previous position. The action of bringing the hands apart and holding the front legs of the chair is more demanding for your shoulders and is intended for more advanced practitioners. When learning this action a belt can be looped around the front legs of the chair so that your hands can hold onto it and walk incrementally closer to the chair. This position prepares you for the more advanced backbend chakra bandhasana.
- Start with your fingers interlocked behind your head.
- Lift your shoulders up and turn your outer upper arms forward in the direction you are looking.
- Release the interlock of your fingers and keeping your hands behind your head bring your palms flat together into a prayer position.
- Turning your outer upper arm forward start to bring your hand apart.
- One hand at a time start to walk your hand towards the front legs of the chair. If you are using a belt, walk your hands along the belt towards the front legs of the chair.
- Fundamental to this pose is the rotation of your upper arms. From the outer armpit to the outer elbow turn your upper arm away from the chair.
- Squeeze your elbows closer then press your elbows down to lift your shoulders up.
STAGE 9

This pose prepares you for eka pada viparita dandasana. Although placed at the end of this particular sequence it follows on most naturally from the stage two chair backbend.
- Sit through your chair.
- Leave your left leg as it is and bring your right leg around the outside of the frame of the chair.
- Lie back over the chair bringing your shoulder blades just off the edge of the seat of the chair.
- Straighten your left leg bringing the ball of your foot firmly against the wall.
- Bend your right knee up into your chest and hook your right heel onto the top part of the chair frame.
- Deepen your right thigh crease away from your rib cage. Move your right outer hip away from your rib cage.
- Now straighten your right leg. Ideally the leg will come completely away from the frame of the chair into a vertical position. If you are working with tighter hamstrings this may not yet be possible. If this is the case then aim to have the leg as lightly as possible touching the frame of the chair.
- Right inner heel lift upwards.
- Right thigh bone draw downwards. So that the back of your right hip presses firmly into the seat of the chair.
- Left thigh press down.
- Roll your left inner thigh down.
- Turn your let outer hip upwards.
- Turn your pubic bone towards the right leg.
- Release and come up to repeat on the left side.
Enhance Your Yoga Journey with Yoga Selection Membership
As a Yoga Selection member, you gain unlimited access to our extensive video library, featuring over 650 on-demand classes. Additionally, explore a diverse range of courses, with two new videos released every week.
Experience the flexibility of joining live classes in real time, allowing for personalised guidance and support. Immerse yourself in a vibrant community that nurtures your growth and provides valuable resources for your yoga practice.
Explore a World of Online Yoga. Unlimited Access to All Classes and Courses.
Try it Free for 14 days. Cancel Anytime.
Share:
See Related Blog Posts: