Shoulderstand—known in Sanskrit as Salamba Sarvangasana—is one of the most revered and beneficial inversions in yoga. This pose involves balancing on the shoulders with the legs extended vertically and the hands supporting the back. In the Iyengar tradition, it is often referred to as the “mother” of all asanas. Yet despite its many benefits, Shoulderstand requires thoughtful preparation, intelligent prop use, and step-by-step progression to be both safe and effective.
This article draws from one of Yoga Selection’s in-depth tutorial-style classes on Shoulderstand. It offers a methodical and structured breakdown of the pose, ideal for newer students or anyone seeking to consolidate their foundational understanding. We will explore the key preparatory steps, prop arrangements, and variations designed to protect the neck and promote stability, lift, and alignment.
At the end of the article, you’ll also find links to two standalone Yoga Selection classes dedicated to Shoulderstand practice. These provide additional variations and detailed instruction to guide your development.
Explore a World of Online Yoga. Unlimited Access to All Classes and Courses.
Try it Free for 14 days. Cancel Anytime.
Why Shoulderstand?
Salamba Sarvangasana promotes a wide range of physical and physiological benefits:
- Stimulates the parasympathetic nervous system
- Supports endocrine health, especially thyroid function
- Calms the brain and reduces anxiety
- Improves circulation and venous return
- Builds strength in the shoulders, arms, and core
- Enhances focus, patience, and inner awareness
However, to access these benefits without compromising neck safety, the pose must be approached with precision and care.
Stage 1: Set Up Your Props for Safety and Support
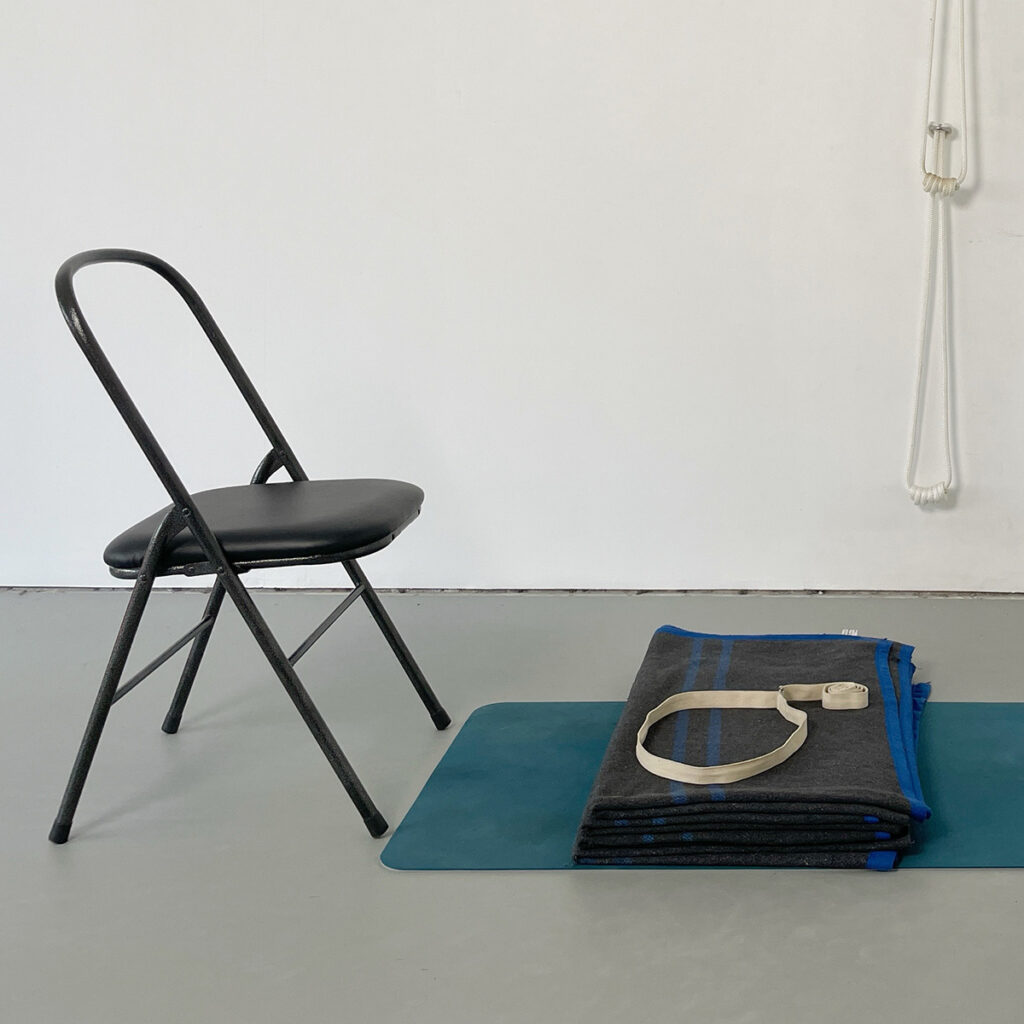
Before beginning, gather the following props:
- 3–4 neatly folded yoga blankets
- 1 yoga mat
- 1 belt
- A wall
- A chair
- Optional: shoulder pads, 2 yoga blocks
How to Stack the Blankets:
- Lay the blankets on your mat with the folded edges aligned vertically.
- The stack should create a flat, even platform with clean folded edges facing the end where your shoulders and neck will be placed.
- Leave a small portion of the mat extended beyond the blanket stack for your head to rest on.
- Optionally, unfold one section of the top blanket to create extra cushioning under the back of the skull.
The goal is to elevate the shoulders while allowing the head to rest lower, creating space in the cervical spine and reducing compression on the neck.
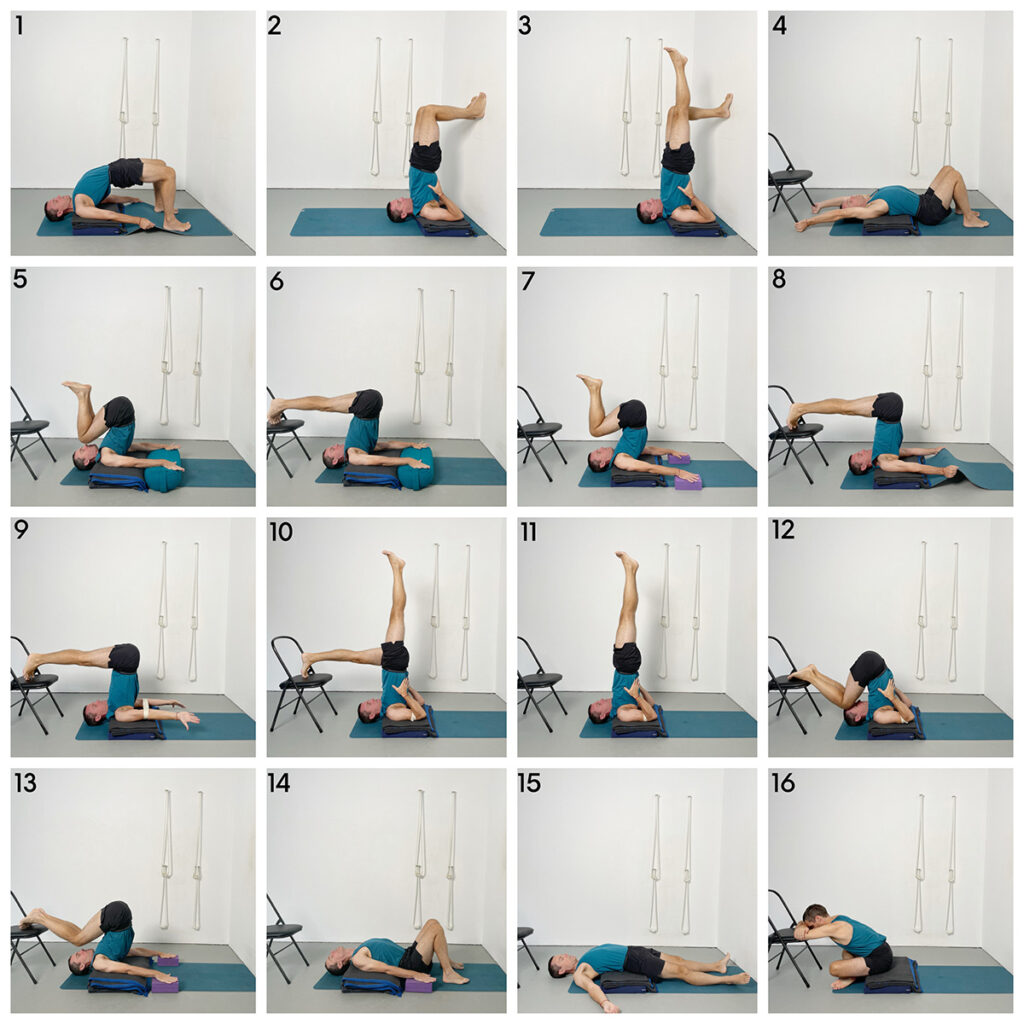
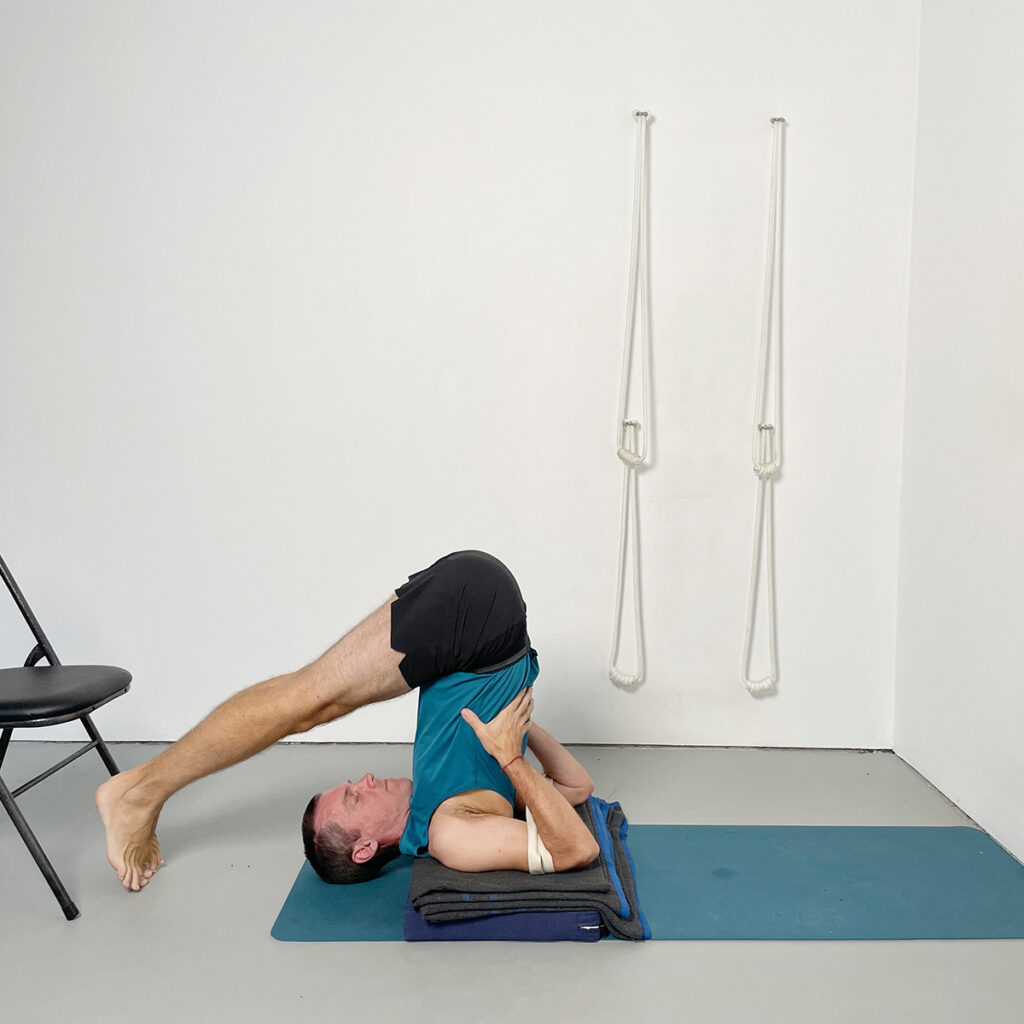
Stage 2: Prepare the Upper Back with Chatushpadasana
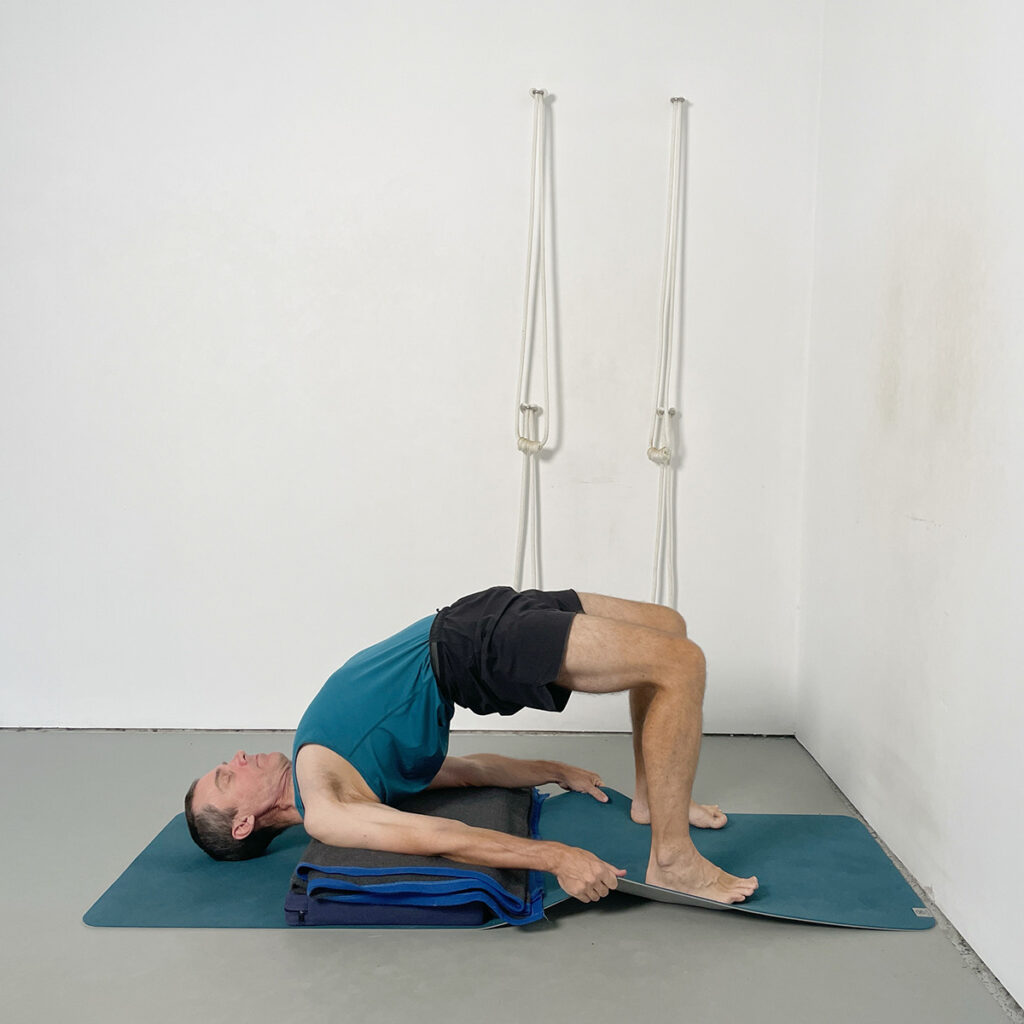
Begin your sequence with Chatushpadasana (Four-Footed Pose), a bridge-style asana that teaches essential actions for Shoulderstand:
- Lie back over your blanket stack, shoulders placed about 2–3 cm behind the folded edge.
- Bend your knees, feet hip-width apart and flat on the floor.
- Grip the sides of your mat.
- Press down through your feet and upper arms to lift your pelvis.
- Focus on lifting your chest by pressing the tops of the shoulders and upper arm bones into the support.
- Draw the shoulder blades up off the blankets and into the body.
- Soften the throat and facial muscles, allowing them to recede.
Repeat this action several times to reinforce the lifting of the chest and containment of the upper back. These dynamics will carry forward into your Shoulderstand.
Stage 3: Shoulderstand with Wall Support
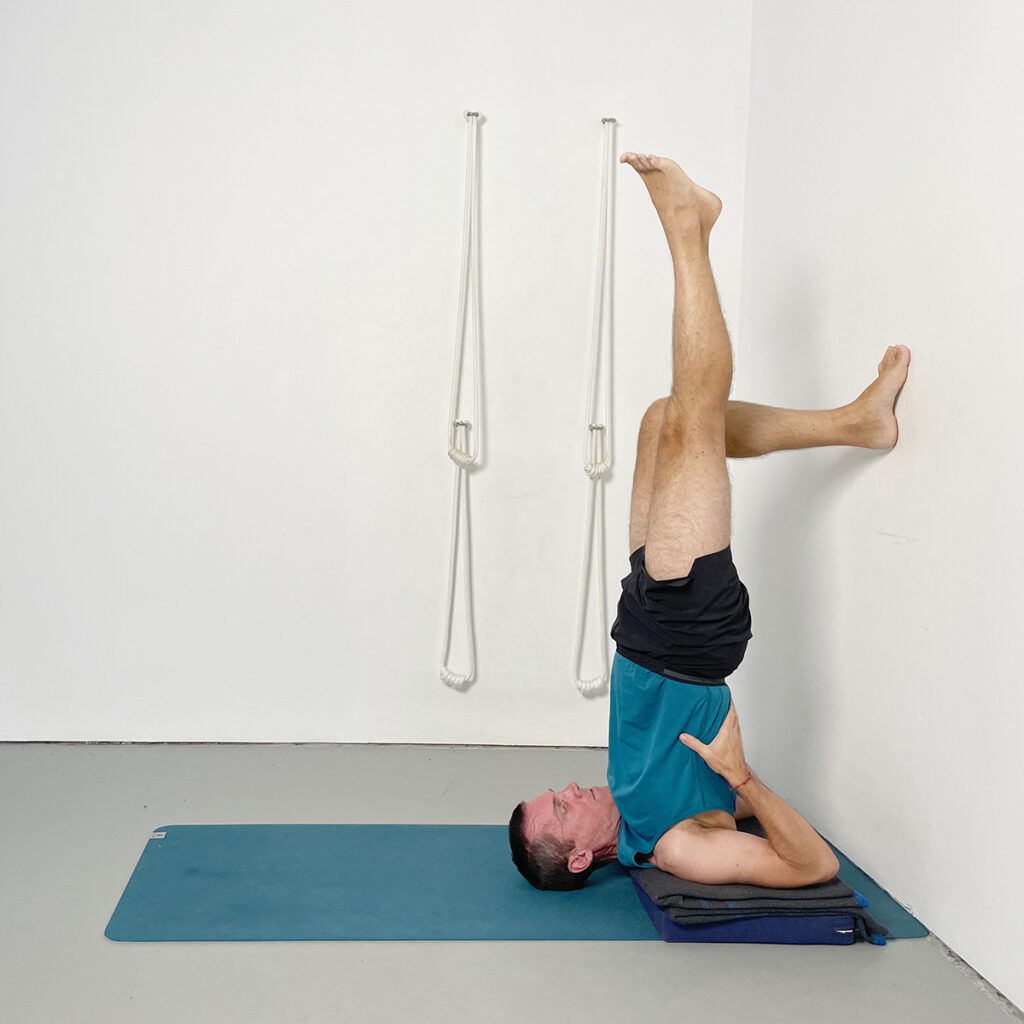
This variation introduces inversion with wall support, ideal for students new to Shoulderstand or those refining their setup.
Entry Steps:
- Move your blanket stack close to a wall, leaving about one palm’s width between the stack and the wall.
- Sit beside the blankets with your hip against the wall.
- Swing your torso down and legs up the wall, aiming to place the centre of the neck in the middle of the blanket stack.
- Once your head is on the floor and your feet are on the wall, bend your knees.
- Tuck each shoulder under, ensuring the top of each shoulder points downward.
- Bend your elbows and bring your hands to your back. Spread the fingers, wrapping the thumbs around the sides of the ribs.
- Press your feet into the wall to lift the pelvis and ribs.
- Practise lifting one leg at a time to vertical, maintaining straight knees and active legs.
This stage introduces the inverted alignment without needing to fully balance the pose. It builds confidence while reinforcing key shoulder, arm, and back actions.
Stage 4: Supported Chair Entry (Halasana as a Transition)
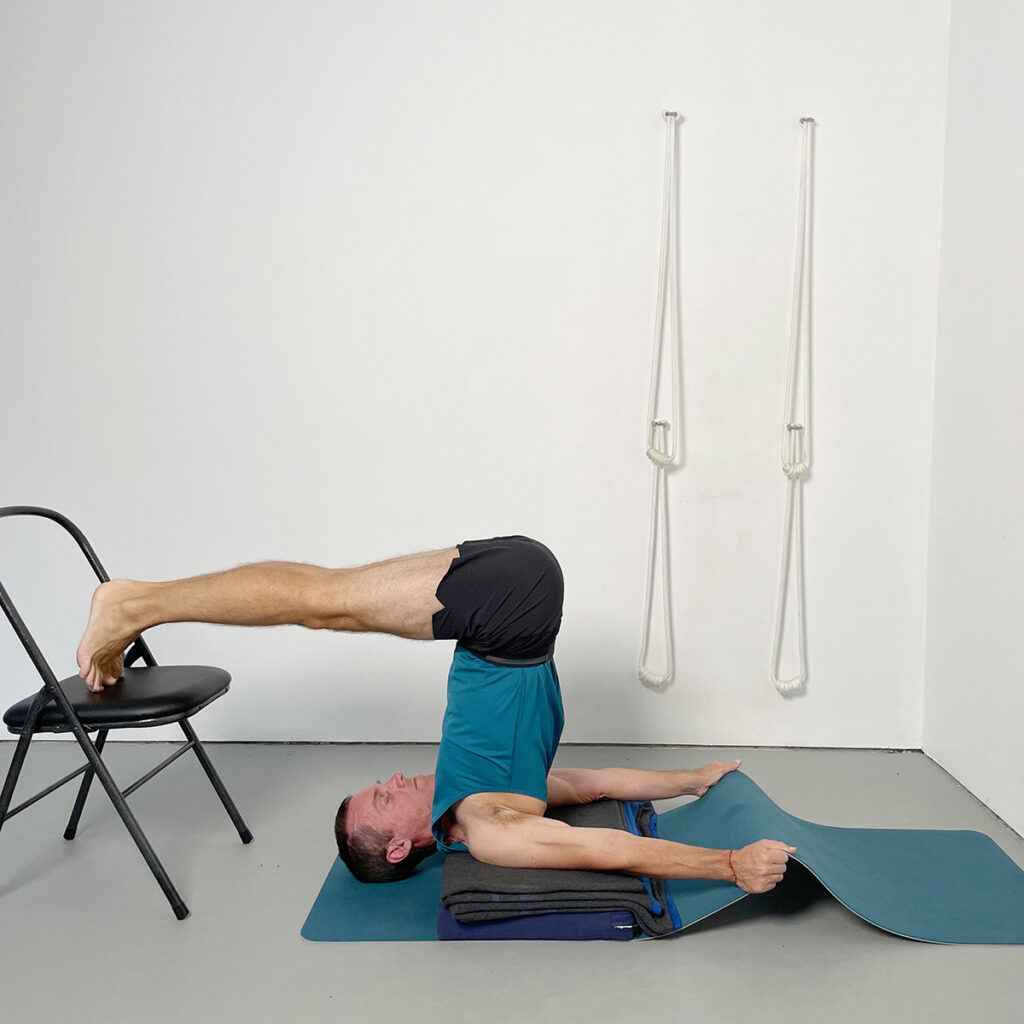
Using a chair introduces the next evolution of Shoulderstand by supporting your legs and spine, allowing for longer staying time and more refined actions.
Chair Setup:
- Position the chair near the top of your mat, seat facing the blanket stack.
- Lie back over the stack as before, position the chair, and gently kick over into Halasana (Plough Pose), resting your toes on the seat of the chair.
- Ensure shoulders remain on the blankets.
- With toes on the chair, tuck your shoulders under and lift your shoulder blades up.
This transitional use of the chair allows you to test your readiness for the classical pose with reduced risk and improved alignment.
Building to Sarvangasana:
- With toes on the chair, tuck your shoulders under and lift your shoulder blades up.
- Place the belt around your arms again if needed.
- Bring your hands to your back and begin raising one leg at a time vertically.
- When steady, raise both legs.
This transitional use of the chair allows you to test your readiness for the classical pose with reduced risk and improved alignment.
Stage 5: Adding a Belt to Contain the Elbows
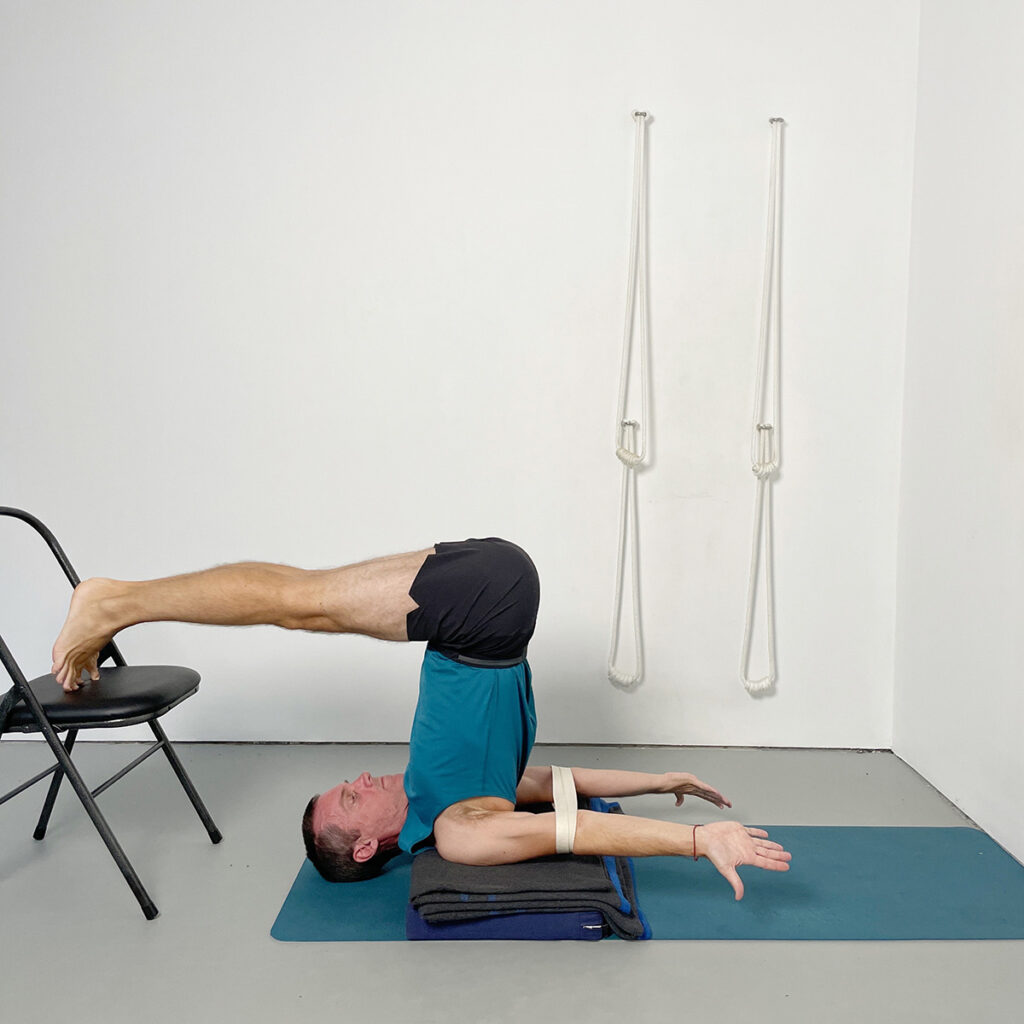
Elbows that splay wide often compromise lift and control in Shoulderstand. To prevent this:
- Use a yoga belt to loop around your upper arms, just above the elbows.
- Adjust the belt so the elbows remain shoulder-width apart when the arms are behind your back.
- The belt contains the arms, supporting chest lift and reducing strain.
This prop setup is especially useful as you begin lifting both legs and refining alignment.
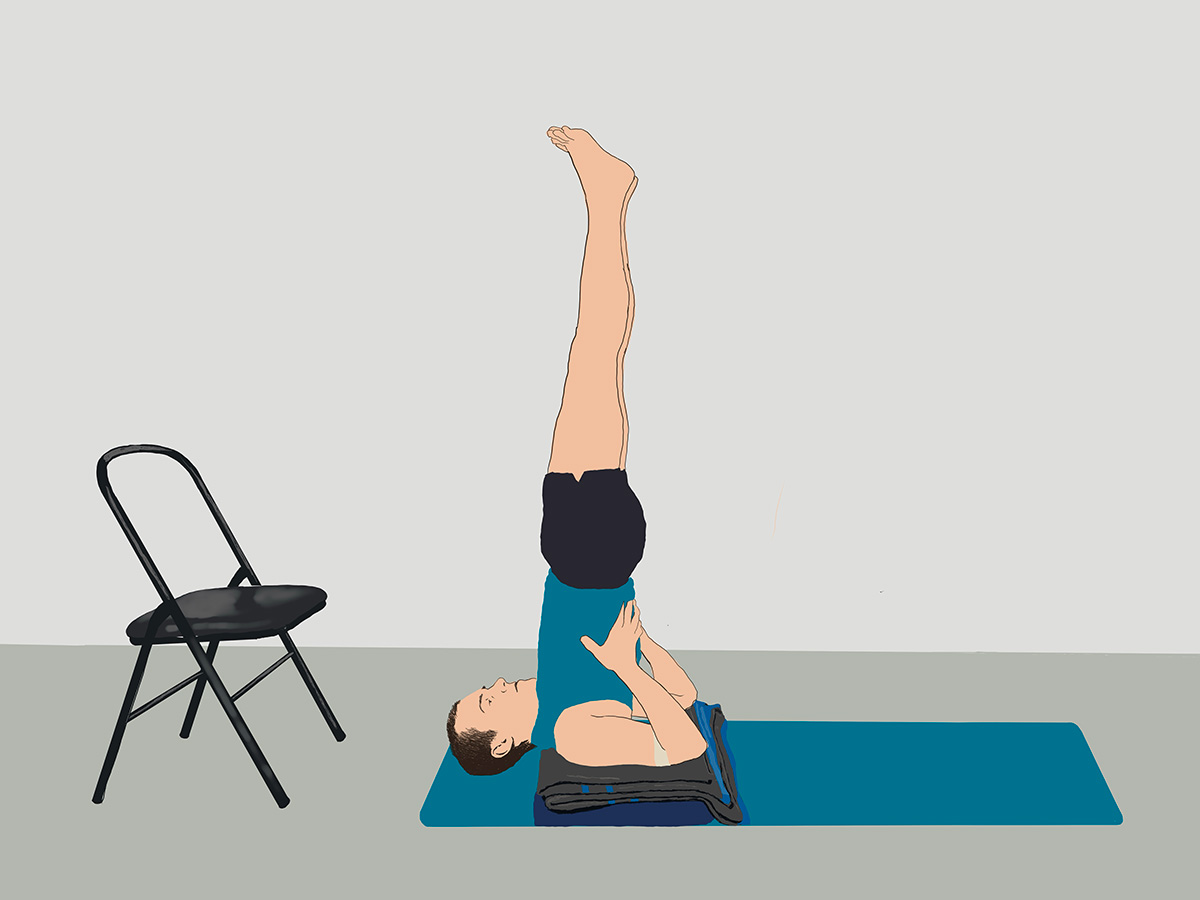
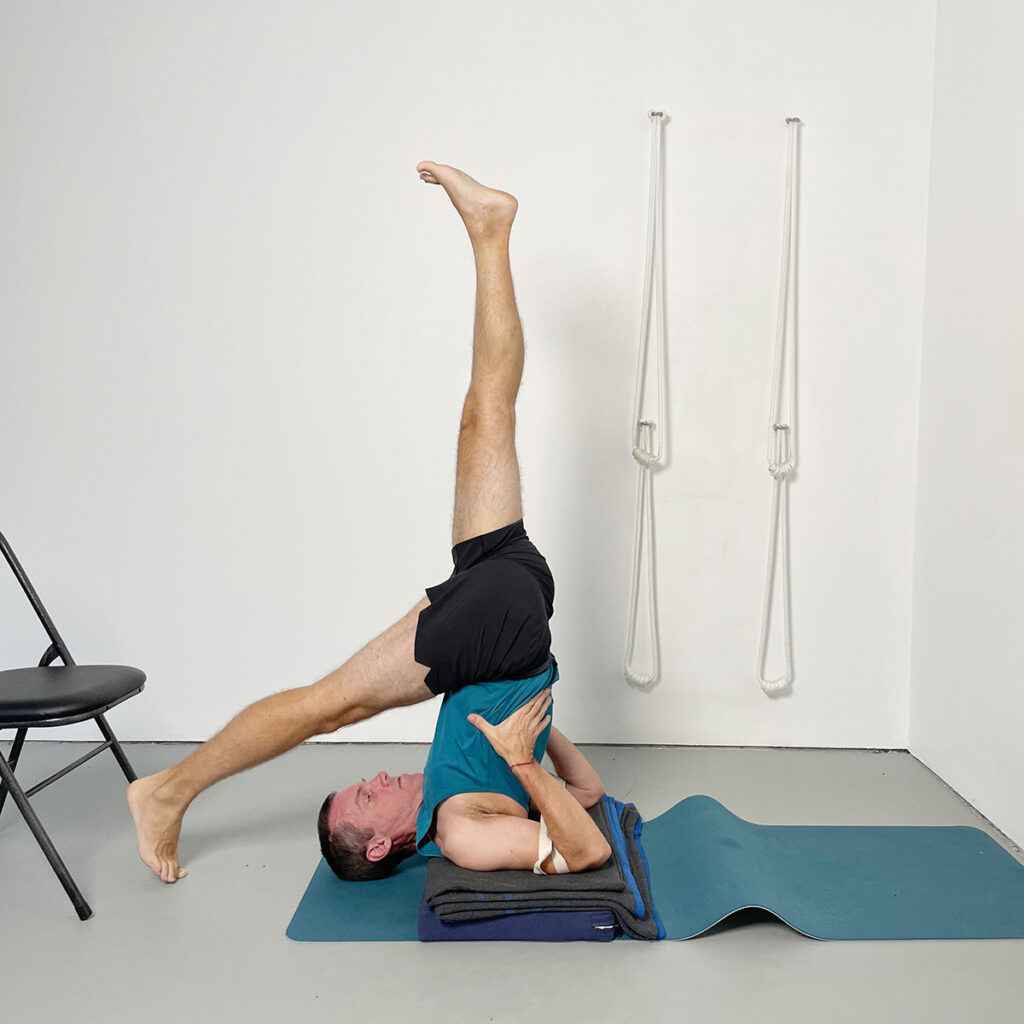
Stage 6: Placing the Hands and Raising the Legs
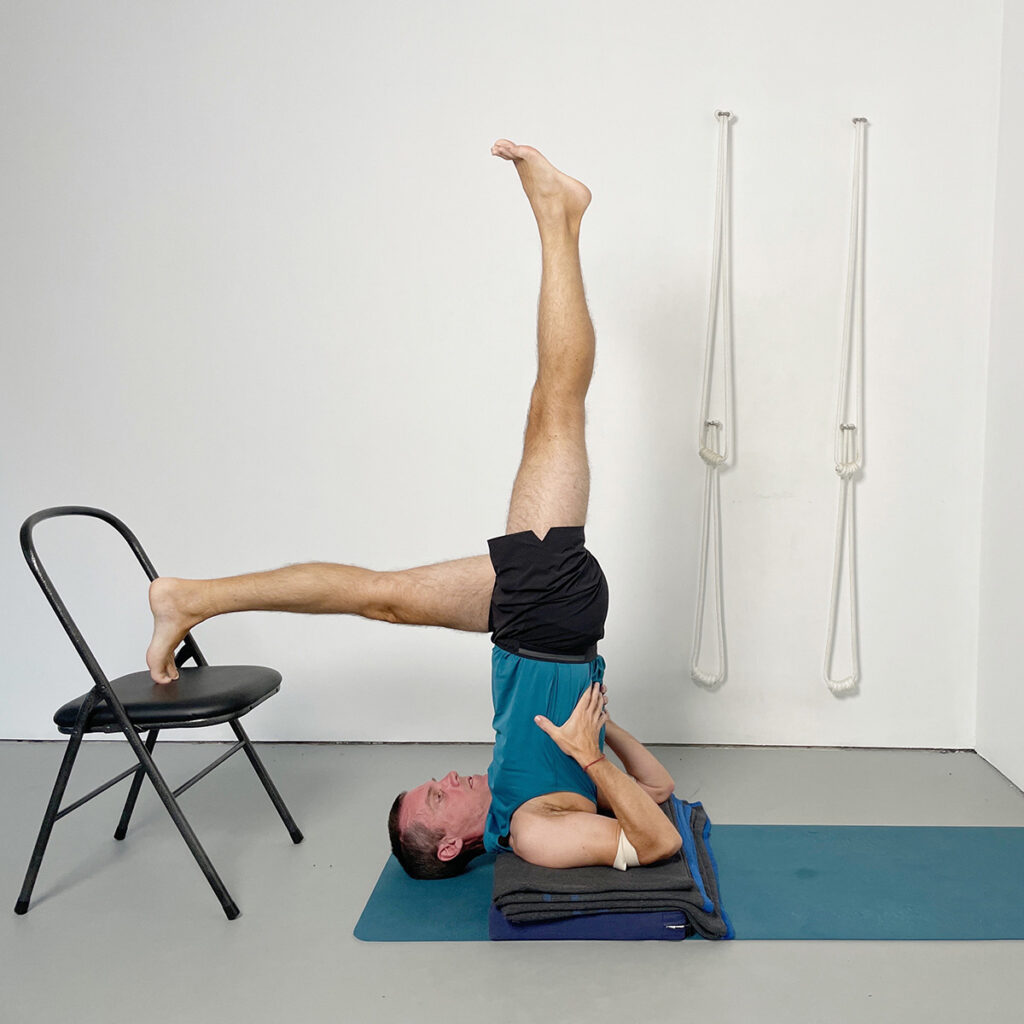
Once shoulder and upper back support are established, the next step is to place the hands correctly on the back and lift into the full pose.
Hand Placement:
- Bend your elbows and bring your hands to your back with fingers pointing up toward the shoulder blades.
- Spread your fingers wide, wrapping your thumbs around the sides of the ribs.
- Walk the hands as far down the back as possible, ideally near the base of the shoulder blades.
- Keep the elbows shoulder-width apart, contained either naturally or by a belt.
Lifting the Legs:
- Begin by pressing down through the arms and shoulders to lift the chest.
- Raise one leg at a time to vertical, ensuring the knee stays straight and the thighbone pulls back into the hip socket.
- Maintain containment in the legs and trunk as you lift the second leg to join the first.
- Once both legs are vertical, firm the buttocks and draw the tailbone inward to support the lift of the spine.
This methodical transition helps develop the strength and structure needed for a stable and upright Shoulderstand.
Stage 7: Halasana to Sarvangasana Without the Chair
As confidence and alignment improve, you can explore removing the chair and working directly from Halasana to Sarvangasana.
Halasana with Feet to the Floor:
- Begin as before, kicking over into Halasana.
- This time, instead of landing on the chair, allow the toes to reach toward or touch the floor behind you.
- Keep knees straight and hips lifted.
- Ensure shoulders remain supported on the blankets and hands press firmly into the back.
- Check that the neck feels free and the weight stays on the shoulders.
Transitioning to Sarvangasana:
- From Halasana, walk your hands further down your back toward the shoulder blades.
- Begin lifting one leg at a time into vertical.
- Engage the inner legs, keeping knees straight and thighs lifting back into the pelvis.
- Once steady, lift both legs, maintaining containment through the arms and upward lift through the spine.
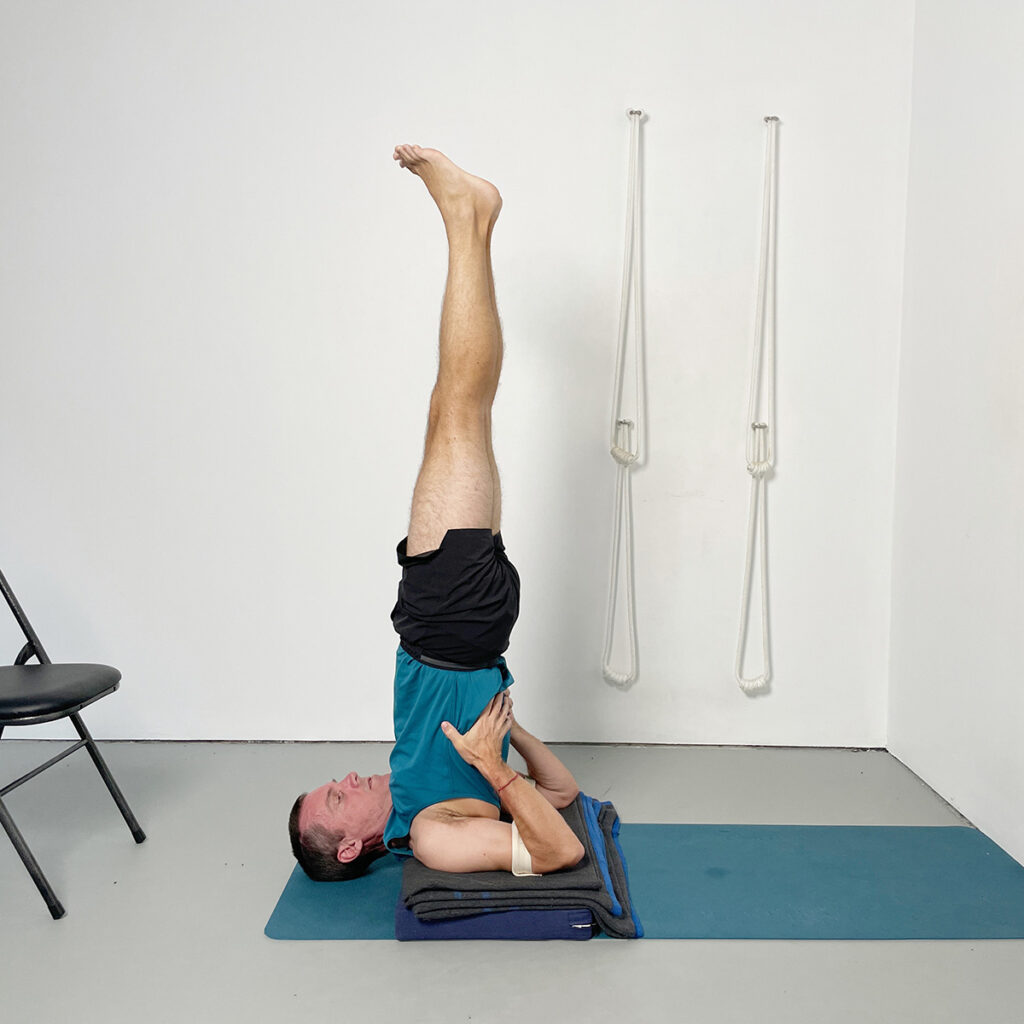
This version represents the classical entry into Shoulderstand and marks a significant progression in your practice. Over time, you may use the floor instead of the chair entirely.
Stage 7: Coming Down and Counterpose
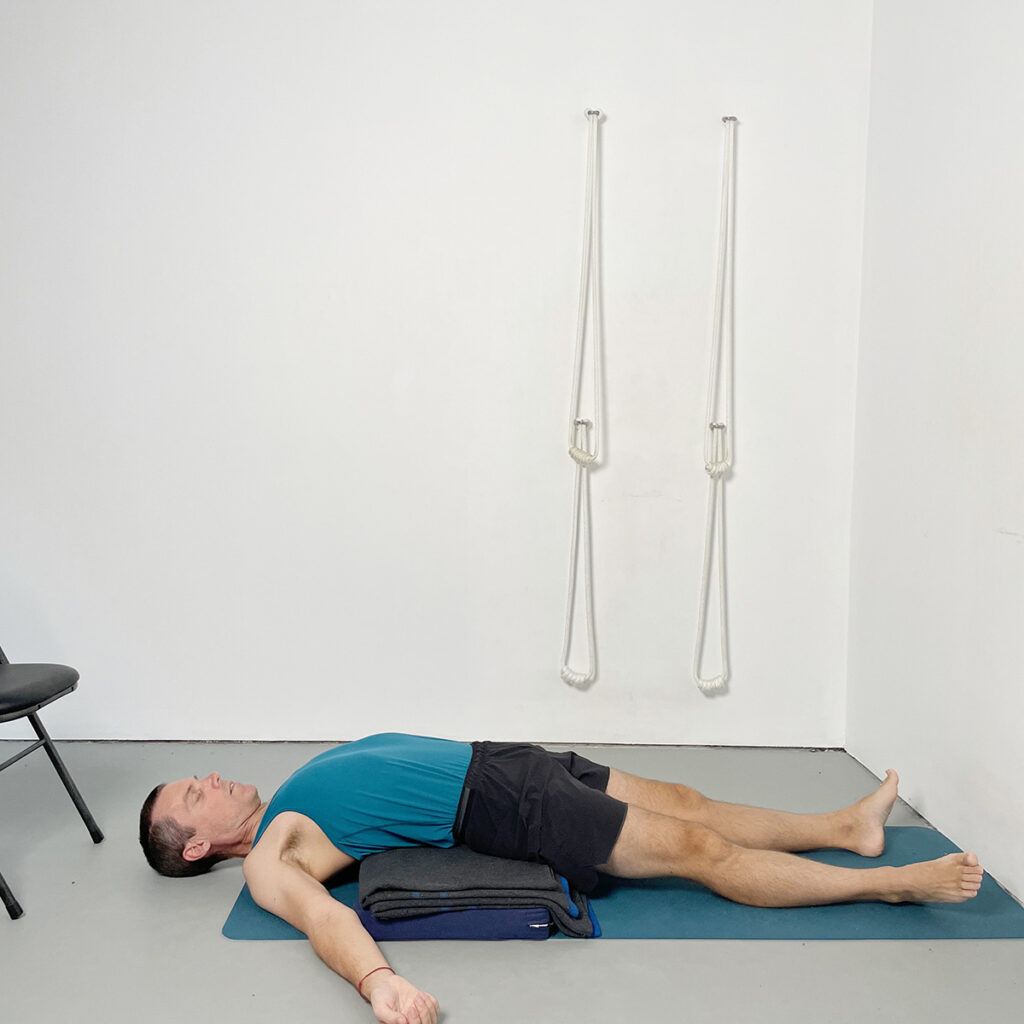
Always exit Shoulderstand slowly and mindfully:
- Lower one leg at a time or bring both legs to the chair or floor.
- Slide your pelvis back down to the floor with hands beside your hips for control.
- Rest on your back momentarily.
Counterpose:
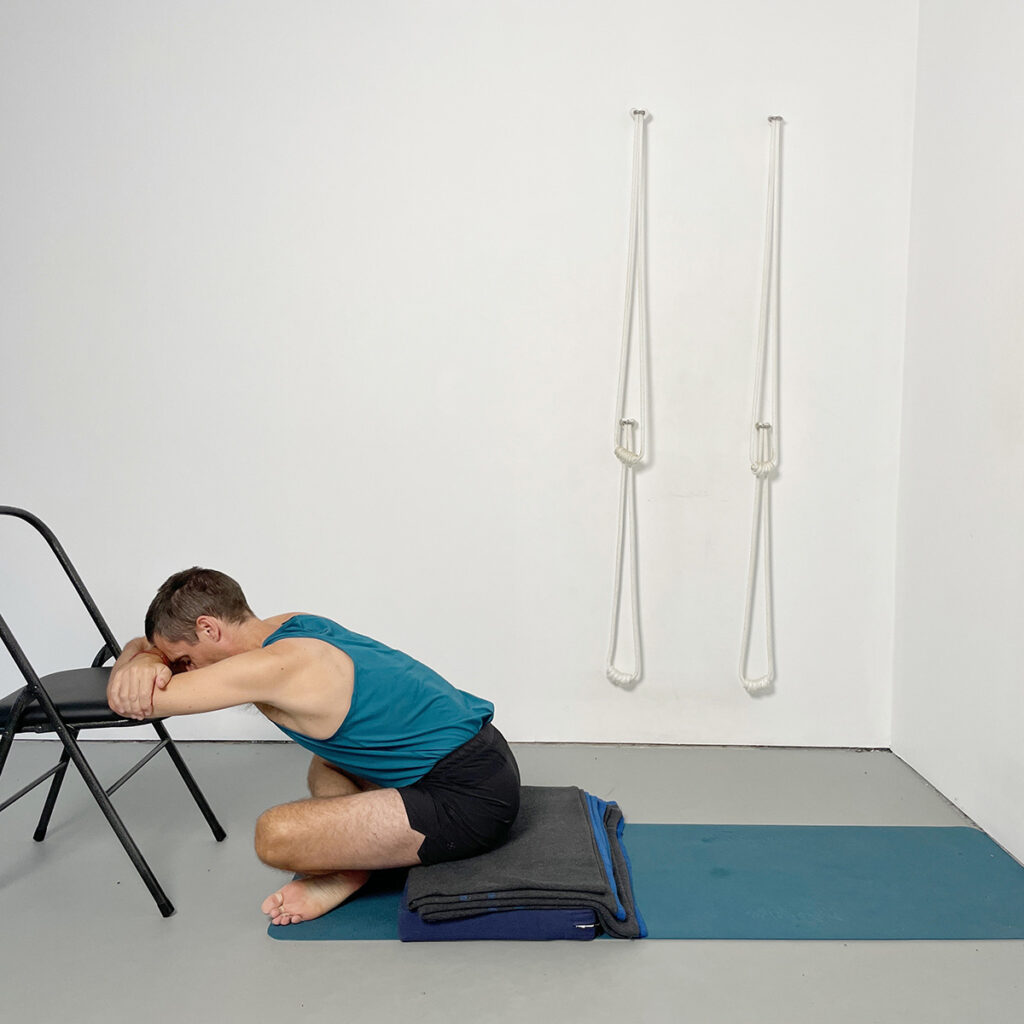
Come to a simple cross-legged forward fold using a chair or bolster to rest your forehead and release the neck, spine, and diaphragm.
Final Tips for Practising Shoulderstand (Salamba Sarvangasana) Safely
- Always prioritise neck safety by using an adequate stack of blankets to elevate the shoulders.
- Avoid turning the head while in the pose.
- Practise with supervision or under instruction if new to inversions.
- Use props liberally to support your evolution in the pose.
- End your practice with a simple forward bend or supported savasana to restore balance.
Continue Learning with Yoga Selection
To deepen your understanding and explore these methods in detail, practise along with our two dedicated Shoulderstand classes:
- Shoulderstand Class One – A Step-by-Step Introduction
- Shoulderstand Class Two – Refining Technique and Evolving Practice
Each class features guided instruction, intelligent sequencing, and demonstrations of the prop setups and techniques described above.
Whether you’re learning Shoulderstand for the first time or refining your existing approach, these tutorials will support your practice and help you gain confidence in this essential inversion.
Note: Always practise Sarvangasana under the supervision of a qualified teacher if you are new to the pose or working with any neck, shoulder, or spinal conditions.
Experience the flexibility of joining live classes in real time, allowing for personalised guidance and support. Immerse yourself in a vibrant community that nurtures your growth and provides valuable resources for your yoga practice.
Explore a World of Online Yoga. Unlimited Access to All Classes and Courses.
Try it Free for 14 days. Cancel Anytime.
Share:
See Related Blog Posts: