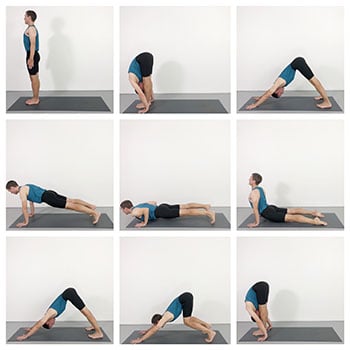
This article explores Surya Namaskar (sun salutes) from an Iyengar Yoga perspective.
Surya Namaskar is a warming sequence of movements that can help to stimulate your heart rate and boost your energy levels. It can strengthen your wrists, arms and chest, and bring suppleness to your muscles and joints. Practicing surya namaskar can help to combat lethargy and build a sense of confidence and resilience. It can be included in your practice in a variety of ways. For Iyengar Yoga practice sequences that focus on surya namaskar head to the weekly classes section of yogaselection.com and see “Vinyasa Forward Bend Sequence – Intermediate Class 100”..
STAGE 1

Tadasana is the position from which you begin and also the position to which you return. Allow the pose to settle before you start to move.
- Knowing that you are heading towards movement, consciously stabilise your body and become still.
- Knowing that you are about to move in a forward direction, start with your weight in your heels.
- Pressing your heels down, lift your body from the ankles upwards.
- Stabilise your tailbone… without it moving, lift your spine upwards.
- Dorsal spine (between the shoulder blades) move in, side ribs move forwards, front ribs lift upwards.
From this position the hands can be brought to namaskar (prayer position) in front of your chest, or the arms can be raised to urdhva hastasana to bring a more energetic opening to the chest.
STAGE 2
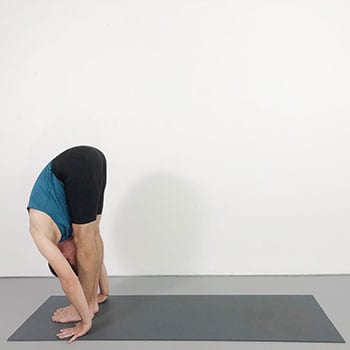
Inhale and as you exhale come to uttanasana. Place your hands to the floor, or to your shins if you are unable to bring your hands to the floor without your knees bending.
- Press your inner feet (big toe bases and inner heels) firmly down and into the floor,
- Lift your front thighs up.
- Roll your inner thighs back.
- Contain your outer thighs inwards towards the centre.
- Stabilise your legs, without disturbing them move your torso closer to your legs.
- Move your chest towards your legs, not your face.
- Maximise the length at the front of your spine.
- Move the back of your spine into your body.
If at this point your hands are to the floor, position your hands so that they are ready for adho mukha svanasana (downward facing dog pose). If your hands are placed on your shins then bend your knees until you are able to get your palms flat to the floor.
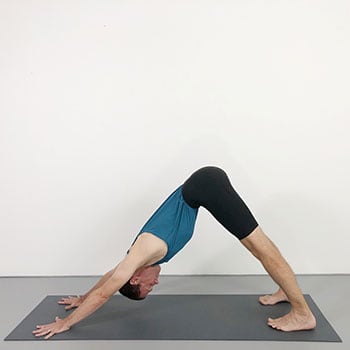
STAGE 3

From uttanasana bend your knees and look forwards, inhale and as you exhale jump (or step) your feet back to adho mukha svanasana (downward facing dog pose).
- Land your feet with your knees bent, then consciously straighten your legs as you settle into the pose.
- Press your index finger bases down.
- Lift the sides of your rib cage up and back
- Lift your spine up and back
- Allow you neck to release downwards with gravity.
- Lift the front of your thighs up and back
- Without your sitting bones dropping, descend your heels.
- As your heels descend, move your ankle joints back.
STAGE 4

From downward facing dog pose you will now come to a transition position that will prepare you for chaturanga dandasana.
- As you inhale, keep your elbows straight and bring your weight forwards so that your shoulders are placed vertically over your wrists. Your arms will now be perpendicular to the floor.
- Ensure that your body forms a straight line from your shoulders, through your hips, and right down to your ankles.
- Keep you tailbone tucked in.
- Maintain lift in your lower front ribs without hardening your diaphragm.
STAGE 5

You now lower yourself down to chaturanga dandasana. Your chest will be near to the floor but not touching the floor. This position requires a degree of strength to maintain. If this is not yet possible, then as an interim measure gently lower your chest all the way to the floor.
- As you begin to lower yourself down bend your elbows straight back.
- As your arms bend ensure that your elbows remain shoulder shoulder width apart.
- Once you are in chaturanga dandasana make sure that your elbows are tucked in towards the side ribs.
- Lift your inner groins up.
- Keep your tailbone in.
- Navel lift.
- Move your Sternum bone away from the navel.
- Maintain the straight line from your shoulders through to your hips and ankles.
STAGE 6

From chaturanga dandasana you then come to urdhva mukha svanasana (upward facing dod pose).
- As you inhale move your body forwards and upwards to urdhva mukha svanasana.
- As you move forwards come onto the tops of your feet with your toes pointing back.
- Press the tops of your feet down and straighten your knees.
- Lift your inner groins.
- Pressing your index finger bases down, turn your biceps outwards.
- Move your chest forwards and upwards
- Roll your shoulders back and down
- Lift your sternum bone as you look up.
STAGE 7
From urdhva mukha svanasana you now return to ardho mukha svanasana.
- With an exhalation, tuck your toes back under and press back to downward facing dog pose.
- This action of tucking the toes under can be performed with a subtle jumping action where both feet move simultaneously. If necessary one foot can be moved at a time. Bear in mind that all movements should be smooth and seamless.
- As you press back to dog pose maximise the height of your pelvis.
- In downward facing dog pose press the fronts of your thighs back, descend your heels, and bring your body weight back into your feet.
STAGE 8

This transition stage prepares you to jump your feet back to uttansana.
- From adho mukha svanasana inhale as you bend your knees and look forwards.
- As your knees bend keep your pelvis lifting up and back.
- Press the floor away with your hands but bring your weight back into your feet.
- The legs in this position will have a spring like quality to them.
STAGE 9

Ensure that you synchronise the movements of the breath with the movements of the body as you jump back to uttanasana.
- With an exhalation jump both feet simultaneously to uttanasana. (If you are working more quietly then your feet can step one at a time).
- The jumping action requires a dynamic transfer of weight from the feet into the hands.
- At the moment when your feet kick off the floor, press your hands down.
- The ability to bring the feet lightly to the floor comes from pressing the fingertips firmly down as the jump unfolds.
- Whilst the feet are still in the air transfer weight from the heels of the hands towards the fingertips.
- Catch the weight of the body with your arms before your feet come back to the floor.
- Adjust the pace of the movements so that you can reach uttanasana on one complete exhalation.
STAGE 10

From uttanasana you now return to your starting position tadasana.
- Press your heels down and with an inhalation come up to tadasana.
- In tadasana allow your body weight to evenly settle down through the soles of your feet.
- Be conscious of the rhythm and pace of your breath. Allow this rhythm and pace to lead the body movements as you prepare to commence your next cycle of surya namaskar.
Learn Iyengar yoga online with expert guidance.
Stream unlimited Yoga Selection classes and build a home practice that gets results.
Try it free for 14 days. Cancel anytime.