
A structured Iyengar Yoga approach to relieving lower back pain through alignment, support, and progressive sequencing.
Includes two free guided classes and a step-by-step pose breakdown for safe and effective home practice.
Lower back pain is one of the most common reasons people turn to yoga. In many cases, this type of pain develops gradually – through stiffness, prolonged sitting, or imbalances between the spine, hips, and legs. Rather than being caused by a single issue, it is often the result of how different parts of the body interact over time.
Iyengar Yoga offers a precise and methodical approach to working with these patterns. Instead of relying on general stretching, it emphasises alignment, support, and carefully sequenced movements to help reduce unnecessary strain on the lumbar spine. By improving how the pelvis, legs, and spine coordinate with one another, it becomes possible to move with greater ease and stability.
This article presents a structured approach to improving lower back health through Iyengar Yoga. It includes two guided video classes, a full-length sequence and a gentle beginner practice, along with a pose-by-pose breakdown that can be incorporated into your home practice.
Last updated March 2026: This article now includes two free video classes, an in-depth intermediate sequence and a new, gentle 35-minute class suitable for beginners.
Table of Contents
- Free 45-Minute Class: Iyengar Yoga Sequence for Lower Back Pain
- Key Iyengar Yoga Poses for Lower Back Pain Relief
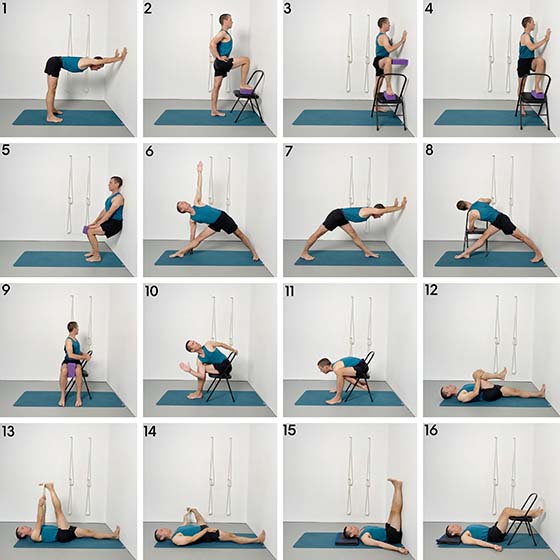
- Pose-by-Pose Breakdown of the Sequence
- 1. Half Uttanasana
- 2. Utthita Hasta Padangusthasana I (Bent Leg Variation)
- 3. Utthita Hasta Padangusthasana II (Bent Leg Variation)
- 4. Standing Marichyasana III
- 5. Utkatasana
- 6. Trikonasana
- 7. Parsvottanasana
- 8. Parivrtta Trikonasana
- 9. Chair Bharadvajasana
- 10. Chair Pasasana
- 11. Chair Malasana
- 12. Pavana Muktasana
- 13. Supta Padangusthasana
- 14. Supta Padangusthasana II
- 15. Legs Up The Wall
- 16. Savasana (Calves on Chair)
- Understanding Lower Back Pain
- Beginner-Friendly 35-Minute Iyengar Yoga Class for Lower Back Pain
- The Role of Tight Hamstrings in Lower Back Pain
- How Iyengar Yoga Helps Lower Back Pain
- Continue Your Practice: A Structured Course for Lower Back Pain
- Common Mistakes
- Frequently Asked Questions
Free 45-Minute Class: Iyengar Yoga Sequence for Lower Back Pain
This 45-minute class guides you through a complete Iyengar Yoga sequence designed to relieve lower back pain. It is best suited to those with some prior experience and explores key poses that improve mobility, release tension, and support the spine through well-aligned movement.
Support Your Lower Back with Structured Iyengar Yoga
Continue your progress with the full Yoga for Lower Back Pain course.
These carefully structured classes are designed to reduce tension, improve mobility, and support the spine through precise alignment and progressive sequencing.
Your membership includes full access to this course, over 900 on-demand classes, and Yoga Selection’s complete library of structured yoga programs.
Clear Instruction. Intelligent Sequencing. Iyengar Yoga for Every Body.
Key Iyengar Yoga Poses for Lower Back Pain Relief
The following sequence brings together key Iyengar Yoga poses for relieving lower back pain. These poses are arranged to improve flexibility in the hamstrings and hips, reduce tension in the lumbar spine, and develop better coordination between the legs, pelvis, and spine.
You can use this sequence as a reference alongside the video, or as a standalone guide for your home practice.
Pose-by-Pose Breakdown of the Sequence
Below you’ll find a step-by-step breakdown of each pose featured in the full-length class. Use this section to follow along with the video, revisit key actions, or study the structure of the sequence in more detail.
1. Half Uttanasana

This pose allows you to stretch your hamstrings whilst keeping your spine long and straight. It is an adaptation of the classical uttanasana pose where you reach down towards your feet. It reduces the common tendency in this pose for the spine to round and pull towards the pelvis.
- Place your hands to the wall at waist height. Ensure that your hands are shoulder width apart, with your fingers spreading and the middle finger of each hand pointing directly upwards.
- Step your feet back so that your body forms a right angle shape with your hips directly over your ankles. Ensure that your feet are placed hip width apart, with your toes pointing directly forwards.
- Look down at your feet without dropping your head. Keep your ears and upper arms level.
- Press your hands evenly into the wall.
- Straighten your elbows.
- Without dropping your elbows bring your back ribs closer to the floor.
- Move your sternum bone towards the wall.
- Lift your kneecaps up, as you press your heels down.
- Press your thighbones back deeper into your legs.
2. Utthita Hasta Padangusthasana I (bent leg variation)

This pose will be well suited to anyone working with tight hamstrings. Keeping your leg bent helps you to contain the back of your pelvis and lift your spine upwards from its base. In time it will teach you the techniques that are necessary for practicing this pose with your extended leg straight. In this picture a block is placed on the seat of the chair to ensure that the knee is positioned higher than the hip. Better still would be to use a higher stool if one is available.
- Begin in tadasana standing upright with your feet together.
- Without disturbing the position of your left foot, step your right foot onto the support. Ensure that you have taken sufficient height so that your knee is higher than your hip.
- Check that your right knee aligns directly over your right ankle, with your shin bone perpendicular to the floor.
- Check that your left ankle sits directly underneath your left hip.
- Press your left heel (standing leg) firmly down.
- As you contain the front of your left thigh, turn your inner groin back.
- Ensure that the front of the standing leg faces directly forwards.
- Check that your right outer hip has stayed down level to the height of your left hip.
- With your hands on your hips, move your elbows closer so that your back ribs move in and your chest lifts.
- Ensure that your whole spine is lifting from its base upwards.
3. Utthita Hasta Padangusthasana II (bent leg variation)

Just as tight hamstrings can limit the movement of your pelvis, so too can tightness around your hips. This pose helps to address this tightness. The pose is similar in many respects to parsvakonasana, and may be a suitable alternative to that pose for anyone practicing with lower back pain.
- Although a chair is used in this particular image a taller support such as a stool would work even more effectively. Ideally the knee of your bent leg is kept higher than your hip.
- Stand with your left toes facing the wall.
- As you step your right foot up onto the support turn the knee and toes directly out to the side.
- Wedge a block between your bent knee and the wall.
- Position your fingertips to the wall at shoulder height.
- Stabilise the front of your left thigh. Without it leaning forwards, move your right hip socket towards the wall.
- As the hip socket moves in guide your right buttock downwards.
- The purpose of the block is to stabilise the right knee so that it remains stationary as the hip is adjusted.
- As you move your right hip forwards, lift the right side of your chest upwards and forwards.
- As you move your right hip forwards turn the front of your spine to face directly forwards.
4. Standing Marichyasana III

The first twisting action of this sequence aims to gently improve the range of rotational movement in the spine. This pose can be effective in helping to release tension and hardness from the back. The pelvis is held stable as the spine and ribcage turn.
- The chair can remain in the position where it has just been for the previous pose.
- Stand facing the chair with your right hip touching the wall.
- Step your right foot up onto the chair making sure that your knee is positioned directly over your ankle.
- As you now turn your chest towards the wall, ensure that your knee remains over your ankle, without it leaning towards the wall.
- As your chest turns towards the wall resist your left thigh back.
- This action is intended to stabilise the pelvis so that the front of the left hip does not steer towards the right knee.
- As you turn your chest, lift the left side of your chest upwards.
- Ensure that your chest is lifting, not your shoulders.
- Spread your left back ribs away from your spine.
5. Utkatasana

This pose helps to bring stability to the back of the pelvis. The back waist is encouraged to both lengthen and broaden. Your legs are strengthened, enabling them to more effectively lift and support the spine.
- Stand with your heels slightly less than a thigh bones length away from the wall.
- Lean back into the wall with the back of your pelvis and shoulders.
- In this position the lumbar curve is temporarily removed. Press your whole back waist flat into the wall.
- Have your feet slightly apart so that you can position a block between your knees.
- Place your palms onto your thighs. The pressure of your hands against your thighs will help to lift and open your chest.
- As you bend your knees and slide down the wall keep both heels pressing firmly into the floor.
- Hold the pose with your hips slightly above the height of your knees.
- As you hold the pose; press your outer heels down; squeeze the block with your knees; press your back waist into the wall.
- As you press your sacrum into the wall lift your chest and spine up.
- Without sucking the navel back observe how it naturally moves towards the spine.
- Press your shoulders back into the wall and move your thoracic spine deep into the body.
- To come up, push the floor away with your heels and straighten your legs.
6. Trikonasana

In addition to improving hamstring flexibility, trikonasana is also able to lengthen the adductors on the insides of your thighs. Tightness in these muscles can restrict the movement of the pelvis in standing poses. Even when the chest is correctly turning upwards in trikonasana this restriction can tip the front of the pelvis to face downwards. The following instructions look to address this conflict and bring balance to the movement of the chest, pelvis and spine. (right leg = front leg, left leg = back leg)
- Ensure that you have your bottom hand correctly positioned. If it comes too low down you will find that the hip of your front leg protrudes back. This will exaggerate the tendency of the front pelvis to turn downwards.
- Instead, position your hand at a height that enables you to align the back of the top shoulder with the outside of your front outer thigh. Your front outer thigh moves in and lifts up.
- Make the right side of your spine longer than the left side.
- Start the rotation of the torso from the chest but consciously look to develop this rotation closer to the pelvis itself.
- Right chest turn upwards.
- Right waist turn upwards.
- Front of your pelvis turn upwards
- Your back leg can help to develop this action still further… Left outer thigh turn back, left outer heel press down.
- Coordinate your chest, waist and front pelvis turning upwards. Simultaneously turn the back of your pelvis downwards.
7. Parsvottanasana

Parvottanasana is a standing pose that is particularly effective at stretching hamstrings. Unfortunately it is consequentially a pose that is often challenging for anyone with lower back problems. A common tendency in this pose is for the back of your pelvis to be pulled towards your legs. This can result in rounding of the back ribs, shortening of the anterior spine and discomfort in the lower back. This image shows how a wall can be used to modify the pose so that your hamstrings are stretched whilst keeping your spine is kept straight and supported.
- Enter the pose from half uttanasana.
- Step your right foot forwards so that the toes of your front foot come roughly the length of your own foot away from the wall.
- Step your left foot back so that you have a legs length distance between your feet.
- Ensure that your front knee is straight. If it cannot comfortably straighten then bring both hands slightly higher up the wall.
- To bring your hips level, turn your left buttock away from your right buttock, and lift your right outer hip up and back.
- Now that you have the basic shape of the pose, to further optimise the pose, press more firmly the big toe base of your front foot down, and contain your outer ankle towards your inner ankle.
- So as to avoid hyper-extension in your front knee, press down the part of the sole where your heel pad and arch meet. Simultaneously lighten the contact of your back heel to the floor.
- Maintaining the stretch of the right hamstring, press your hands firmly to the wall; without your elbows dropping straighten your upper back and move your chest forwards towards the wall.
8. Parivrtta Trikonasana

The use of a chair in this standing twist helps to improve your balance and stability. It also enables you to enter this pose gradually with incremental control. This supported version of parivrtta trikonasana imparts a gentle twisting action to the lower back. This can help to release tension, and improve the range of movement in your spine.
- Position your left heel up against a wall and step your right foot out a legs length distance.
- Place your chair beside your right outer calf. Ensure that the chair is as close as possible to your right leg.
- Reach forwards and place your left forearm and hand on the seat of the chair .
- Hold the top of the chair with your right hand.
- Ensure that your hips are level. Turning your left buttock away from your right buttock will help to achieve this.
- Keeping your hips level, lengthen your left waist and turn it downwards towards the floor.
- Spread your left back ribs downwards, away from your spine.
- Move your left shoulder blade deep into your body.
- Lengthen your spine outwards from your pelvis as you start to come more deeply into the twist.
- Lift your right collar bone upwards towards the ceiling as you look upwards.
9. Chair Bharadvajasana

In this pose the position of your pelvis is kept stable whilst your spine simultaneously lifts and turns. This pose has the potential to improve the range of motion your lower back, helping it to more easily perform rotational movements.
- Sit sideways on your chair with your right outer thigh against the back rest of the chair. Ensure that your hips are slightly higher than your knees. For taller people this may entail increasing the height of the chair by adding a folded blanket.
- Brace your knees by placing a block between them. As your knees squeeze the block, press your left outer heel down into the floor. This action helps to keep your knees in line as your chest lifts and turns.
- As you turn your chest to the right take hold of the back frame of the chair with both hands. Position your hands at a height that enables you to release your shoulders down and away from your ears.
- Use the grip of your hands to develop the turning of your chest and spine.
- Lift and turn the left side of your chest. Lift and turn your left waist.
- Draw your left thigh bone back into your hip socket.
- Spread your left back ribs away from your spine.
- As you turn your spine, lift the back of your skull upwards and move your trapezius muscle downwards.
10. Chair Pasasana

This version of pasasana allows you to simultaneously lengthen and rotate your lumbar spine and back waist. This pose will be suited to more experienced students who already have a good range of movement in the lower back. If you are newer to yoga, or working with stiffness or soreness in your spine, consolidate the previous chair twist instead.
- Sit far back in your chair, but ensure that your heels are able to reach the floor. Bring your feet and knees together so that they touch.
- Lean forwards and place your left shoulder across your right outer thigh.
- Close the gap between your left armpit and right outer thigh.
- With your elbow bent, press your left upper arm against your thigh in order to turn your chest upwards.
- Catch hold of the top of the chair with your right hand. As you start to come more deeply into the twist this hand can walk further across to the left side of the chair.
- Keep your left heel pressing down, and your left thighbone drawing back into the hip socket as you turn.
- Draw both thigh creases back into the body as you turn.
- Lengthen the left side of your spine out and over your thighs as you turn.
- Move your sternum bone away from your pelvis as you turn.
11. Chair Malasana
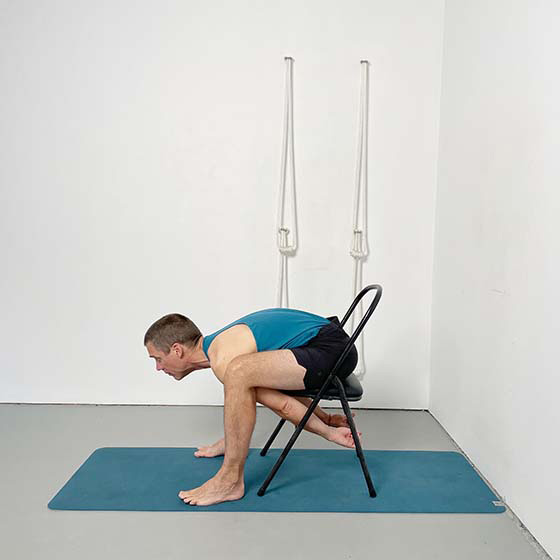
This position can bring traction to your lower back. It might be especially helpful for combatting compression in the lumbar spine. Allow sufficient time for your spine to move comfortably through the stages of this pose. It can also be a good counter-pose to include in your practice after a session of backbends.
- Sit far back in your chair ensuring that your heels remain in firm contact with the floor. For shorter people it may be necessary to pace flat blocks under the feet.
- Have your feet slightly wider than the front legs of the chair, and ensure that your shoulders will fit between your knees.
- Keeping your heels firm to the floor and keeping your sitting bones pressing into the seat of the chair, reach forwards and place your fingertips to the floor between your feet.
- Pause here and allow your lower back sufficient time to release.
- if your back feels able to release further then fold your arms at your elbows and let your head hang down between your knees.
- Either stay at this point and consolidate, or reach through the front legs of the chair and grip the cross bar between the back legs of the chair. (Hold the back legs if your chair does not have a cross bar.)
- Pull firmly with your hands against the cross bar.
- Move your back ribs down and lift your head to look across the room.
- Lengthen your navel away from your pubic bone, and lengthen your sternum away from your navel.
12. Pavana Muktasana

This simple but effective pose can help to lengthen and release tension in your lower back. Make sure that your neck is comfortable as you lie back. If your chin is lifting higher that your forehead a blanket can be placed under your head.
- Lie on your back with the soles of both feet placed against a wall. Have your big toes and inner heels touching.
- Keeping your left toes pointing directly upwards, bend your right knee into your chest. Interlock your fingers around the head of your shin bone.
- Gently hug your right knee into your chest.
- As your knee comes towards your chest, resist your right outer hip away from your chest.
- Deepen your right thigh crease away from your chest.
- Resist the back of your right hip away from your ribcage.
- Press the front of your left thigh down.
- Press your left big toe base firmly into the wall.
13. Supta Padangusthasana I

This pose stretches your hamstrings whilst keeping your spine supported by the floor. In this image a belt is used to grip the top foot, and the leg is being held on a vertical angle. If you have tight hamstrings it is quite likely that you will be unable to raise your leg in this vertical position without your knee bending. If this is the case, keep your knee straight but with your leg angled further away from your body.
- Lie on your back with the soles of both feet in contact with the wall.
- Bend your right knee to your chest and position a belt around the ball of your right foot.
- Straighten your right leg and hold the belt in both hands.
- As you hold the belt keep your elbows sightly bent, and press the back of your shoulders down to the floor.
- Pressing your top foot up into the belt, turn your right outer thigh and right outer hip away from your ribcage.
- Keep the right side of your sacrum moving away from your ribcage.
- With the belt, guide your right foot away from the wall, whilst resisting your right thighbone towards the wall.
- Press the front of your left thigh down.
- Close the gap between the back of your left thigh and the floor.
- Press your left big toe base firmly to the wall.
14. Supta Padangusthasana II

This pose follows immediately on from the previous pose.
- Keeping your right leg raised up, hold the belt in your right hand and position your left arm out to the side. Check that your hand is in line with your shoulder.
- Pressing the front of your left thigh down, start to bring your right leg down and out to the side.
- The action of bringing your right leg down and out to the side should not make the front of your left thigh lift up.
- Close the gap between the back of your left thigh and the floor.
- Bring the left side of your sacrum down to the floor.
- Anchor the back of your left shoulder to the floor.
- Turn the right side of your chest upwards towards the ceiling.
- With the belt guide your right foot away from the wall.
- Resist your right hip socket towards the wall.
15. “Legs Up The Wall”

This simple pose helps to bring space to the sacral and lumbar vertebrae. Your legs are elevated, as they are in viparita karani, but the back of your pelvis is kept in contact with the floor. Ideally your sitting bones will come all the way to the wall. If you have tight hamstrings, you may find that getting this close to the wall makes the back of your pelvis lift up. If this is the case, leave enough space between your sitting bones and the wall to ensure that your sacrum is in contact with the floor. The effect of this pose will be optimised by the addition of weights, such as sand bags resting on the soles of the feet. The pose is pictured here in a way that can be conveniently incorporated into a simple home practice.
- The easiest way to get into this position is to start lying on your side with your knees bent in towards your chest.
- Remaining on your side, you shuffle closer to the wall until both of your sitting bones make contact with the wall.
- Once your sitting bones are in contact with the wall, you simply swivel your legs up the wall and straighten your knees.
- At this point assess whether or not your sacrum is in contact with the floor.
- If not, incrementally slide away from the wall until your are able to clearly feel the back of your pelvis is in contact with the floor.
- As you remain in the pose and relax, allow the weight of your legs to gently press the back of your pelvis down and into the floor.
- Encourage your sacral and lumbar vertebrae to release and lengthen.
- Encourage the back of your pelvis to broaden from the centre outwards.
16. Savasana (Calves on Chair)

This version of savasana gives your lower back more length and space. Your lumbar spine sits much closer to the floor, and relaxes in that direction.
- Lie on your back and rest your calves up onto the seat of a chair.
- Position the chair so that the edge of the seat comes all the way into the back of your knees.
- Allow a slight incline in the angle if your thighs. Ideally your knees sit slightly forwards of your hips.
- Keep your feet apart hip width so that your lower legs remain comfortably balanced on the seat of the chair.
- Use a folded blanket to elevate your skull so that your forehead is slightly higher than your chin.
- Keep your arms comfortably out to your sides. Ideally no part of your arm will make contact with the sides of your body.
- Have your knuckles resting into the floor, your palms facing upwards.
- Shut your eyes and allow your eyes to relax.
- Breathe evenly and smoothly.
Understanding Lower Back Pain
Beginner-Friendly Free 35-Minute Iyengar Yoga Class for Lower Back Pain
In addition to the full-length sequence, this shorter 35-minute class offers a more accessible approach to working with lower back pain. It uses gentle, supported variations to help reduce tension, improve mobility, and build confidence in your practice.
It is well suited to beginners, those returning to yoga, or anyone looking for a more gradual and supported way to work with lower back discomfort.
The Role of Tight Hamstrings in Lower Back Pain
One of the most common contributors to lower back discomfort is tightness in the hamstrings—the group of muscles at the back of the thighs. When these muscles are stiff, they can restrict the natural movement of the pelvis in relation to the legs.
A simple example of this can be seen in Dandasana (staff pose). When sitting upright with the legs extended forward, tight hamstrings can pull the back of the pelvis downwards. This reduces the natural curve of the lumbar spine, making it more difficult to sit upright without strain. As a result, the spine may feel as though it is being simultaneously pulled down and lifted up, creating unnecessary tension in the lower back.
Because of this relationship, improving hamstring mobility is often an important part of relieving lower back discomfort. However, this presents a challenge: many positions that stretch the hamstrings can also place stress on the lower back if they are not approached carefully.
For this reason, the sequence presented here focuses on ways of improving flexibility while maintaining support for the spine. It includes poses that:
- safely lengthen the hamstrings
- release tension from the lower back
- improve range of movement in the spine
These poses are designed to be practical and accessible for home practice. They are not intended for acute or severe back pain, and should not replace advice or treatment from a qualified medical professional where needed.
How Iyengar Yoga Helps Lower Back Pain
Iyengar Yoga approaches lower back pain by improving how the different parts of the body work together, rather than focusing on the lower back in isolation. In many cases, discomfort in the lumbar spine is influenced by stiffness or imbalance in the legs, hips, and pelvis. By addressing these areas, it becomes possible to reduce unnecessary strain on the back and create a more stable foundation for movement.
A key feature of Iyengar Yoga is its emphasis on alignment. Learning how to position the pelvis, legs, and spine more accurately helps to distribute load more evenly through the body. This reduces the tendency for the lower back to become overworked or compressed in everyday actions such as sitting, standing, and bending.
Props – such as blocks, belts, and supports – make this work more accessible. They allow poses to be adapted so that the spine remains supported while other areas of the body are being mobilised. This is particularly helpful when working with tight hamstrings or restricted hips.
Sequencing also plays an important role. Rather than approaching poses in isolation, Iyengar Yoga uses structured progressions that gradually prepare the body. Supported poses may be used to release tension, followed by work that develops strength and stability, and then movements that improve range of motion.
Together, these elements – alignment, support, and sequencing – create a methodical and sustainable approach to working with lower back pain. Rather than forcing flexibility, the aim is to develop more balanced and coordinated movement, both in practice and in everyday life.
Continue Your Practice: A Structured Course for Lower Back Pain
For those who would like to explore this work in greater depth, the Yoga Selection lower back pain course offers a structured progression across seven classes. Each class builds on the previous one, gradually improving mobility, strength, and coordination in the spine, hips, and legs.
The course is designed to take you from supported, accessible work through to more integrated standing and seated poses, helping to establish a sustainable and confident approach to managing lower back discomfort.
You can explore the full course here.
Common Mistakes When Practising Yoga for Lower Back Pain
When working with lower back pain, it is not only the choice of poses that matters, but how they are approached. The following are some common mistakes that can place unnecessary strain on the lower back:
- Forcing forward bends
Trying to reach further into poses such as seated forward bends can pull the spine out of alignment, especially when the hamstrings are tight. - Overstretching the hamstrings too aggressively
While improving hamstring flexibility is important, pushing too quickly can place additional strain on the lower back. - Collapsing the lumbar spine
Allowing the lower back to round or sink can lead to compression rather than support. - Working without adequate support
Avoiding the use of props such as blocks, belts, or height under the pelvis can make poses unnecessarily difficult and less effective. - Moving too quickly between poses
Rushing through a sequence can prevent the body from adjusting properly and increase the risk of discomfort. - Ignoring early signs of strain
Discomfort is often a signal to modify or come out of a pose rather than push further.
By approaching poses with care, using appropriate support, and progressing gradually, it becomes possible to work with lower back pain in a way that is both safe and effective.
Frequently Asked Questions
Is yoga good for lower back pain?
Yoga can be helpful for many people with lower back pain, particularly when it focuses on alignment, support, and gradual progression. Rather than forcing flexibility, a structured approach such as Iyengar Yoga aims to improve how the spine, hips, and legs work together, helping to reduce unnecessary strain on the lower back.
Which yoga poses should I avoid with lower back pain?
Poses that involve deep forward bending, backbending or twisting can place strain on the lower back if they are not properly supported. It is generally best to avoid forcing movements or working at end range without adequate preparation. Using props and modifying poses can help make practice safer and more effective.
Can yoga make lower back pain worse?
Yoga can aggravate lower back pain if poses are performed incorrectly or without sufficient support. This is why careful attention to alignment, sequencing, and the use of props is important. A gradual and methodical approach helps to reduce the risk of irritation.
How often should I practise yoga for lower back pain?
Consistency is more important than intensity. Practising a few times per week with a well-structured sequence is often more beneficial than occasional longer sessions. Over time, regular practice can help to improve mobility, strength, and coordination.
Is Iyengar Yoga suitable for beginners with back pain?
Yes, Iyengar Yoga is particularly well suited to beginners because of its emphasis on precision and the use of props. Poses can be adapted to suit different levels of ability, making it accessible for those who are new to yoga or returning after a period of discomfort.
Can Iyengar Yoga replace medical treatment for back pain?
Iyengar Yoga can be a helpful complementary approach, but it is not a replacement for medical advice or treatment. If you are experiencing acute or persistent pain, it is important to consult a qualified healthcare professional.
In some cases lower back discomfort may be associated with irritation of the sciatic nerve. If this is the case, you may find our Yoga for Sciatica sequence helpful.
Improving spinal alignment and postural awareness can also play an important role in long-term back health. See our guide to Yoga Poses for Improving Posture.
Support Your Lower Back with Structured Iyengar Yoga
Continue your progress with the full Yoga for Lower Back Pain course.
These carefully structured classes are designed to reduce tension, improve mobility, and support the spine through precise alignment and progressive sequencing.
Your membership includes full access to this course, over 900 on-demand classes, and Yoga Selection’s complete library of structured yoga programs.
Clear Instruction. Intelligent Sequencing. Iyengar Yoga for Every Body.
About Rod Stennard
Rod Stennard – Founder of Yoga Selection
Rod Stennard is the founder of Yoga Selection, the first online yoga platform dedicated entirely to Iyengar Yoga. A certified Iyengar Yoga teacher since 2002, Rod has practiced yoga since 1992 and studied under senior teachers from around the world, including members of the Iyengar family in Pune, India.
Rod launched Yoga Selection in 2016 to bring structured, high-quality Iyengar Yoga training to a global audience. As a pioneer in the field of online yoga education, he is passionate about making this method accessible to all, through rigorous, inclusive, and thoughtfully designed classes. His work continues to support students of all levels in over 50 countries.
Continue Exploring with Yoga Selection
- → Iyengar Yoga for Beginners – A structured starting point for building clarity and confidence.
- → Yoga at Home – Establish a steady, sustainable home practice.
- → Yoga for Stiff Bodies – Supported sequences designed to improve mobility safely.
- → Iyengar Yoga for Back Care – Develop strength and stability to support spinal health.
Share:
Comments 2
Pingback: Yoga Poses For a Healthy Spine | Yoga Selection
Pingback: Homepage