A carefully structured sequence of yoga poses for sciatica designed to decompress the lower back, release the piriformis, and bring relief from sciatic nerve pain.
What is Sciatica?
Sciatica is a condition caused by pressure or irritation of the sciatic nerve – the longest nerve in the body – as it exits the lower spine or passes through the pelvis. The pain may radiate anywhere from the buttocks down the back of the leg, and is often described as sharp, shooting, tingling, or numb. For many, even everyday movements like sitting or standing for extended periods can increase discomfort.
How Yoga Can Help
Practicing yoga for sciatica – especially with careful sequencing and support – can relieve nerve compression, decompress the lumbar spine, and gently stretch the piriformis region. Iyengar Yoga, with its emphasis on alignment, props, and sequencing, offers a particularly safe and effective way to relieve sciatica and improve overall back health.
Benefits of This Sciatica Relief Sequence
• Decompresses the lower back and reduces pressure around the sciatic nerve
• Releases tension in the piriformis and gluteal muscles
• Improves mobility in the hips and hamstrings
• Encourages healthy movement in the lumbar spine
• Helps restore balanced support for the spine
Watch the Full Sciatica Relief Yoga Class
Follow this 40-minute Iyengar Yoga for Sciatica class designed to relieve sciatic pain and release the lower back. The sequence mirrors the 16 poses outlined below, with detailed instruction to help you practice safely and effectively at home.
Table of Contents
- What is Sciatica?
- How Yoga Can Help
- Watch Along with the Free Step-by-Step Class
- 1. Supported Pavanamuktasana
- 2. Adho Mukha Virasana
- 3. Ardha Uttanasana
- 4. Uttanasana with Chair Support
- 5. Utkatasana with Wall Support
- 6. Eka Pada Pavanamuktasana
- 7. Pavanamuktasana
- 8. Supta Padangusthasana I
- 9. Supta Padangusthasana II
- 10. Supta Padangusthasana IV (Back Releasing Variation)
- 11. Seated Eka Pada Rajakapotasana
- 12. Chair Malasana
- 13. Active Chair Malasana
- 14. Therapeutic Viparita Karani
- 15. Prone Savasana
- 16. Chair Savasana
- Common Causes of Sciatica and How Yoga Can Help
- Frequently Asked Questions
- Iyengar Yoga’s Therapeutic Approach to Sciatica
Explore a World of Online Yoga
Unlimited access to all classes and courses, including yoga for sciatica.
Try it Free for 14 DaysCancel anytime.
Overview of the Iyengar Yoga for Sciatica Sequence
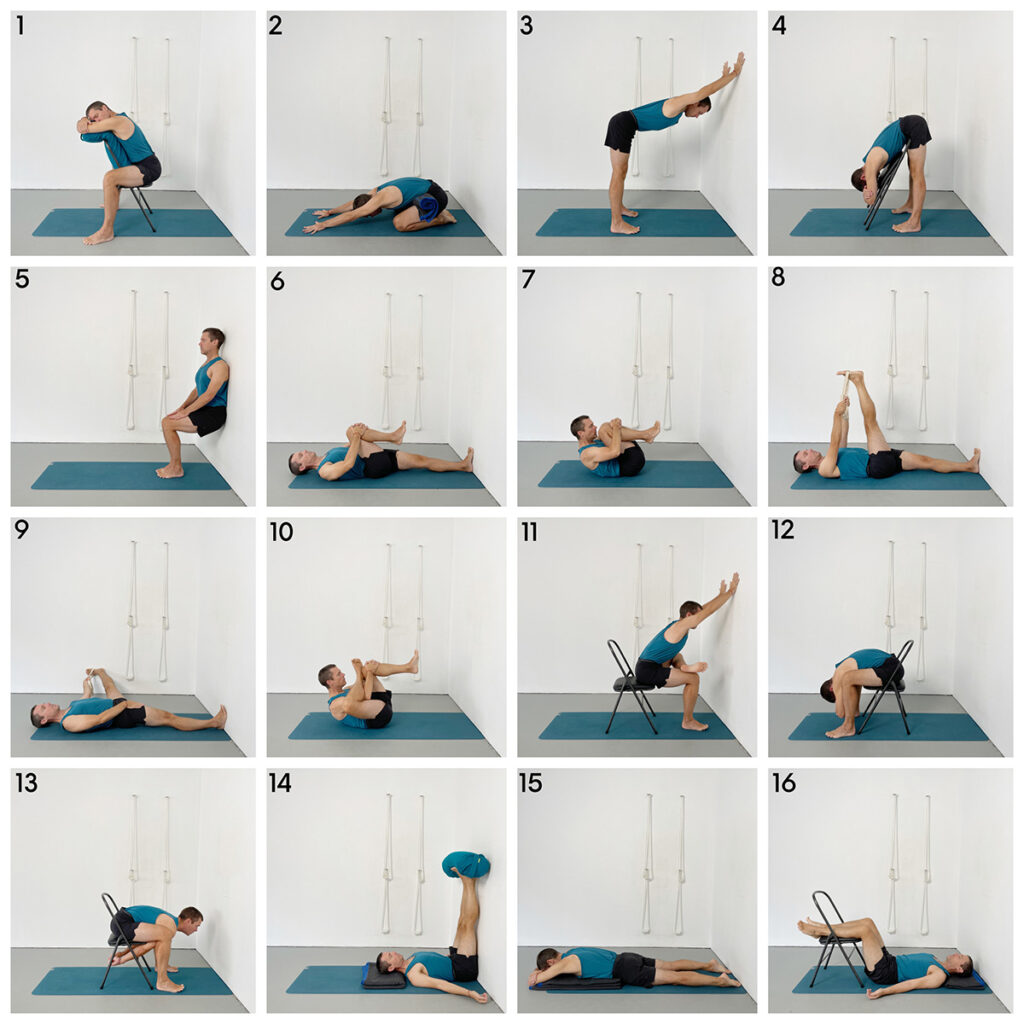
This therapeutic sequence features 16 carefully selected poses designed to release the lower back, reduce tension around the sciatic nerve, and soothe the muscles of the buttocks and hips. It’s suitable for those currently experiencing sciatica, as well as anyone looking to maintain spinal health or recover after a session of strong backbends. Each pose includes a clear image, concise instructions, and prop suggestions where relevant.
Pose 1: Supported Pavanamuktasana
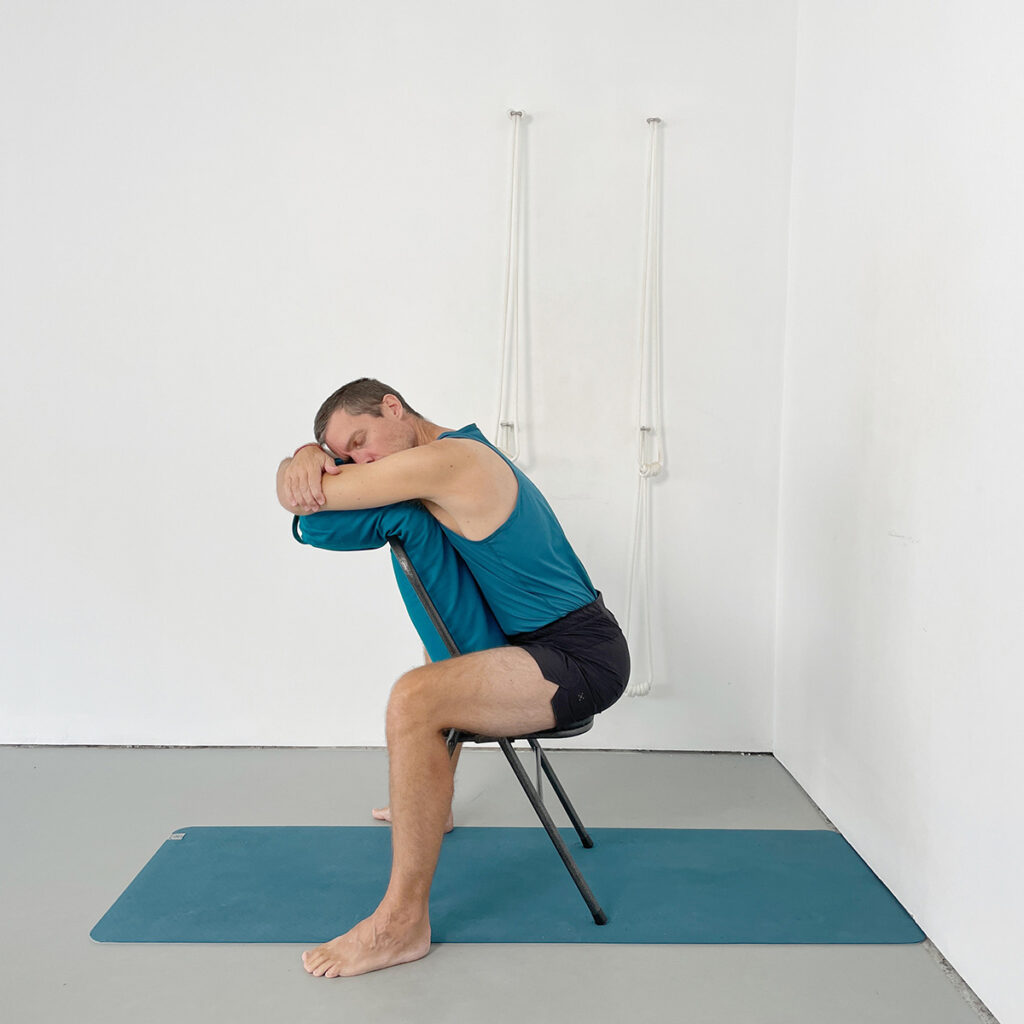
Seated forward fold with bolster support on chair
This gentle supported variation of Pavanamuktasana helps release tightness and compression from the lumbar spine. The forward tilt of the pelvis, combined with the softness of the bolster, creates subtle traction that eases tension in the lower back without strain. It’s an ideal starting point for those experiencing sciatic discomfort or stiffness in the back body.
Instructions:
- Sit on a yoga chair facing the backrest, straddling the seat with your legs.
- Position a bolster vertically against the chair back and rest your chest onto it.
- Fold your arms and rest your forehead or cheek on the bolster.
- Use your hands on the chair frame to first lift and lengthen your spine upward before leaning forward.
- As you settle, feel the front of the torso gently lifted by the bolster, avoiding collapse into the lower back.
- Soften the groins and allow the back body to release downward with each exhalation.
Pose 2: Adho Mukha Virasana
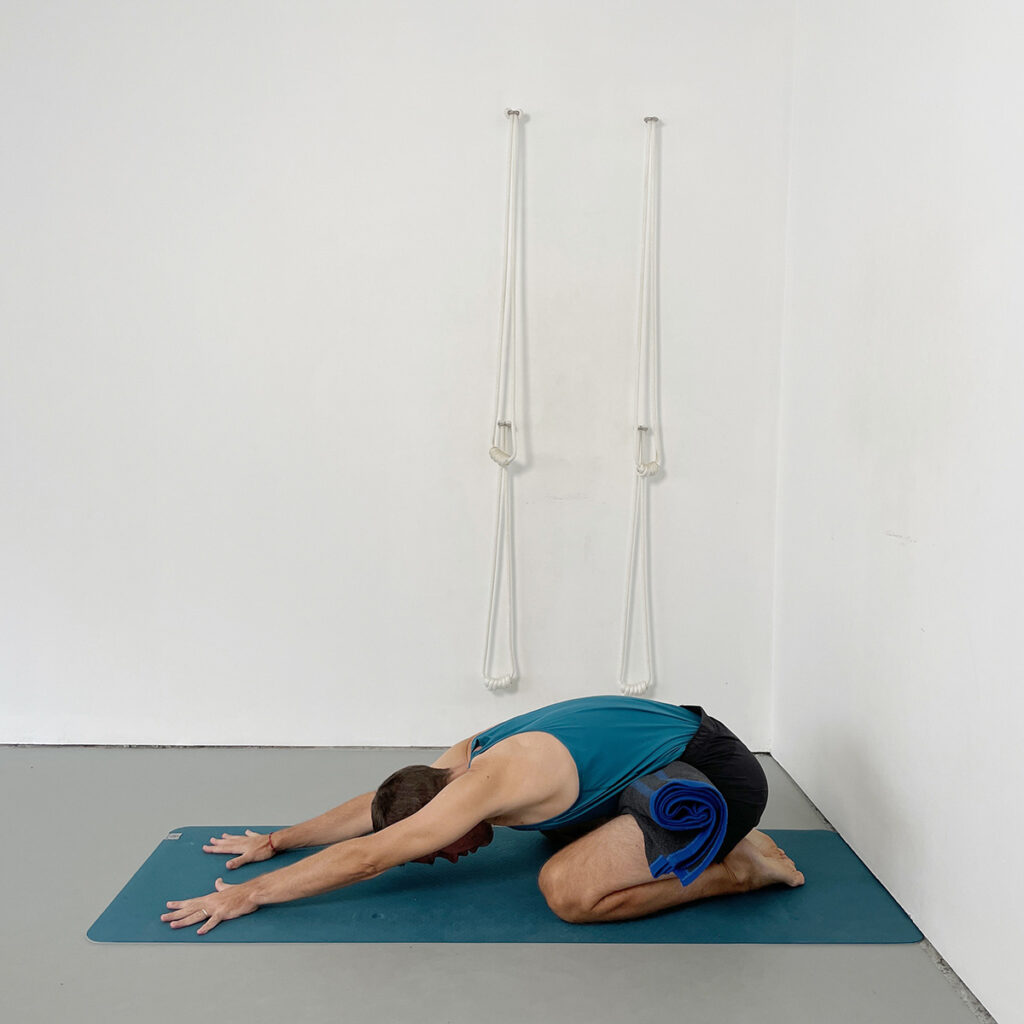
Forward-folding kneeling pose to release tension in the lower back
Adho Mukha Virasana encourages deep rest in the lower back while gently lengthening the spine. By anchoring the hips and extending the arms forward, this pose uses gravity to create soft traction through the lumbar region. It’s an effective and accessible shape for relieving sciatic nerve sensitivity and calming the nervous system.
Instructions:
- Begin in a kneeling position with your big toes touching and knees wide apart.
- Place a folded blanket roll between your thighs and hips to maintain support in the lumbar spine.
- Stretch your arms forward with palms down and rest your forehead on the floor or a block.
- Press your hands into the floor to lengthen the sides of the waist and lift the lower abdomen slightly.
- Anchor your hips back toward the heels to encourage space in the lower spine.
- Allow the breath to soften the abdomen and quieten any gripping around the buttocks or sacrum.
Pose 3: Ardha Uttanasana at the Wall
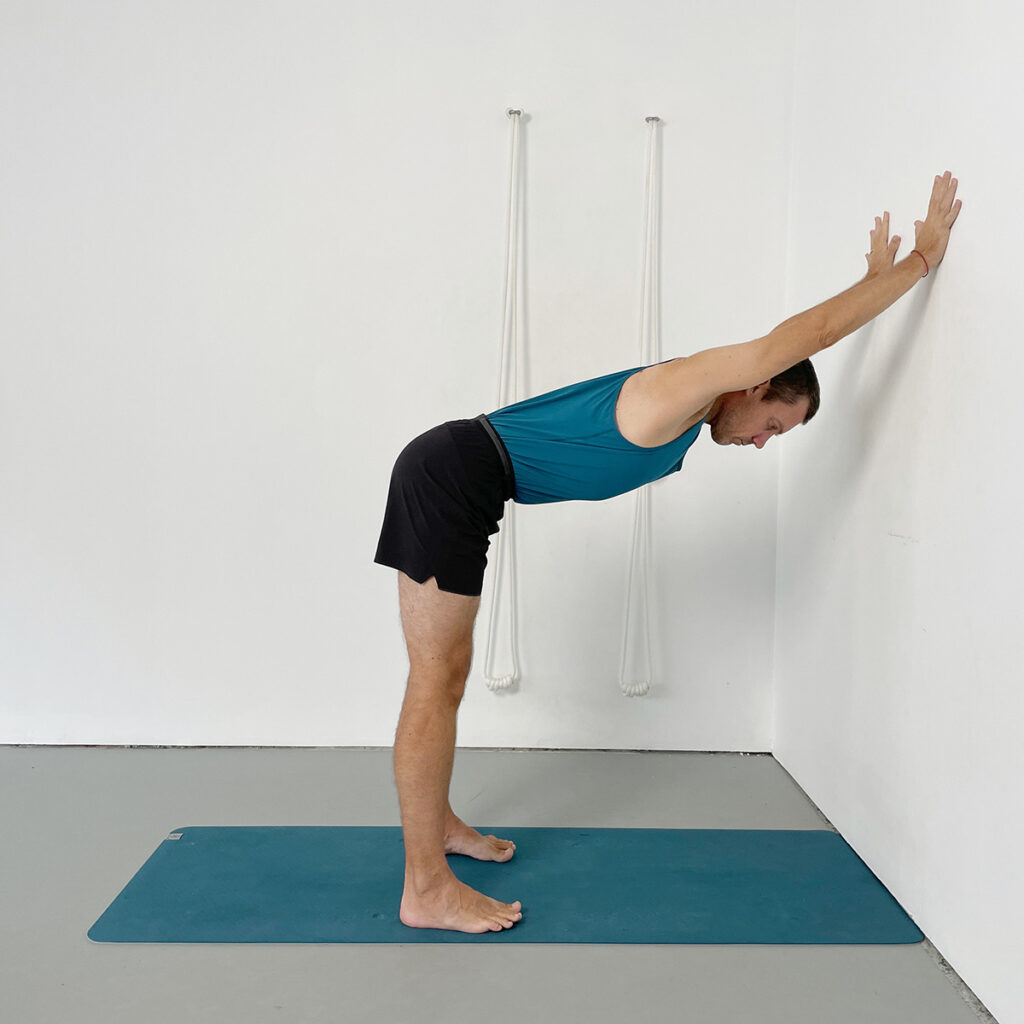
Half Forward Bend to lengthen the spine and decompress the lumbar region
Ardha Uttanasana helps create traction through the spine while keeping the lower back supported and stable. The elevation of the hands on the wall reduces load on the hamstrings and allows for better spinal alignment, especially for those dealing with sciatic nerve irritation. It encourages length without compression — a key principle in therapeutic practice.
Instructions:
- Stand facing a wall with your feet hip-width apart, roughly a leg’s distance from the wall.
- Place your hands flat on the wall at shoulder height, shoulder-width apart, with fingers spread.
- Step your feet back until your spine and arms form a straight horizontal line, hips over heels.
- Firm the thighs and move them back, drawing the front pelvis away from the wall.
- Press the hands into the wall and lift the side ribs and abdomen upward to lengthen the spine.
- Keep the neck relaxed, allowing the head to align naturally between the arms.
Pose 4: Supported Uttanasana with Chair
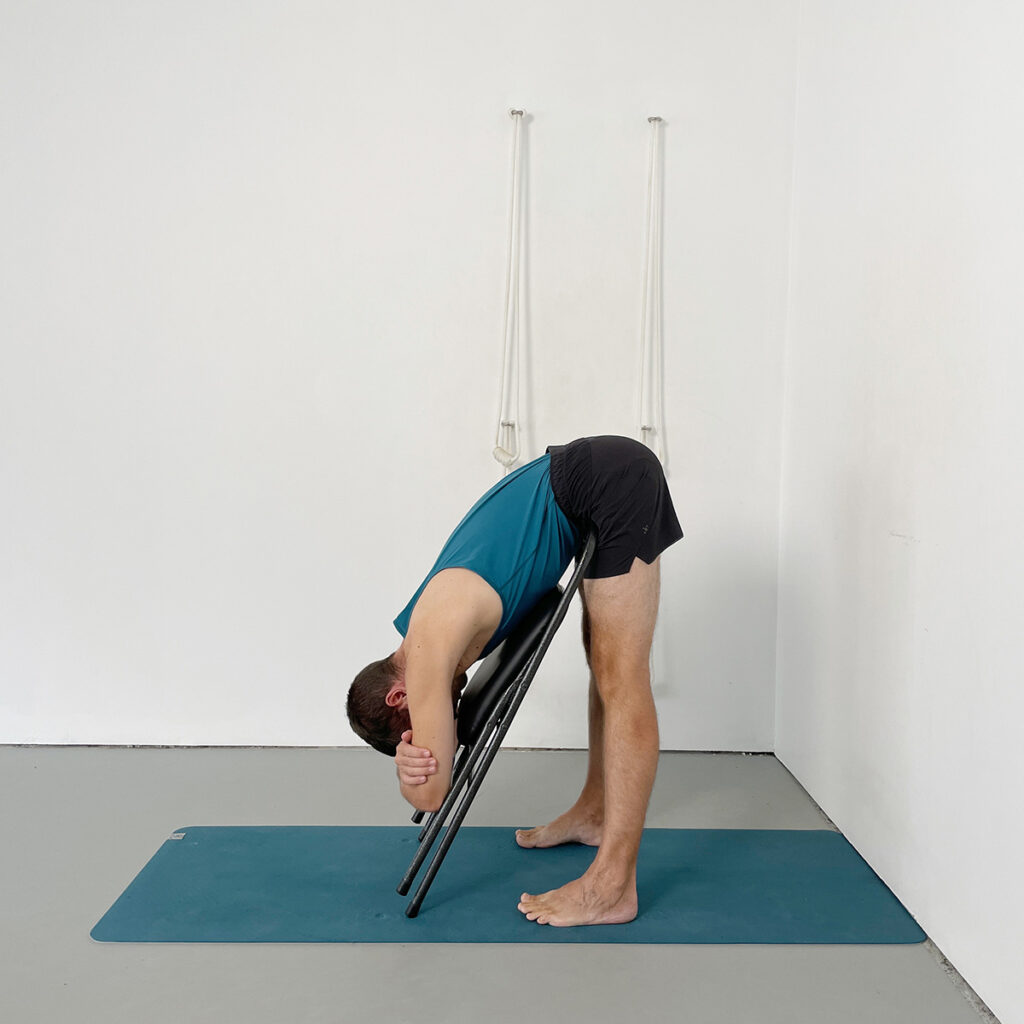
Forward bend with pelvic support to decompress the spine and relieve nerve tension
This Yoga for Sciatica variation of Uttanasana uses the support of a yoga chair to anchor the front pelvis and allow the spine to release downward with less muscular strain. It creates gentle traction through the lumbar spine, relieves tightness in the hamstrings, and reduces pressure around the sciatic nerve — all without collapsing the lower back.
Instructions:
- Place a folded yoga chair a short distance in front of you with the seat facing away.
- Stand in front of the chair with your feet hip-width apart and slightly away from the wall for stability.
- Fold forward, bringing the top edge of the chair into contact with your lower abdomen or pubic bone.
- Adjust the chair’s position so that you feel supported but not compressed in the bladder or belly.
- Let your arms rest on the chair seat, forearms folded or reaching toward the floor if available.
- Allow the torso to hang passively, feeling the spine lengthen and the back body soften with gravity.
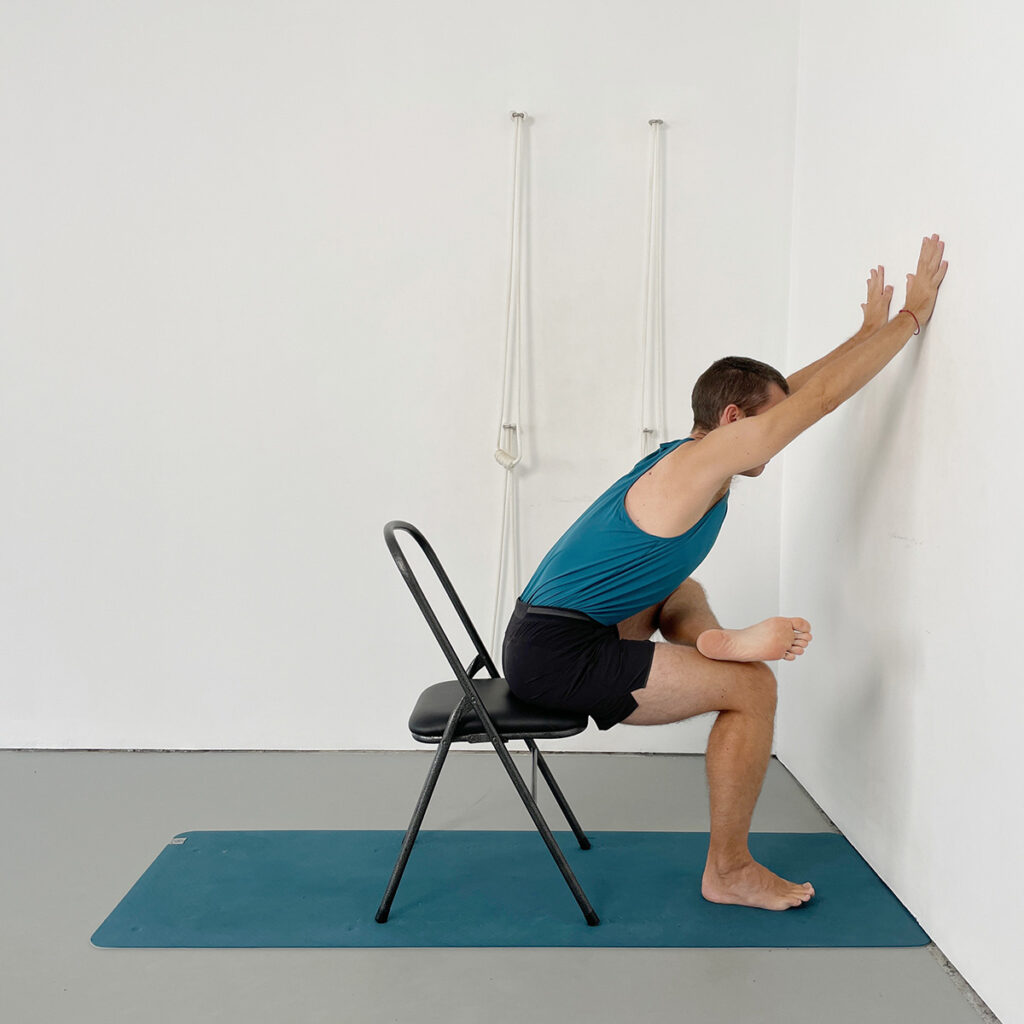
Pose 5: Utkatasana with Wall Support
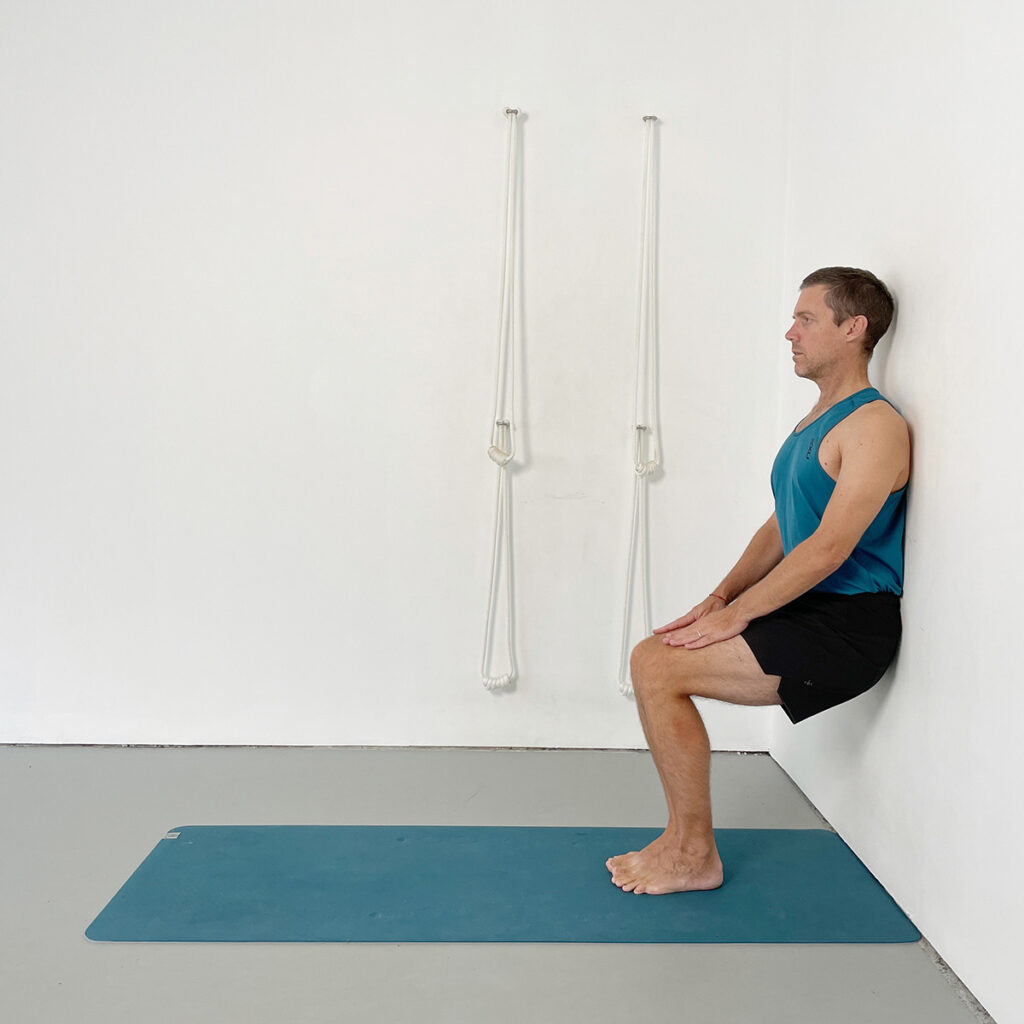
Wall-supported squat to build strength and release compression in the lower back
This supported version of Utkatasana builds strength in the legs and supports spinal traction without strain. By pressing the lower back into the wall and activating the feet and thighs, this pose encourages decompression of the lumbar spine and teaches balanced pelvic alignment — a key element in sciatica relief.
Instructions:
- Stand with your back against a wall, feet hip-width apart and about a thigh’s length away from the wall.
- Bend your knees to slide down the wall until the thighs are at an angle (not yet parallel to the floor).
- Keep the lower back pressing firmly into the wall, especially where the spine meets the pelvis.
- Let your arms hang by your sides or press your hands into your thighs to assist spinal lift.
- Press your feet down into the floor to lift and lengthen through the spine and lumbar region.
- Breathe evenly, maintaining broadness across the lower back and firmness in the thighs.
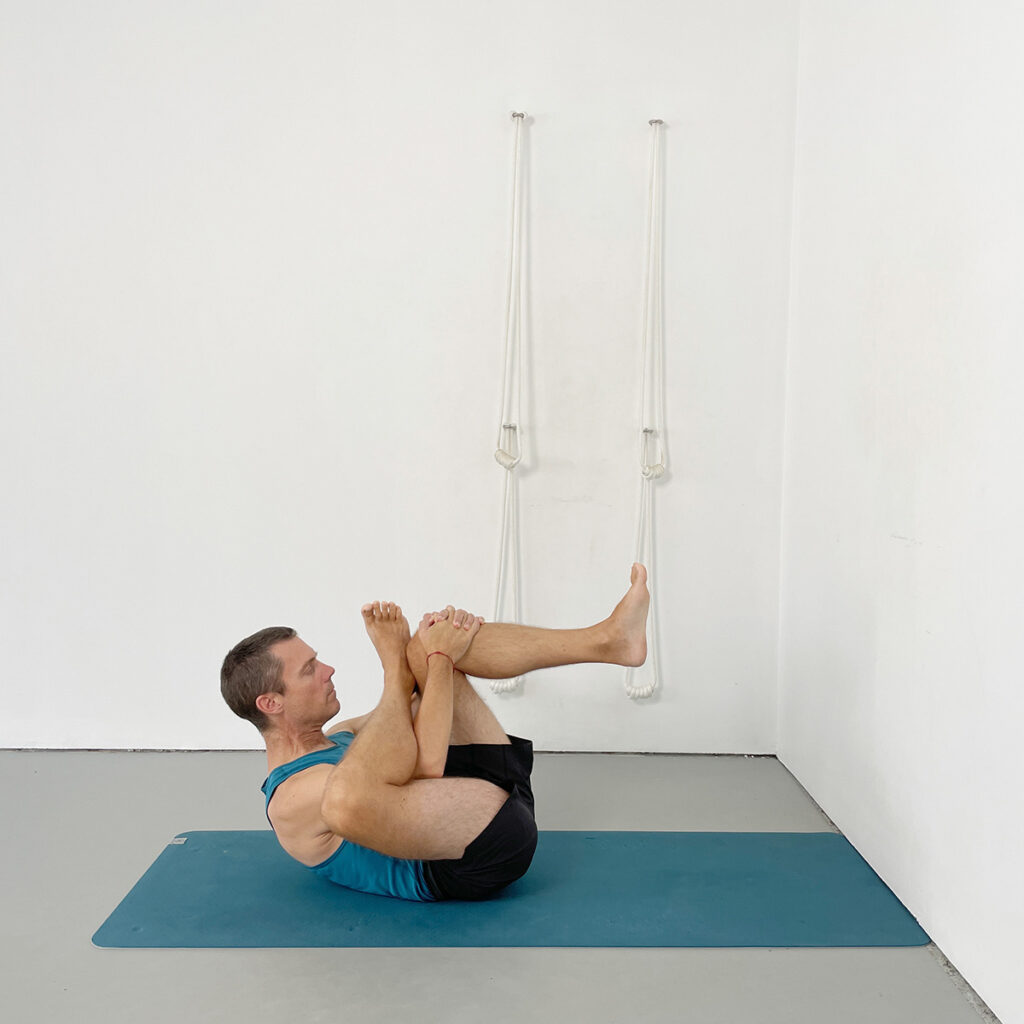
Pose 6: Eka Pada Pavanamuktasana
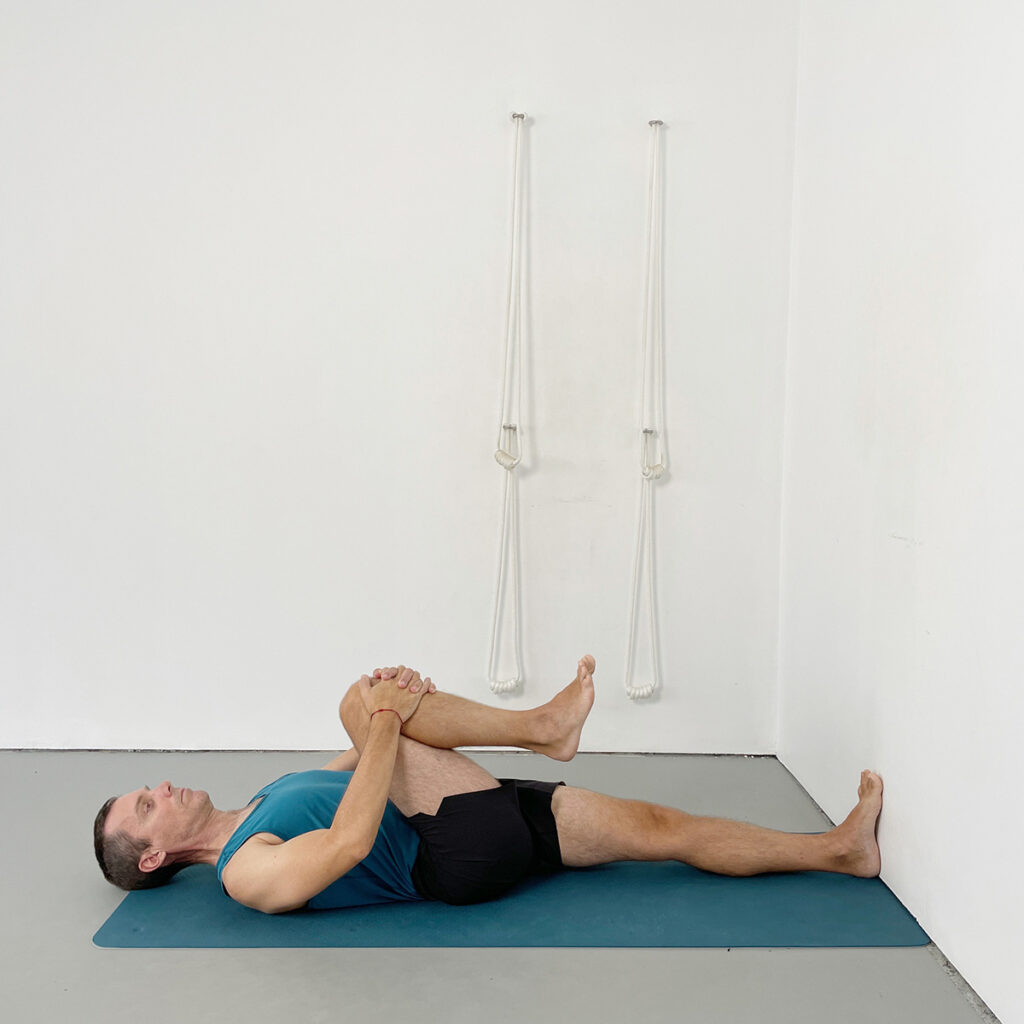
Reclining single-leg pose to lengthen the lumbar spine and soften the glutes
This variation of Eka Pada Pavanamuktasana uses the wall to stabilize the pelvis while one leg is drawn toward the chest. The resistance created between the shin and hands initiates a deep release in the lower back and piriformis region, helping to relieve sciatic pain that radiates down one side of the body.
Instructions:
- Lie on your back with your feet to the wall and place a yoga belt nearby for later use.
- Extend your left leg straight up the wall, keeping the heel in contact and the thigh pressing down.
- Bend your right knee toward your chest and interlock your fingers around the right shin.
- Gently draw the shin toward you while pressing it into your hands to create resistance.
- Allow the back of the right hip and buttock to move closer to the floor and wall.
- Maintain a steady breath, observing the widening across the back waist and the descent of the sacrum.
Pose 7: Pavanamuktasana
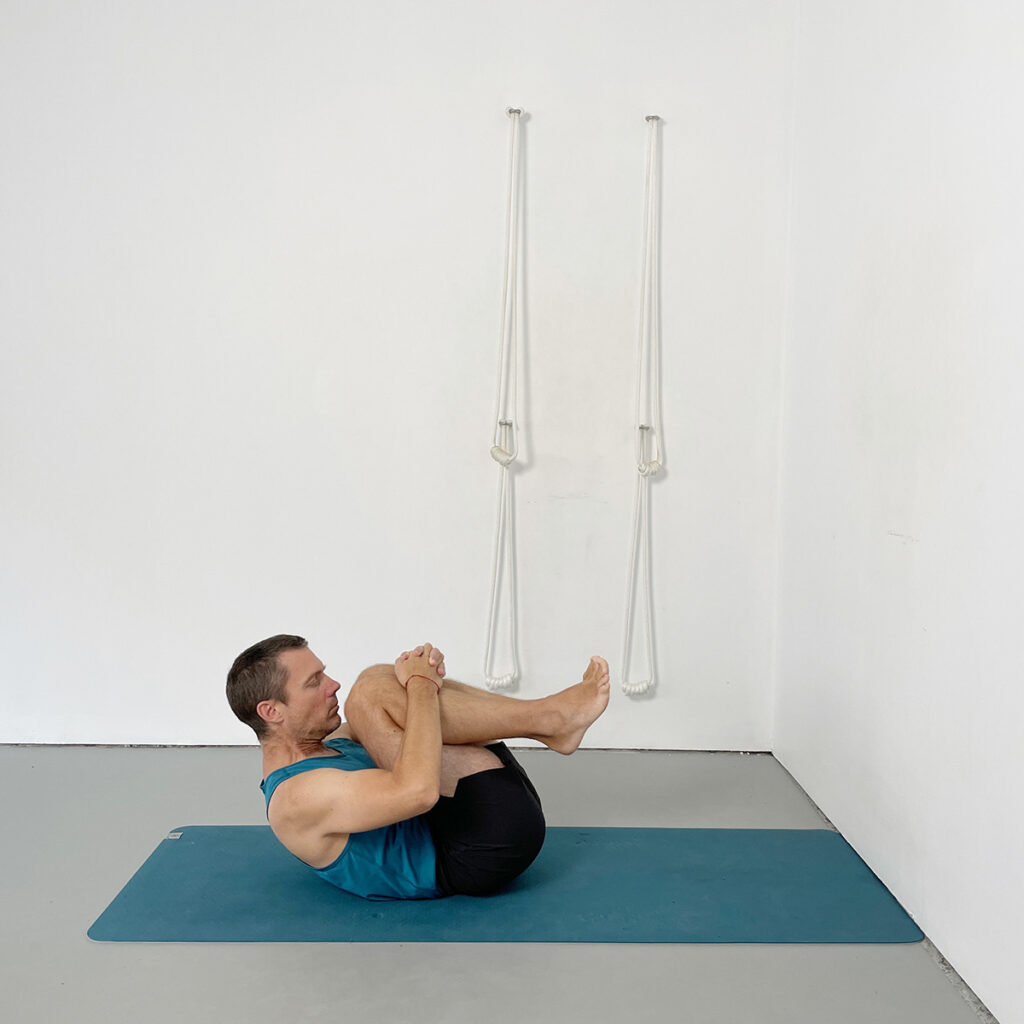
Reclining knee-to-chest pose to release the lumbar spine and balance the pelvis
In this pose, both knees are drawn in toward the chest while the back of the pelvis remains grounded. The action of pressing the shins into the hands creates resistance that encourages the sacrum to descend and the lower back to broaden. This pose is a key transition point for rebalancing pelvic asymmetry and relieving sciatica-related discomfort.
Instructions:
- Lie flat on your back with a neutral pelvis and a soft surface under your head if needed.
- Bend both knees and draw them toward your chest, interlocking your fingers around the shins.
- Gently resist by pressing the shins into your hands as you draw them closer.
- Allow the area where the spine meets the pelvis to press down into the floor.
- Engage your abdominal muscles to slightly lift your head while keeping the back waist grounded.
- Maintain a soft gaze and relaxed face, observing the widening across the lower back and sacrum.
Pose 8: Supta Padangusthasana I
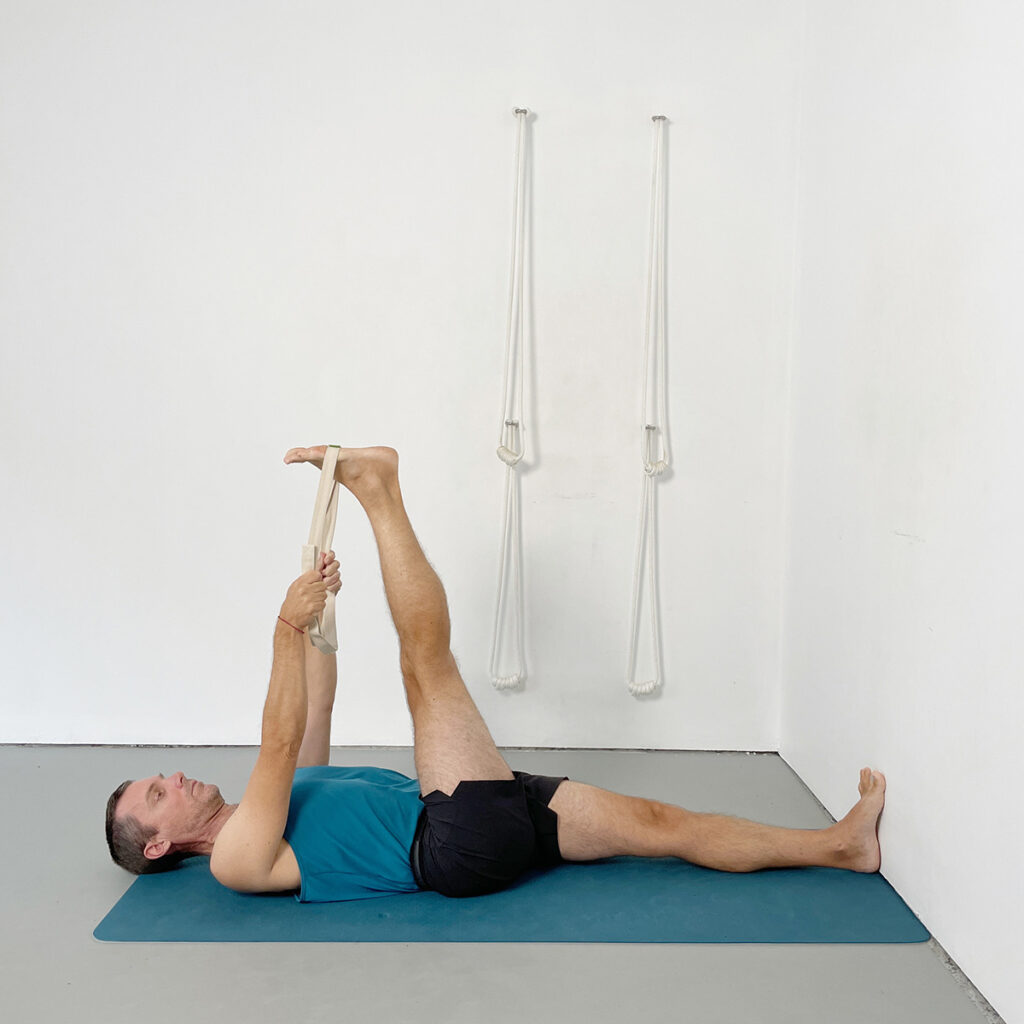
Reclining leg stretch to lengthen the hamstrings and stabilize the lower back
This supported variation of Supta Padangusthasana I offers a safe and effective way to stretch the hamstrings while anchoring the opposite leg to protect the lumbar spine. The use of a yoga belt removes strain from the lower back, allowing the practitioner to focus on symmetry, alignment, and pelvic grounding — all key in relieving sciatic tension.
Instructions:
- Lie on your back with your left foot pressing into the wall and a belt looped around the ball of your right foot.
- Extend the right leg vertically, keeping the knee straight and the arms long but not rigid.
- Press the left thigh and foot firmly into the wall to stabilize the pelvis.
- Gently draw the right leg toward you using the belt, keeping both sides of the waist even.
- Move the right outer hip away from the face to avoid pelvis tilting or over-effort.
- Breathe evenly and allow the back of the pelvis to stay grounded and broad.
Pose 9: Supta Padangusthasana II
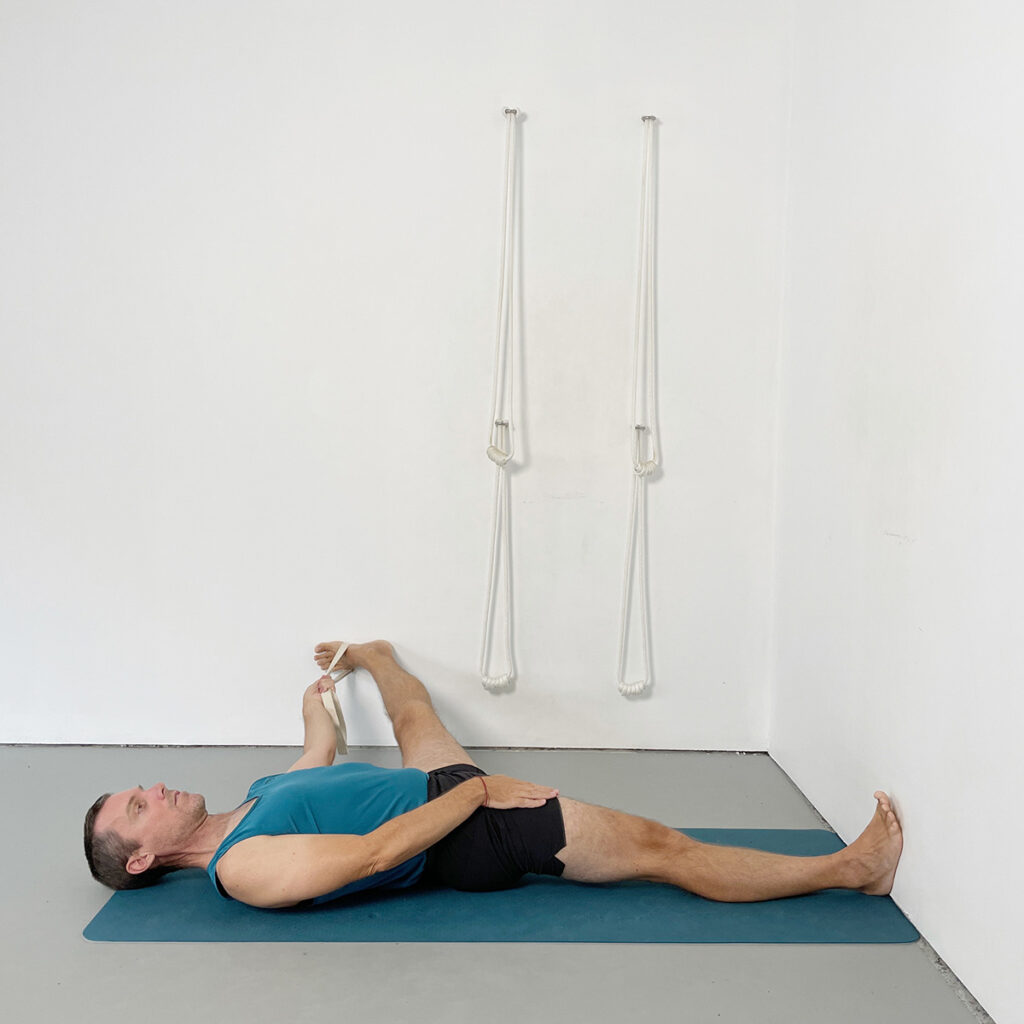
Reclining lateral leg stretch to relieve tension in the outer hip and groin
Supta Padangusthasana II offers a deep stretch to the inner thigh while maintaining pelvic symmetry through the grounded opposite leg. When the outer hip is properly contained and the sacrum remains grounded, this pose can help alleviate sciatic discomfort linked to asymmetrical hip tightness or piriformis tension.
Instructions:
- Lie on your back with your right foot pressing into the wall and a belt around the ball of your left foot.
- Extend the left leg upward and begin to slowly guide it out to the left side.
- Anchor the right thigh and foot firmly into the wall to stabilize the pelvis.
- Keep the left outer hip moving toward the right hip socket as the leg lowers.
- Allow the inner thigh to lengthen without collapsing the left waist or tipping the pelvis.
- Use the belt to manage depth, keeping the back of the pelvis grounded and broad.
Pose 10: Supta Padangusthasana IV (Cross-Leg Variation)
Reclining hip opener to release the piriformis and outer glute
This variation of Supta Padangusthasana provides a targeted stretch to the outer hip and piriformis, regions that often contribute to sciatic nerve irritation. With the spine supported and the legs guided into place with the arms, the pose allows for deep release without strain or compression in the lower back.
Instructions:
- Lie on your back with knees bent and feet flat to the floor.
- Cross your right ankle over your left thigh, just below the knee, keeping the right foot flexed.
- Reach through the triangle formed by the legs and interlace your fingers behind the left shin.
- Gently draw the left leg toward you while pressing the right elbow into the inner thigh.
- Keep both sides of the back waist broad and the pelvis level as you work the right outer hip toward the wall.
- Breathe evenly and soften any tightness around the sacrum and buttocks.
Pose 11: Seated Eka Pada Rajakapotasana (Cross-Leg Variation)
Chair-supported hip opener to target the outer hip and piriformis
This variation uses the support of a chair to safely stretch the outer hip and gluteal muscles, especially the piriformis — a common source of sciatic compression. With the ankle crossed over the opposite thigh and the spine upright, the pose provides an effective and accessible way to release deep-set muscular tension without straining the lower back.
Instructions:
- Sit in a forward-facing position on a yoga chair with your feet flat on the floor and spine upright.
- Cross your right ankle over your left thigh, positioning it near the left knee, and keep the foot flexed to protect the knee.
- Align the right shin so the outer ankle rests securely on the fleshy part of the left front thigh.
- Keep the left foot grounded and both sitting bones evenly anchored on the chair seat.
- Lengthen the spine upward and draw the lower abdomen in, maintaining a broad and lifted chest.
- Use your hands on the chair seat or the wall in front of you for additional support as you encourage the right outer hip to release downward.
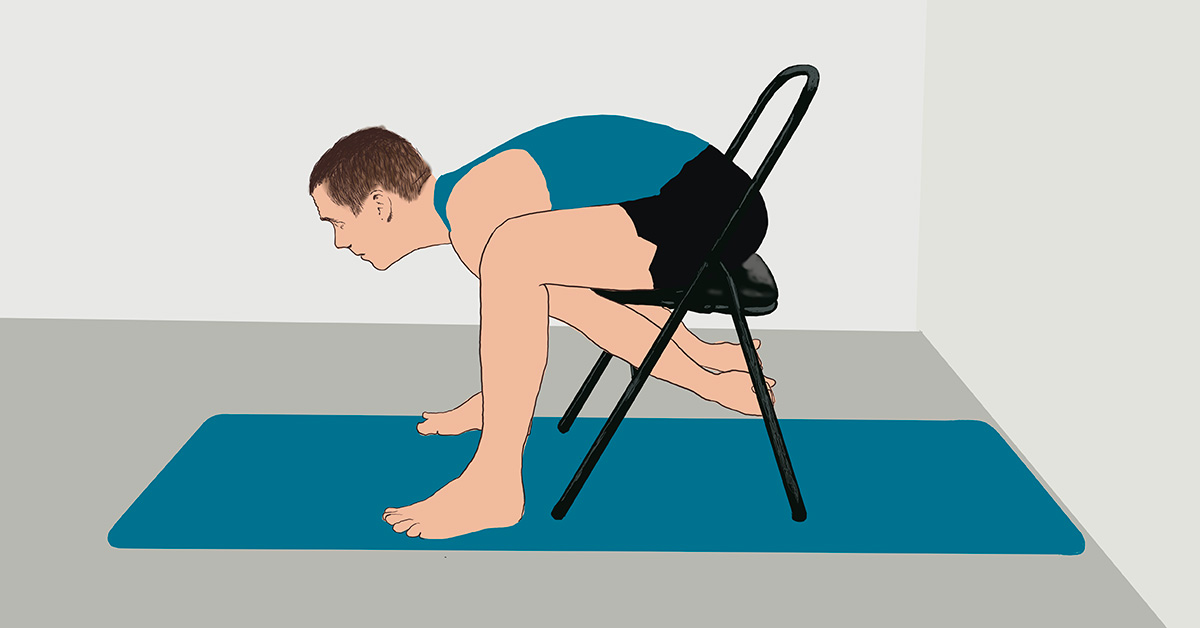
Pose 12: Chair Malasana Yoga for Sciatica Variation
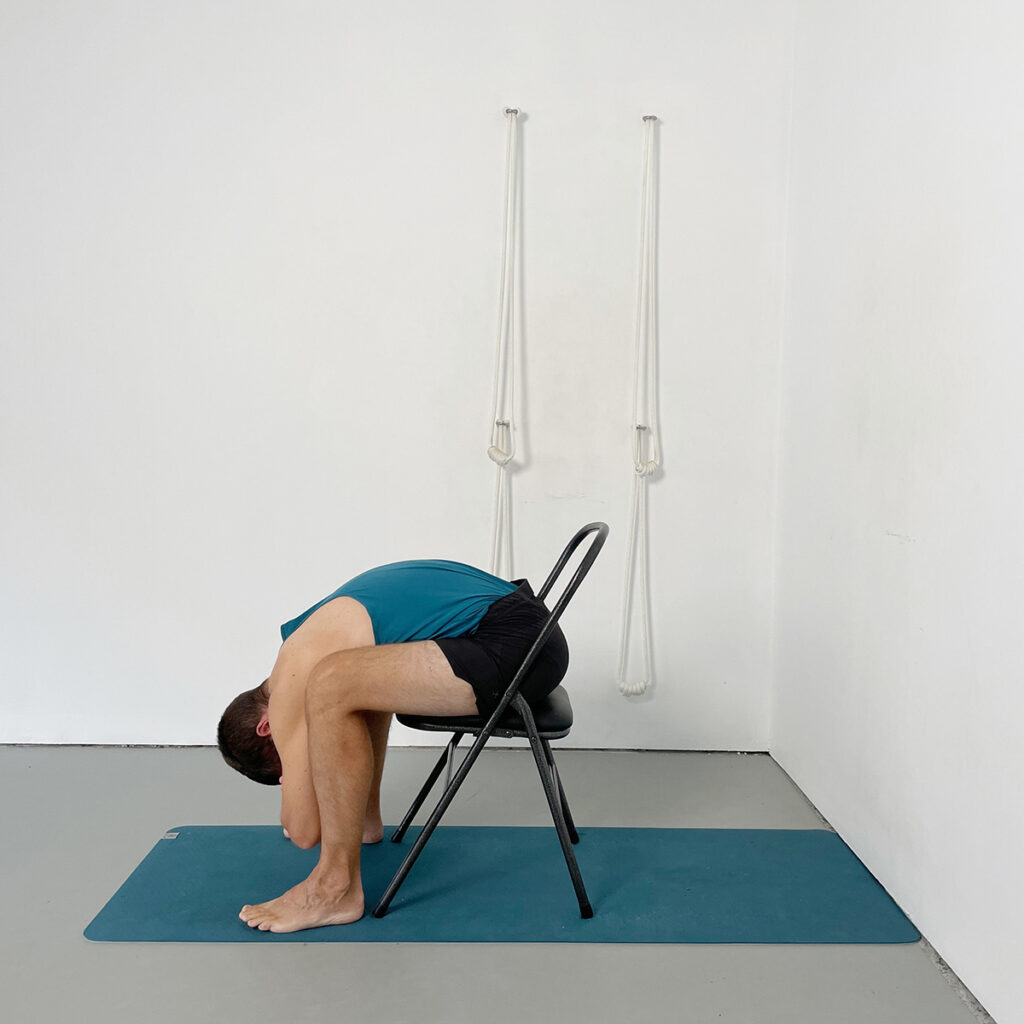
Supported squatting pose to release the lumbar spine and inner groins
Chair Malasana allows practitioners to experience the lengthening and grounding benefits of Malasana without the demands of a deep squat. With the hips anchored on the chair, the pose encourages spinal release and softening through the lower abdomen and inner thighs — especially valuable when dealing with sciatic sensitivity or lower back tightness.
Instructions:
- Sit toward the back of a yoga chair with your feet slightly wider than the front legs of the chair.
- Turn the knees outward so there’s space to bring the arms and shoulders between the legs.
- Begin by placing your fingertips on the floor; over time, allow the palms or forearms to rest down if accessible.
- Let the spine gently release forward, keeping the sitting bones anchored to the chair seat.
- Soften the neck and head, allowing them to release downward in line with the spine.
- Breathe into the back body and inner groins, allowing the lumbar spine to lengthen passively.
Pose 13: Chair Malasana (Active Variation with Traction)
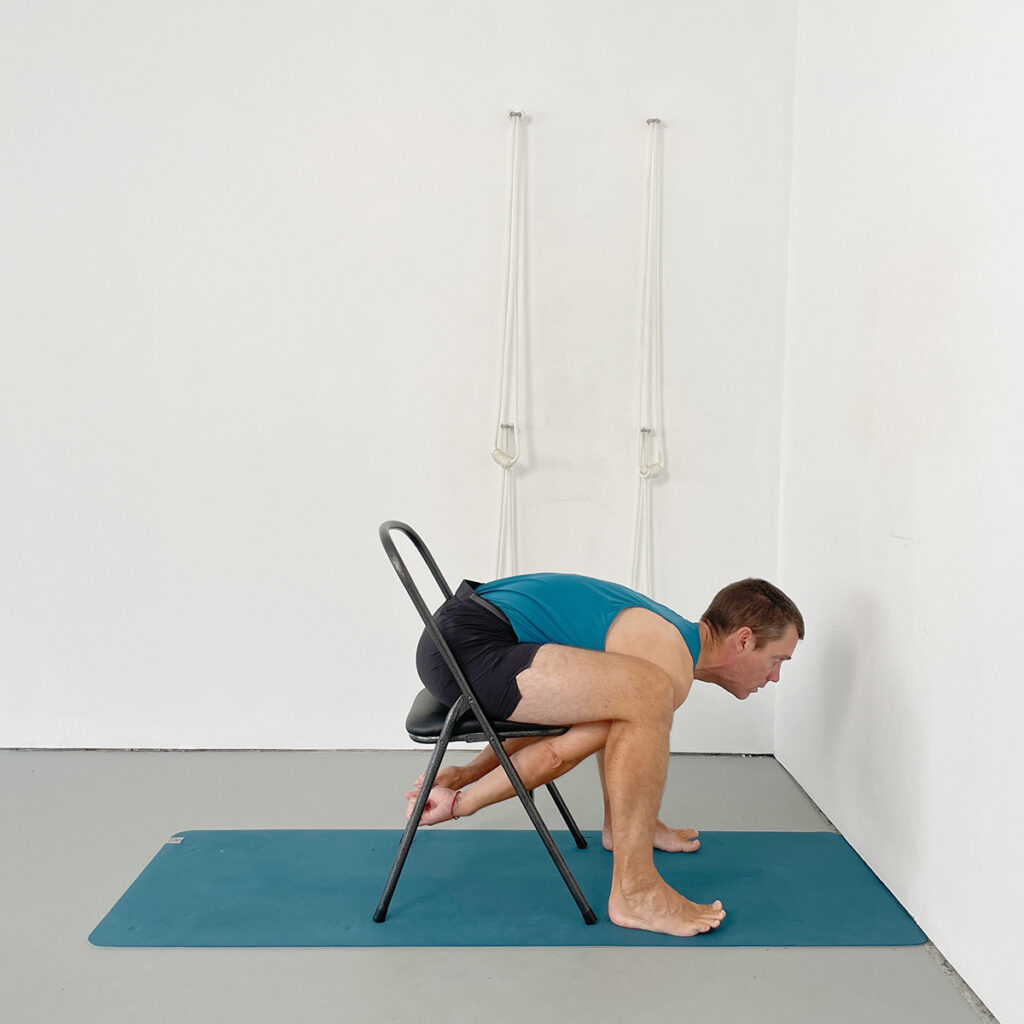
Supported squat with active spinal traction to decompress the lower back
This dynamic version of Chair Malasana introduces an active pulling action to enhance spinal traction. By gripping the crossbar or back legs of the chair, the practitioner deepens the release through the lumbar spine while maintaining the support of the seated position. This variation is ideal for increasing space in the lower back and relieving sciatic nerve compression.
Instructions:
- Sit deeply on the yoga chair with feet wide and knees apart, as in the previous Chair Malasana.
- Reach your arms forward between the legs and grasp the crossbar or back legs of the chair.
- Firmly pull with your hands while simultaneously pressing your feet down into the floor.
- As you pull, lift your chest and lengthen the front of the spine from pubic bone to sternum.
- Draw the lower abdomen in to support the lumbar spine and deepen the traction.
- Keep the sitting bones grounded and breathe steadily as you maintain active length through the spine.
Pose 14: Viparita Karani (Therapeutic Adaptation with Bolster)
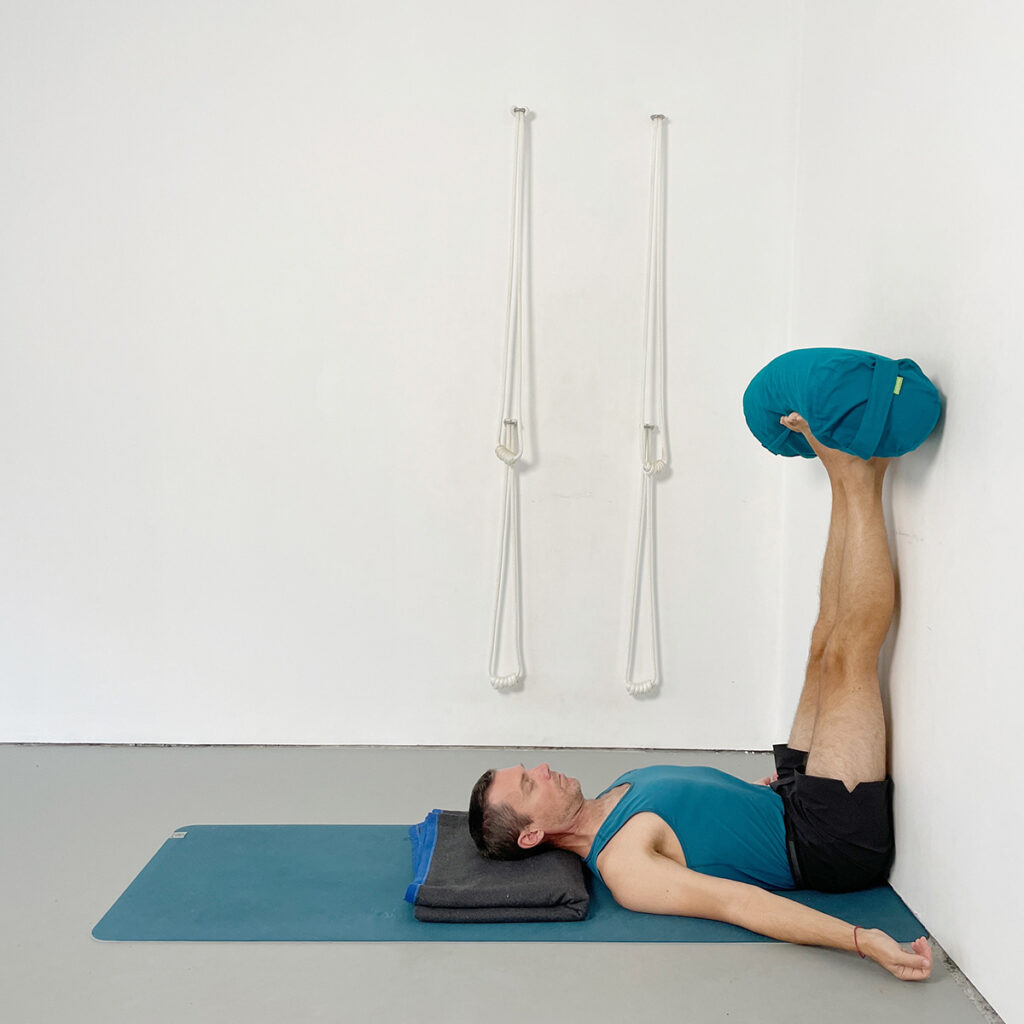
Restorative inversion to release the lumbar spine and calm the nervous system
This yoga for sciatica version of Viparita Karani introduces a bolster placed on the soles of the feet to encourage downward release through the back of the pelvis. As the weight of the bolster subtly travels through the legs and into the sacrum, the lumbar spine is gently drawn toward the floor. It’s an ideal pose for sciatica relief, especially when the lower back feels compressed or fatigued.
Instructions:
- Lie on your back with your legs extended up the wall and a head blanket placed behind you for support.
- Position your hips close enough to the wall so your legs can rest vertically without tension.
- Carefully balance a bolster on the soles of your feet, adjusting until the weight feels evenly distributed.
- Let the weight of the bolster create a soft, downward pressure through the thighs and pelvis.
- Allow the back of the sacrum to settle into the floor and the waist to broaden naturally.
- Stay in the pose for several minutes, breathing calmly and observing the effect of gravity on the lower back.
Pose 15: Prone Savasana
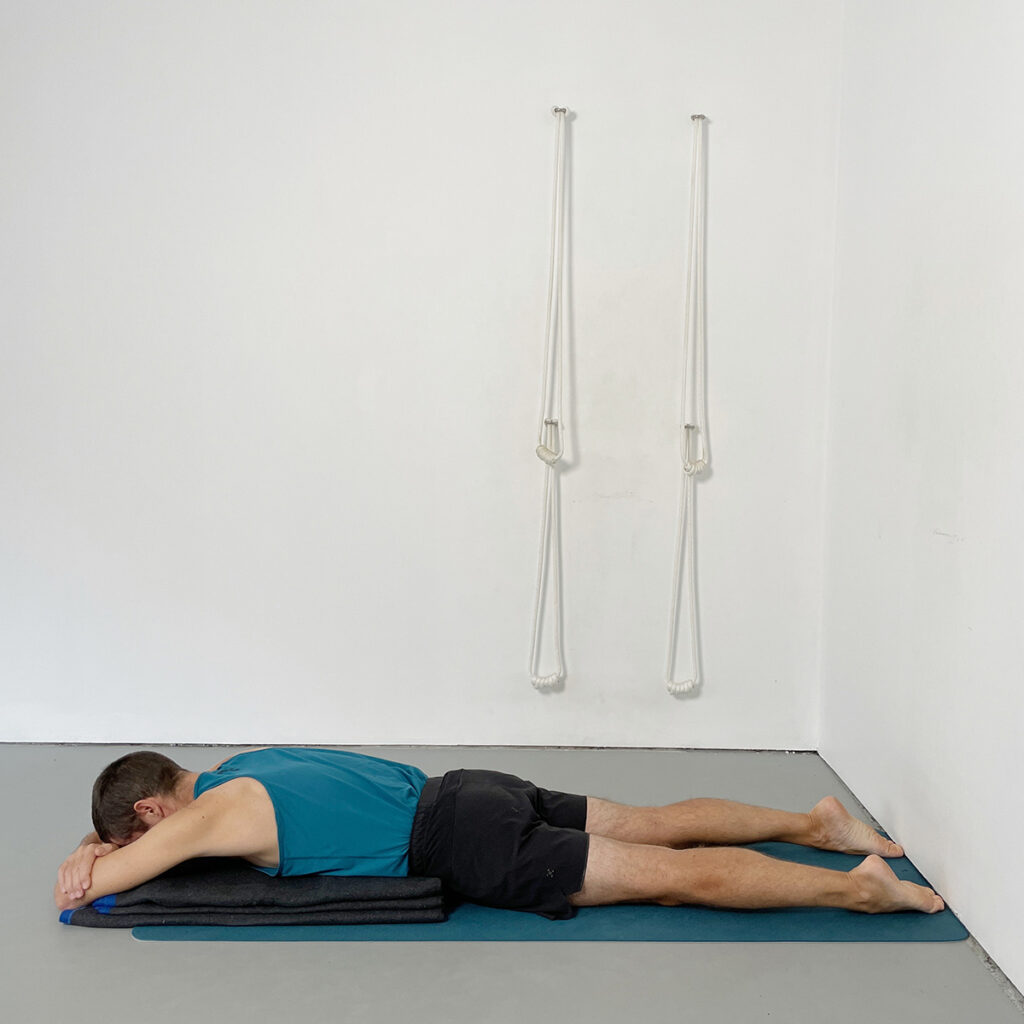
Face-down restorative pose to release the sacrum and settle the lumbar spine
In this therapeutic version of Savasana, the practitioner lies on the front body with the pelvis supported by folded blankets. The gentle downward pressure helps release habitual tension in the lower back, especially around the sacroiliac joint — often a key area in sciatic pain. This yoga for sciatica pose soothes the nervous system while encouraging natural spinal decompression.
Instructions:
- Stack two to three blankets lengthwise near the front of your mat to form a soft platform.
- Lie face down so that the front of the pelvis rests just over the edge of the blanket stack, with legs extended back.
- Fold your arms and rest your forehead on your forearms, or turn your head to one side if more comfortable.
- Adjust your position so the pressure is felt slightly above the front hip bones, not into the abdomen.
- Let the tailbone descend and the back pelvis broaden as you release into the floor.
- Breathe slowly and evenly, softening the buttocks and lower back with each exhalation.
Pose 16: Savasana with Calves Supported on Chair
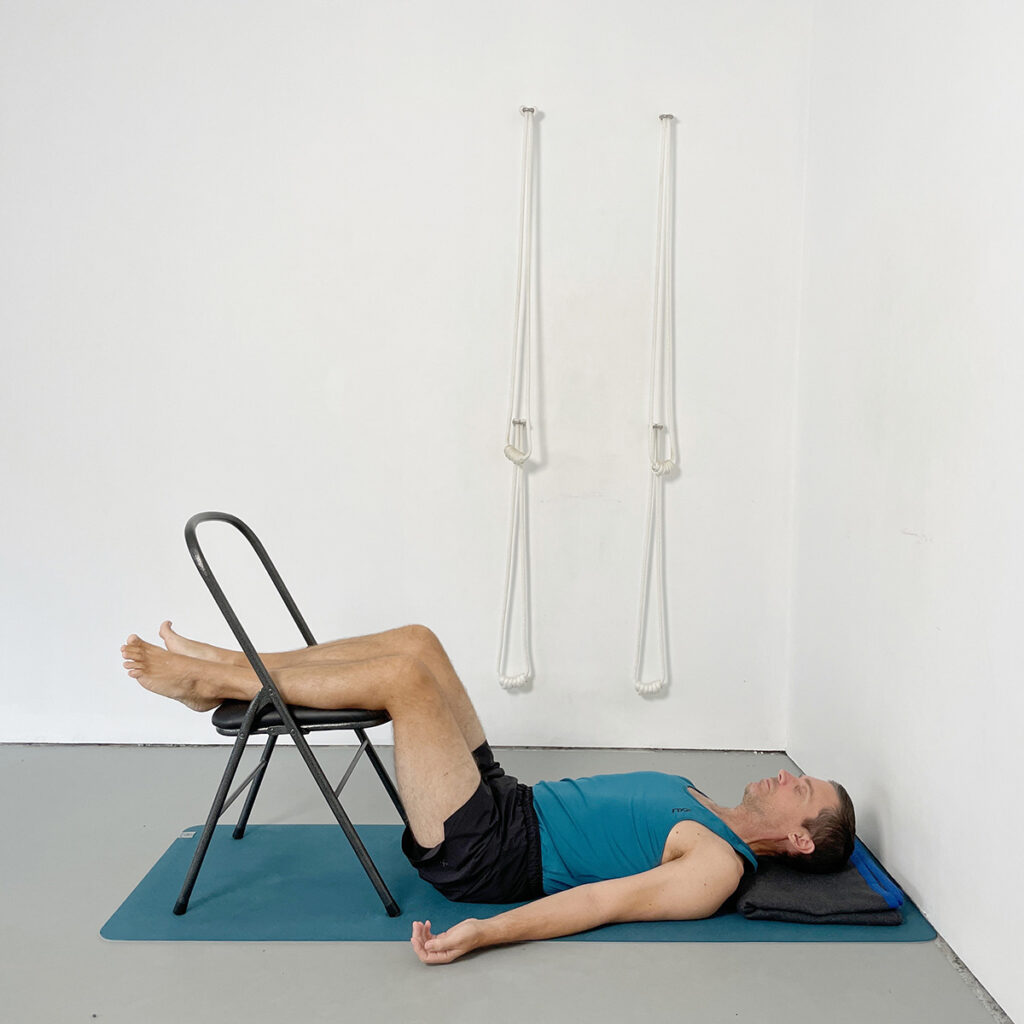
Restorative relaxation pose to soothe the lower back and calm the nervous system
This variation of Savasana provides profound spinal release by elevating the lower legs on a chair, creating space in the lower back without muscular effort. The addition of a bolster on the abdomen or pelvis further deepens the pose’s grounding effect, helping the sacrum settle and allowing the breath to quiet the body and mind.
Instructions:
- Lie on your back with your calves resting on the seat of a yoga chair so that your knees are bent at roughly 90 degrees.
- Place a folded blanket under your head and neck for support, ensuring the chin remains slightly tucked.
- Position a bolster vertically so that it leans gently against the lower abdomen or pelvis.
- Allow the back of the pelvis to make full contact with the floor and feel the lower back broaden.
- Let the arms rest by your sides, palms facing up, with shoulders released down.
- Close the eyes and remain in the pose for several minutes, letting the breath move naturally and evenly.
Common Causes of Sciatica and How Yoga Can Help
Sciatica is not a single condition but a symptom that can arise from several different causes. In many cases, irritation of the sciatic nerve occurs when surrounding muscles become tight or inflamed, particularly in the buttocks and hips. The piriformis muscle, which lies close to the path of the sciatic nerve, is frequently involved in this type of discomfort. Tightness in the hamstrings, gluteal muscles, and hip rotators can also influence the position of the pelvis and place additional strain on the lower back.
Other forms of sciatica may be related to compression of the nerve at the level of the lumbar spine, sometimes associated with disc irritation or joint stiffness. In these situations, gentle movements that decompress the lower back and improve circulation around the spine can be beneficial.
Yoga sequences that combine supported stretches, spinal traction, and gradual strengthening can help address many of the muscular patterns that contribute to sciatic nerve irritation. By improving mobility in the hips and restoring balanced support for the lower back, these practices may help reduce tension around the nerve and promote healthier movement throughout the spine and pelvis.
Many people who experience sciatic nerve irritation also notice general stiffness in the lower back. You may find our guide to Iyengar Yoga for Lower Back Pain helpful for addressing these broader patterns of tension.
Long-term improvement often involves restoring balanced alignment throughout the spine. Our article on Improving Posture with Yoga explores this in more detail.
Frequently Asked Questions
Can yoga help relieve sciatica?
Yoga can help relieve sciatica by reducing tension in the muscles surrounding the sciatic nerve and improving the mobility of the lower back and hips. When practiced carefully, yoga poses may help decompress the lumbar spine, release tightness in the piriformis and gluteal muscles, and improve circulation to the affected area. Iyengar Yoga is particularly well suited to this process because the use of props allows poses to be practiced in a supported and controlled way.
What yoga poses are best for sciatica relief?
Yoga poses that gently release the hips, buttocks, and lower back are often beneficial for sciatica. These may include supported forward bends, gentle spinal extensions, and poses that stretch the piriformis region. In the sequence presented in this article, poses are carefully arranged to decompress the lumbar spine while gradually releasing tension from the hips and surrounding muscles.
Is it safe to practice yoga if you have sciatica?
In many cases, gentle yoga can be helpful for people experiencing sciatica. However, poses should be practiced with care and without forcing the body into strong stretches. Supported variations using props such as blankets, blocks, belts, or chairs can help make poses safer and more comfortable. If symptoms are severe or persistent, it is advisable to consult a qualified healthcare professional before beginning a new exercise program.
Which muscles are often involved in sciatic nerve pain?
Sciatic nerve discomfort is frequently associated with tightness in the piriformis muscle and other muscles of the buttocks and hips. These muscles sit close to the path of the sciatic nerve and can sometimes place pressure on it when they become tight or inflamed. Improving flexibility and mobility in these areas can help reduce irritation around the nerve.
How often should I practice yoga for sciatica relief?
Consistency is more important than intensity. Practicing a gentle therapeutic sequence several times per week can gradually improve mobility and reduce muscular tension around the lower back and hips. Short, regular sessions are often more beneficial than occasional longer practices.
Can tight hamstrings contribute to sciatica symptoms?
Tight hamstrings can restrict the movement of the pelvis and influence the alignment of the lower spine. This restriction may increase strain in the lumbar region and surrounding muscles. Improving hamstring flexibility through supported yoga poses can help restore more natural movement between the legs and pelvis and reduce stress on the lower back.
Continue Exploring with Yoga Selection
- → Iyengar Yoga for Back Care – Develop strength and stability to support spinal health and reduce back discomfort.
- → Improve Your Posture – Learn how targeted yoga poses can help restore balanced spinal alignment.
- → Yoga for Stiff Bodies – Supported sequences designed to improve mobility safely.
- → Iyengar Yoga for Beginners – A structured starting point for building clarity and confidence.
- → Yoga at Home – Establish a steady, sustainable home practice.
Explore a World of Online Yoga
Unlimited access to all classes and courses, including yoga for sciatica.
Try it Free for 14 DaysCancel anytime.
Iyengar Yoga’s Therapeutic Approach to Sciatica
Sciatica and lower back discomfort can significantly limit your comfort, mobility, and quality of life. Practicing yoga with precision and support, as demonstrated in this sequence, offers a practical way to relieve pain, create space in the lumbar spine, and ease muscular tension around the hips and pelvis.
By approaching each pose methodically and with the guidance of props, you reduce the risk of strain while encouraging long-term structural change. This sequence draws on the Iyengar Yoga tradition to offer both therapeutic value and a pathway toward deeper body awareness.
If you found this Yoga for Sciatica article helpful, explore more sequences like this with a free trial at Yoga Selection.
About Rod Stennard
Rod Stennard – Founder of Yoga Selection
Rod Stennard is the founder of Yoga Selection, the first online yoga platform dedicated entirely to Iyengar Yoga. A certified Iyengar Yoga teacher since 2002, Rod has practiced yoga since 1992 and studied under senior teachers from around the world, including members of the Iyengar family in Pune, India.
Rod launched Yoga Selection in 2016 to bring structured, high-quality Iyengar Yoga training to a global audience. As a pioneer in the field of online yoga education, he is passionate about making this method accessible to all, through rigorous, inclusive, and thoughtfully designed classes. His work continues to support students of all levels in over 50 countries.
Comments 1
Thank you, Rod, for all you do. You have helped me in so many ways: with my own body, with my teaching, with my understanding of yoga.