This 40-minute yoga class is designed to help you build a strong and consistent home yoga practice – no props required. Whether you’re new to yoga or simply looking for a no-fuss routine you can do in your living room, this beginner-level Iyengar Yoga sequence offers a clear and accessible introduction to essential standing poses. Each asana is taught step by step with progressive options, allowing you to adapt the practice to your own level of flexibility and experience. If you’re searching for a yoga at home class that’s both structured and supportive, this is the ideal place to begin.
Table of Contents
- Yoga at Home – 40-Minute Standing Pose Sequence (No Props Required)
- Yoga at Home: 16-Pose Sequence Overview
- Pose 1. Adho Mukha Virasana (Downward Facing Hero Pose)
- Pose 2. Uttanasana (Standing Forward Bend)
- Pose 3. Adho Mukha Svanasana (Downward Facing Dog Pose)
- Pose 4: Tadasana (Mountain Pose)
- Pose 5: Urdhva Hastasana (Upward Salute)
- Pose 6: Trikonasana (Triangle Pose)
- Pose 7: Virabhadrasana II (Warrior II)
- Pose 8: Utthita Hasta Padasana (Extended Hands and Feet Pose)
- Pose 9: Virabhadrasana II (Warrior II Pose)
- Pose 10: Parsvakonasana (Extended Side Angle Pose – Forearm Variation)
- Pose 11: Parsvakonasana (Extended Side Angle Pose – Full Version)
- Pose 12: Parsvottanasana (Pyramid Pose – Concave Spine Variation)
- Pose 13: Prasarita Padottanasana (Wide-Legged Forward Bend – Hands on Shins Variation)
- Pose 14: Prasarita Padottanasana (Wide-Legged Forward Bend – Hands to Floor)
- Pose 15: Parvatasana in Vajrasana (Mountain Pose Arms in Hero Pose)
- Pose 16. Savasana (Corpse Pose)
- Deepen Your Practice with the 30-Class Beginner Course — Included in Your Membership
Yoga at Home – 40-Minute Standing Pose Sequence (No Props Required)
This free 40-minute class is designed for home practice and requires no props. It guides you through a foundational standing pose sequence that builds strength, flexibility, and energy. Whether you’re short on equipment, traveling, or simply want a clean, accessible practice, this class helps you stay consistent and connected to your yoga – wherever you are.
Start Your Iyengar Yoga Journey
Your membership gives you full access to every course and class on Yoga Selection — including the 30-Class Beginner Course and our library of 900+ classes.
Start Free TrialNo commitment. Cancel anytime.
Yoga at Home: 16-Pose Sequence Overview
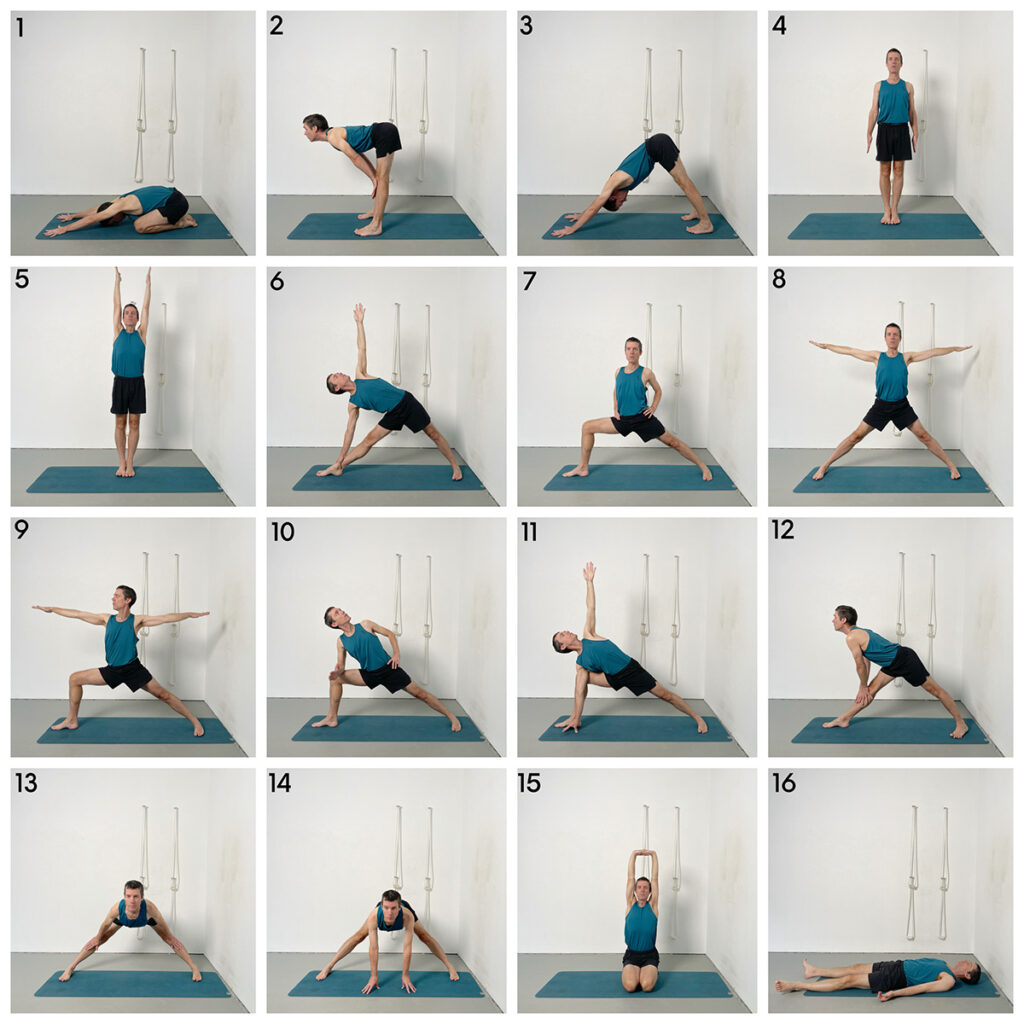
This yoga at home sequence features 16 poses that build strength, flexibility, and focus without the need for props. The grid below offers a quick visual guide to the full class. Scroll down to explore each pose in detail — anchor links make it easy to jump directly to any pose in the sequence.
Pose 1. Adho Mukha Virasana (Downward Facing Hero Pose)
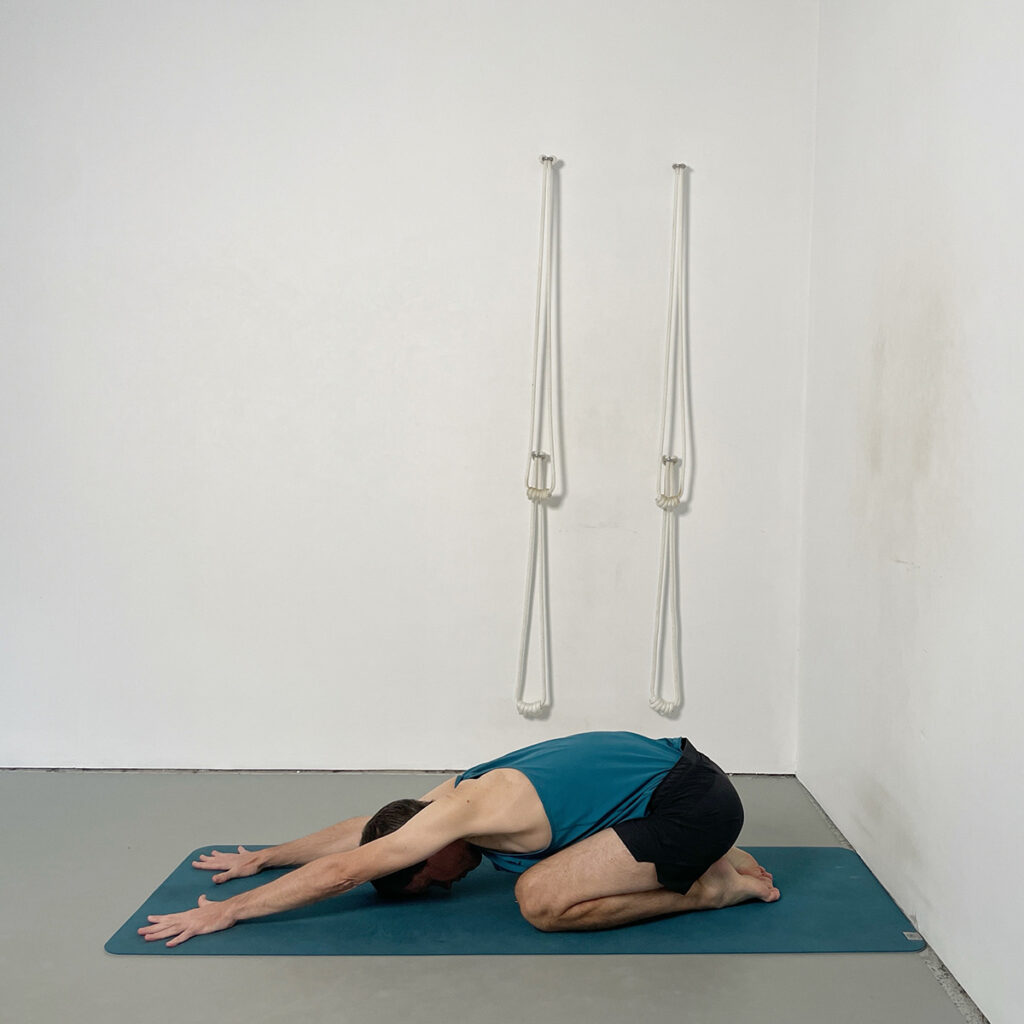
The sequence begins in a kneeling position with a forward extension into Adho Mukha Virasana. This pose gently opens the back, hips, and shoulders while creating a grounded connection with the floor. It’s a centering posture that helps you transition into the class both physically and mentally, without needing any props or previous experience.
Key Instructions:
- Kneel with the big toes touching, knees apart, and pelvis resting on the heels.
- Walk the hands forward and straighten the elbows.
- Ensure wrists are shoulder-width apart and the palms press evenly down.
- Focus on shifting body weight from the knees to the shins and ankles.
- Keep the hip sockets pressing down, deepening the connection of the pelvis to the heels.
- Pressing your palms down, allow the sternum to move forwards and expand on each inhale, creating space in the chest.
Pose 2. Uttanasana (Standing Forward Bend)
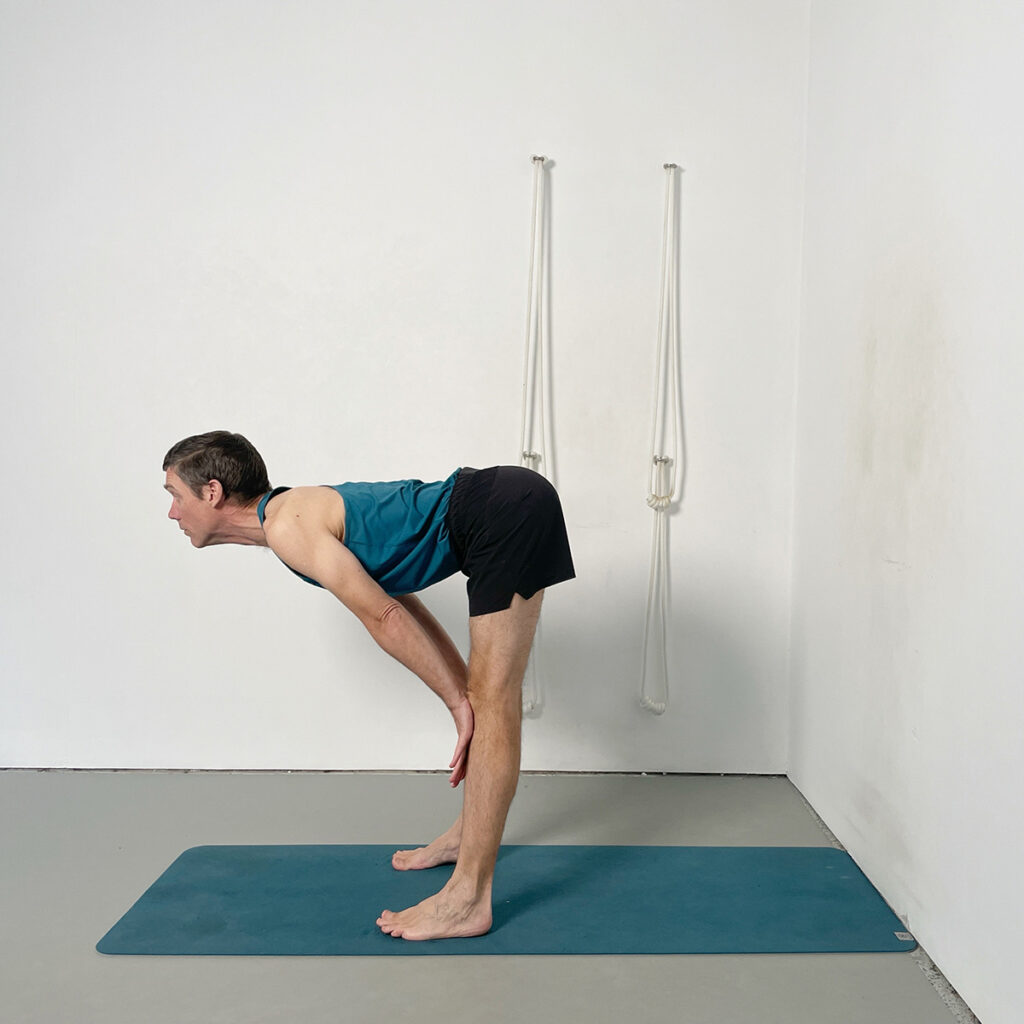
From standing, this variation of Uttanasana introduces a supported forward bend with the hands pressing into the shins. It activates key alignment points in the legs, spine, and chest without needing flexibility to reach the floor. This is a foundational shape in Iyengar Yoga and ideal for learning how to extend the spine while folding forward.
Key Instructions:
- Stand with feet hip-width apart, and place your hands just below the knees on the shins.
- Keep the spine long and the chest open as you extend forward without collapsing.
- Ensure the big toe bases press down and weight shifts slightly forward into the balls of the feet.
- Press the hands gently into the shins to lift the chest and lengthen the front body.
- Maintain straight elbows, and keep shoulders back and away from the ears.
- Avoid leaning the hips back — keep them aligned over the ankles for balance and integration.
Pose 3. Adho Mukha Svanasana (Downward Facing Dog Pose)
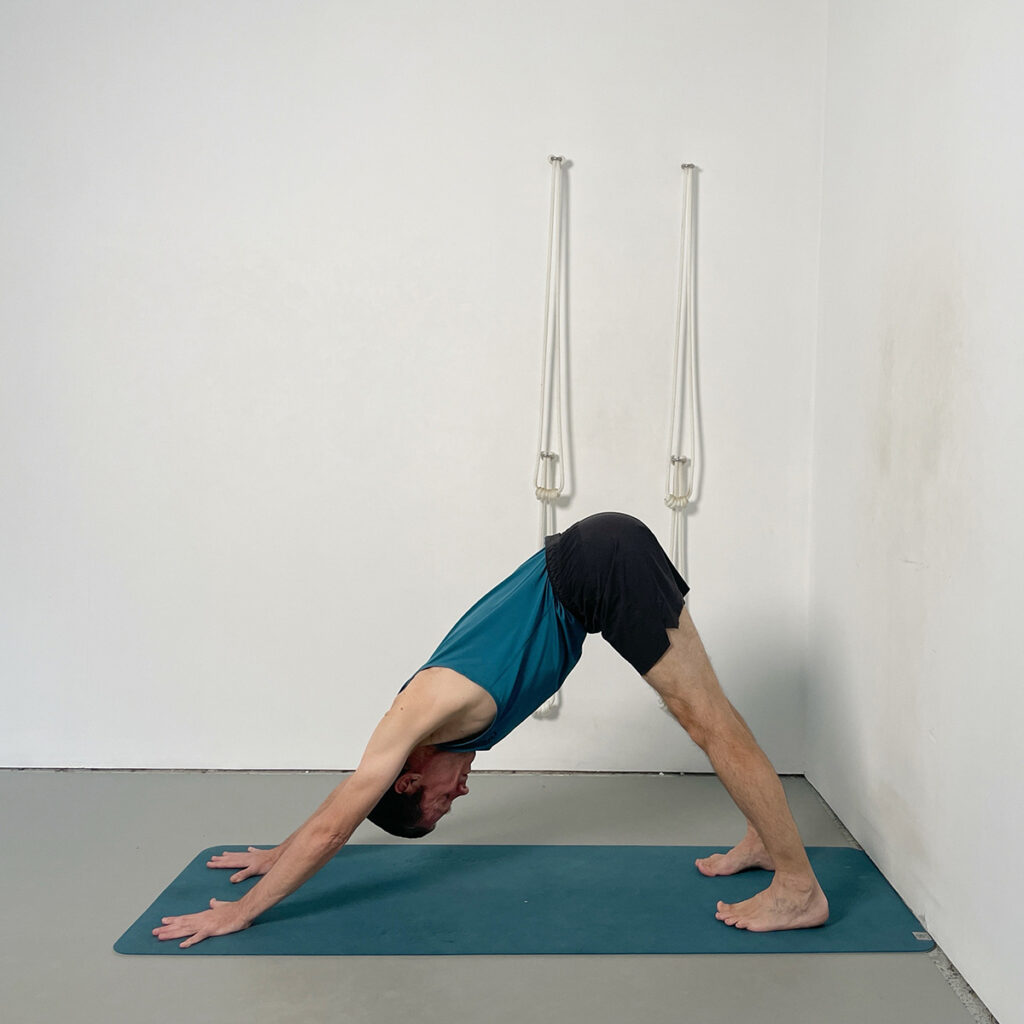
This classic shape builds strength and length through the entire body. In this variation, you’ll explore progressive adjustments to optimise spinal extension and reduce strain on tight hamstrings. It’s a valuable bridge between standing and seated work and a core pose in Iyengar sequences – here taught in a way that’s highly accessible at home.
Key Instructions:
- Start on hands and knees, then walk the hands forward and step the feet back to form an inverted “V” shape.
- Check that the wrists are shoulder-width, and fingers are spread evenly.
- Begin with a slight bend in the knees to reduce tension in the hamstrings and lift the side ribs higher.
- Firmly press the hands into the floor, as if stretching the mat away from your feet.
- With control, straighten the knees and lift the heels, keeping the thigh creases moving upward.
- Gradually press the heels down while maintaining lift in the hips and firmness in the arms.
Pose 4: Tadasana (Mountain Pose)
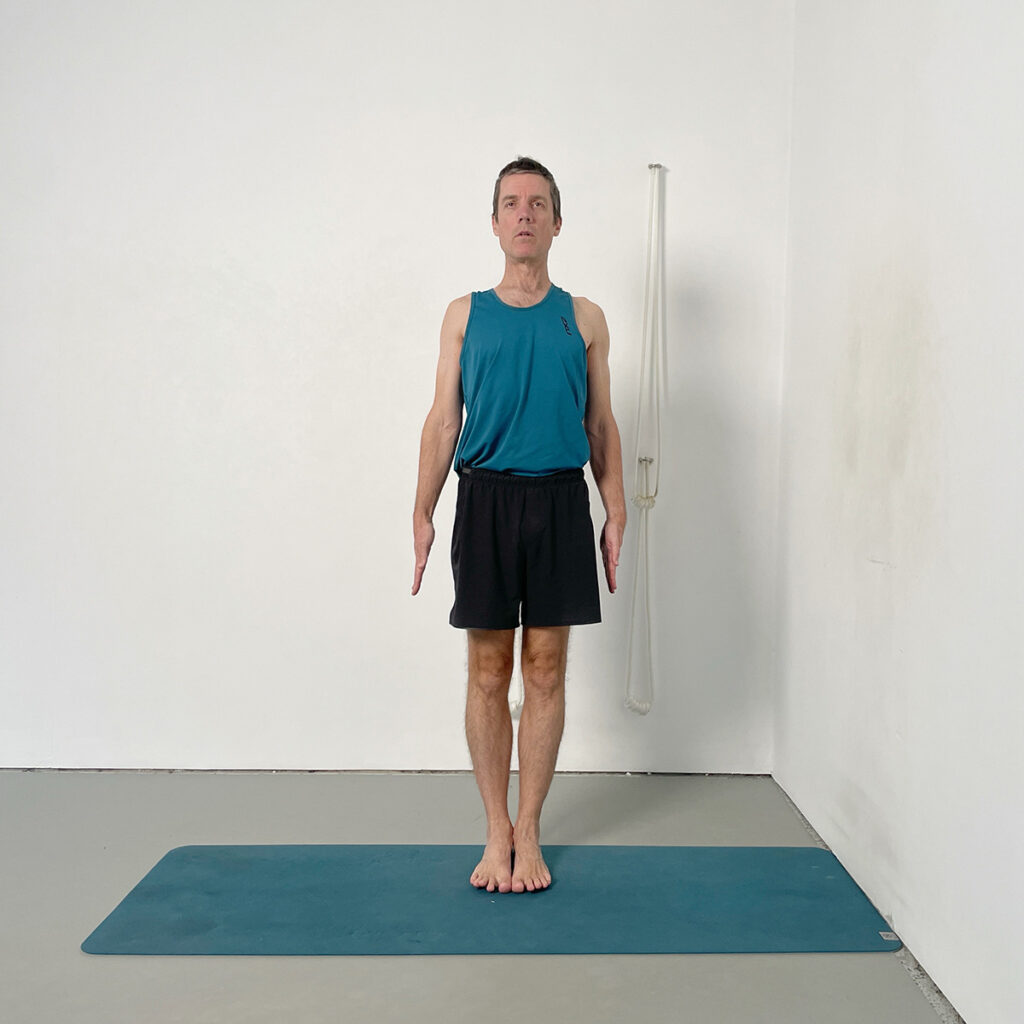
Tadasana is the foundation of all standing poses and an essential starting point for yoga at home. It teaches balance, alignment, and awareness, improving posture and preparing the body for more complex asanas.
Key Instructions:
- Stand with the feet together, big toes and heels touching.
- Press the big toe bases and heels firmly into the floor.
- Lengthen evenly through both legs, keeping the thighs firm.
- Draw the tailbone in and down while lifting the chest.
- Roll the shoulders back and down, arms straight at the sides.
- Keep the gaze forward, steady and relaxed.
Pose 5: Urdhva Hastasana (Upward Salute)
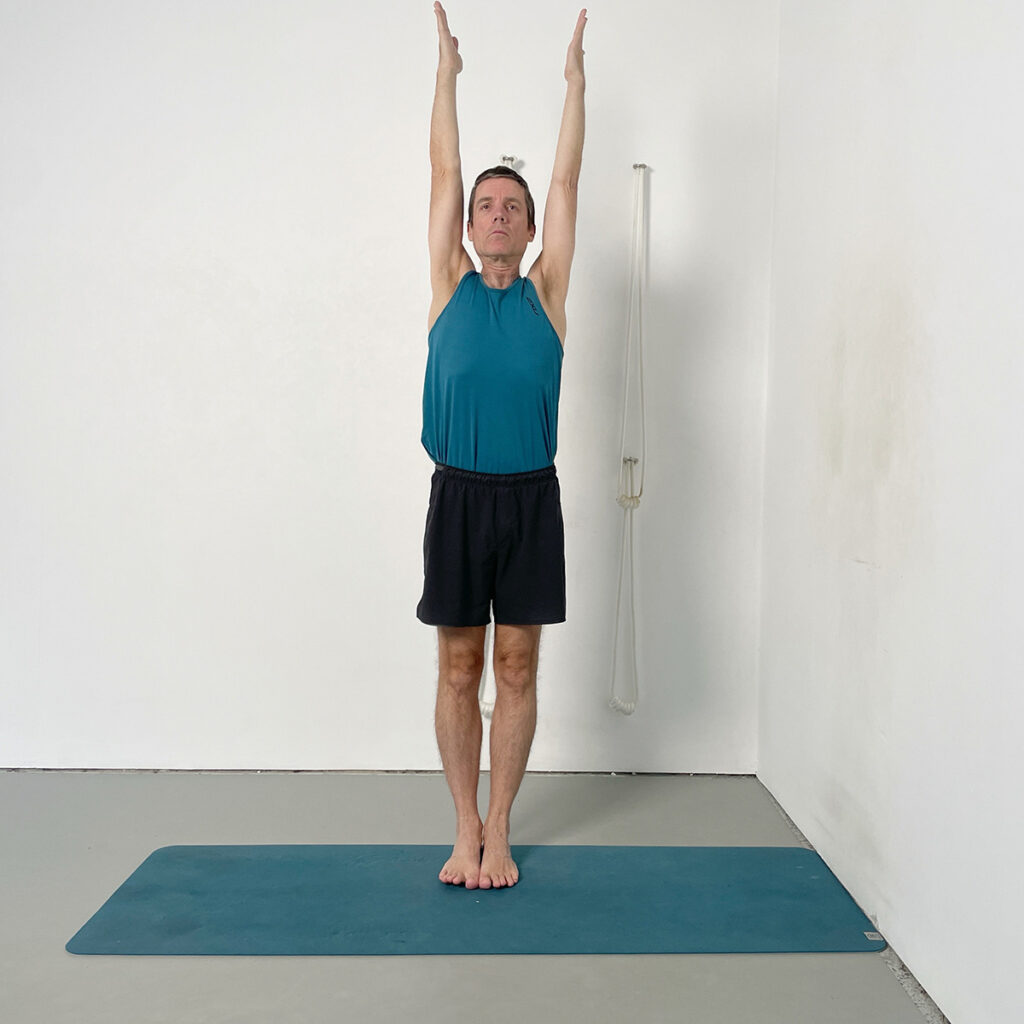
From the grounding of Tadasana, the upward-reaching Urdhva Hastasana introduces vertical lift and elongation of the side body. It helps students feel the entire connection from the feet through to the fingertips, creating mobility through the shoulders and opening and lift in the chest.
Key Instructions:
- From Tadasana, raise both arms overhead, keeping the wrists shoulder-width apart.
- Ensure the palms face each other and remain parallel – do not let them rotate outward.
- Keep the elbows straight, and lift the armpit chest as you raise the arms.
- Elongate the side ribs and waist, maintaining a continuous upward reach from feet to fingertips.
- Simultaneously press the heels and big toe mounds into the floor for grounding.
- Avoid overarching the lower back — instead, tuck the tailbone and maintain lift through the front body.
Pose 6: Trikonasana (Triangle Pose)
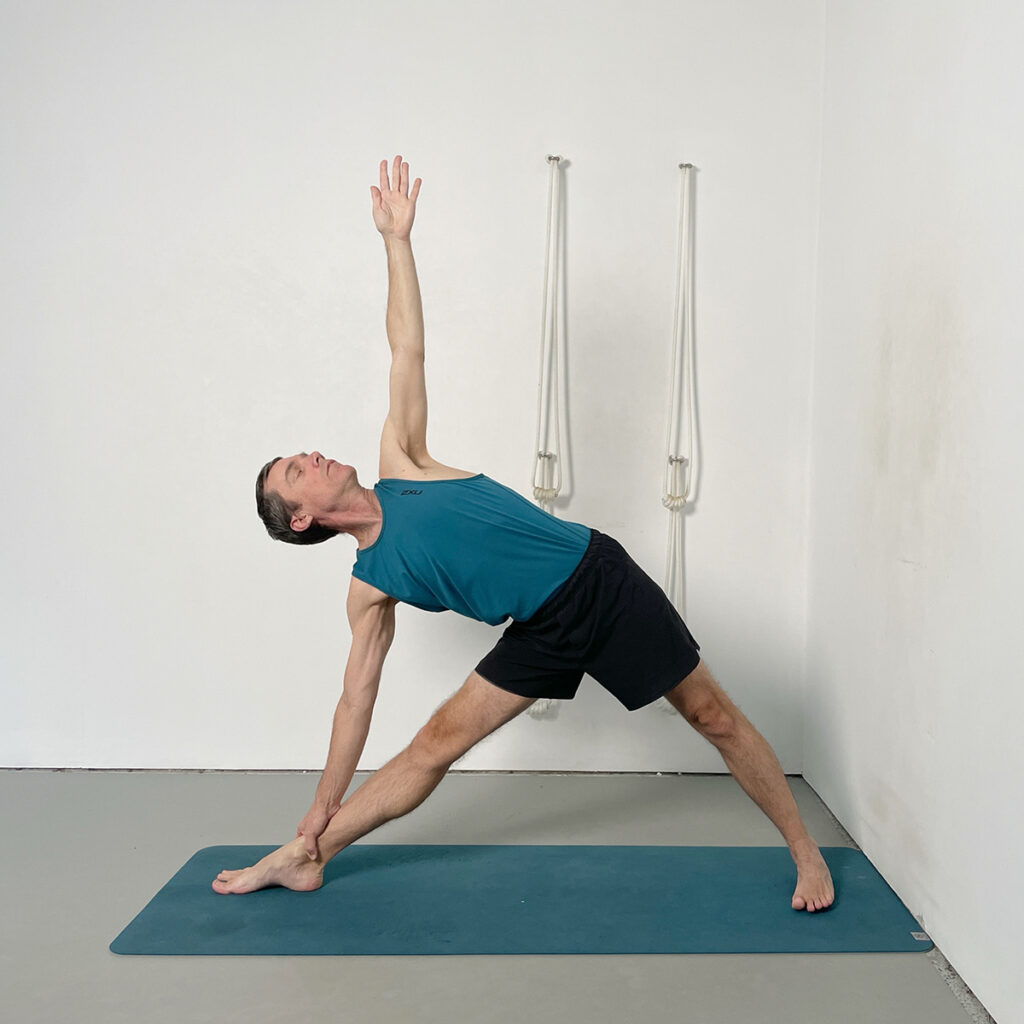
Trikonasana is one of the foundational standing poses in Iyengar Yoga. In this version, practiced with the hand to the shin or ankle rather than the floor, the emphasis is on building structure, alignment, and lift – not just depth. This helps beginners experience the full shape of the pose without strain or collapse.
Key Instructions:
- Step your feet wide and turn the front leg fully out; angle the back foot slightly inward.
- Extend your arms to the sides, then reach the bottom hand to the shin or ankle of the front leg.
- Keep the top hand initially on the hip to help rotate the chest upward.
- Firm the back heel into the floor and draw the back thigh back to stabilise the pelvis.
- Turn the chest upwards and the back ribs downwards.
- Once stable, extend the top arm vertically, keeping the top shoulder drawn back and the chest broad.
Pose 7: Virabhadrasana II (Warrior II)
Virabhadrasana II develops strength, stamina, and mental focus. In this version, the hands remain on the hips initially to help establish correct alignment before the arms are extended. Emphasis is placed on balance between front and back legs, hip opening, and chest lift – making it accessible and effective for beginner students practicing yoga. at home.
Key Instructions:
- From a wide stance, turn the front leg fully out and back foot slightly in.
- Bend the front knee directly over the ankle, widening the distance between the feet if needed.
- Keep the back heel grounded and press the thigh of that leg back.
- Sink the front hip socket down without letting the back leg lose stability.
- Roll the shoulders back, draw the elbows inward, and lift the chest.
Pose 8: Utthita Hasta Padasana (Extended Hands and Feet Pose)
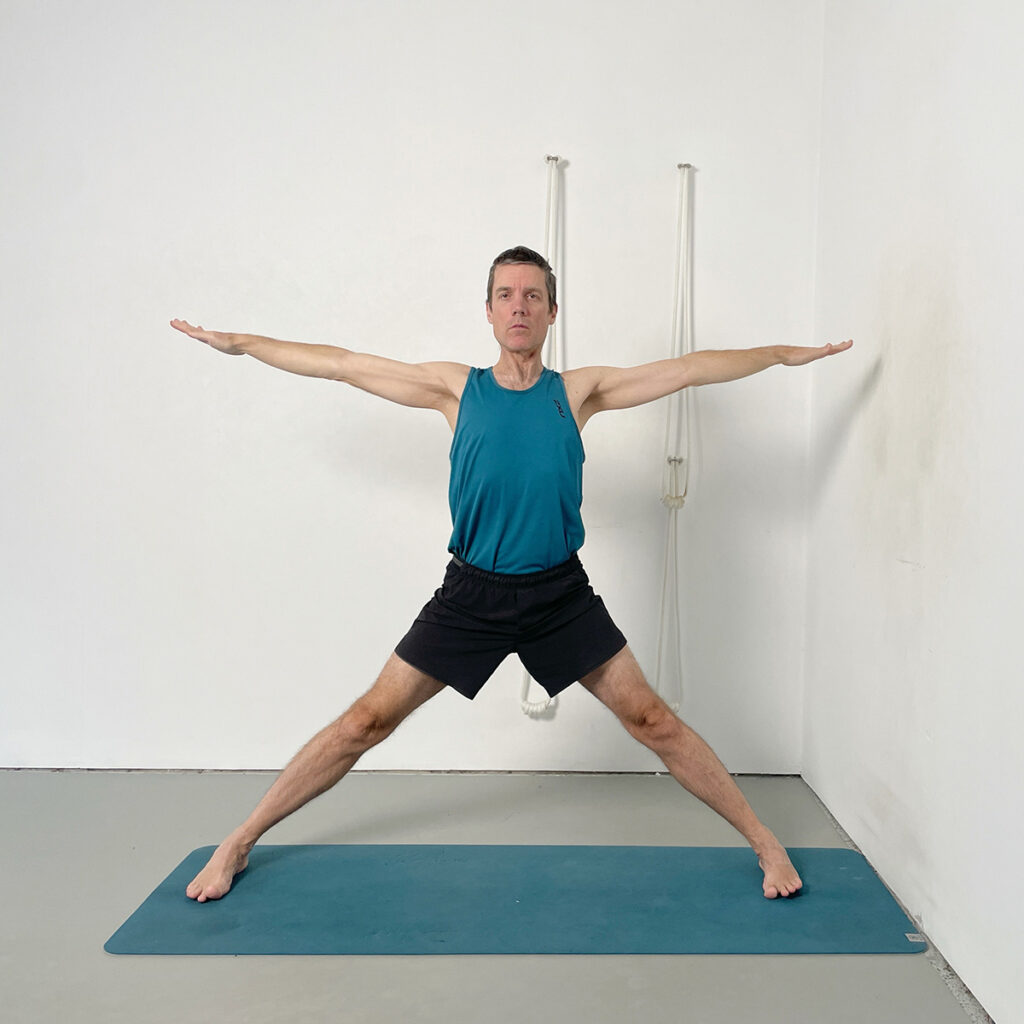
Utthita Hastasana is a wide-legged standing position that creates the foundation for many other poses. It trains steadiness and postural awareness by aligning the legs, hips, and arms, and helps you prepare for lateral standing asanas like Trikonasana and Virabhadrasana.
Key Instructions:
- Step the feet wide apart, keeping them parallel.
- Press the big toe bases and outer heels firmly into the floor.
- Draw the thighs up from the inner knees to the groins.
- Move the back of the pelvis in and the tailbone down.
- Raise the arms overhead, then extend them out to shoulder height.
- Keep the elbows lifted, chest broad, and shoulders contained.
Pose 9: Virabhadrasana II (Warrior II Pose)
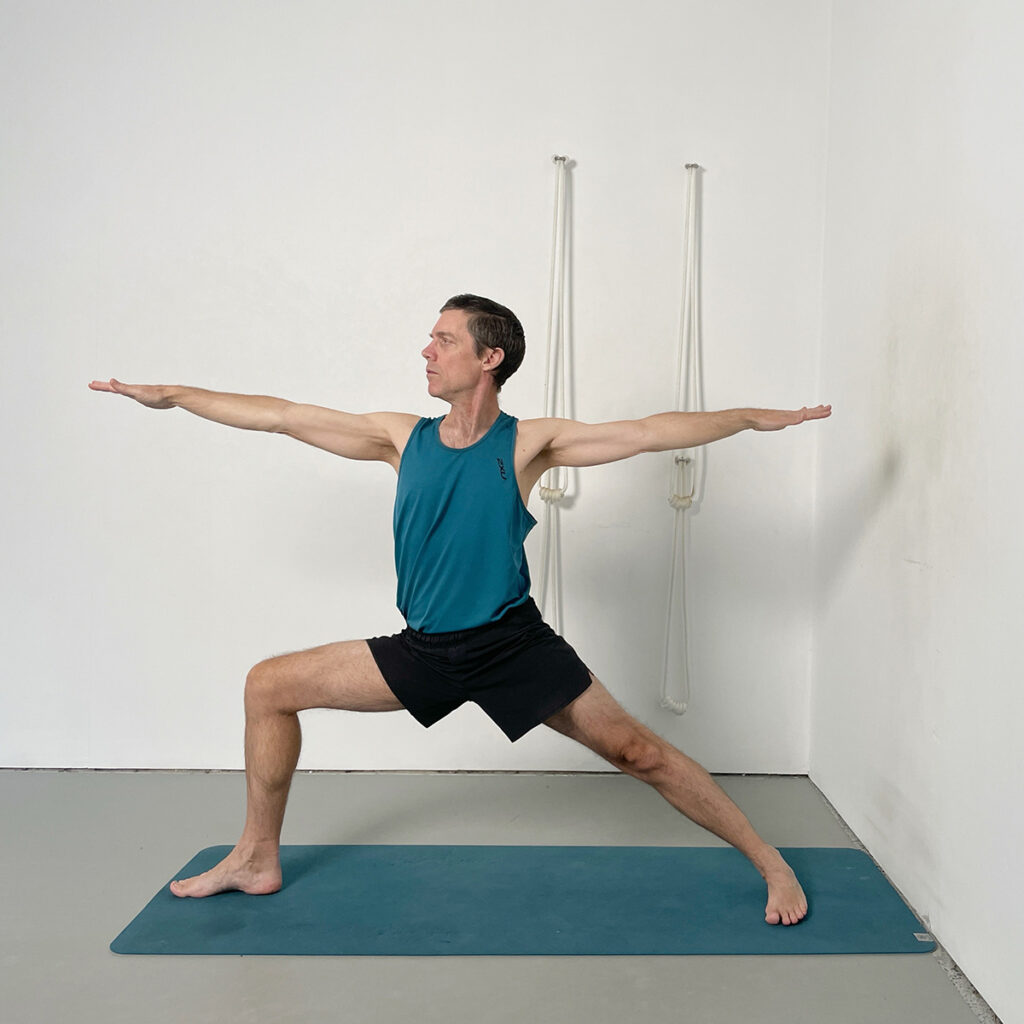
This full version of Virabhadrasana II builds on the earlier hands-on-hips stage. In addition to strengthening the legs and improving postural awareness, extending the arms directs your awareness outward to the extremities and energises the whole body. It is a dynamic standing pose that develops stability, stamina, and focus.
Key Instructions:
- Step the feet wide apart from Utthita Hasta Padasana.
- Turn the front leg out and the back foot slightly in.
- Bend the front knee until it aligns directly above the ankle.
- Press the back heel firmly down and firm the back thigh.
- Extend the arms outward at shoulder height, palms facing down.
- Turn the head to look over the front arm, keeping the chest lifted.
- Repeat the pose on both sides.
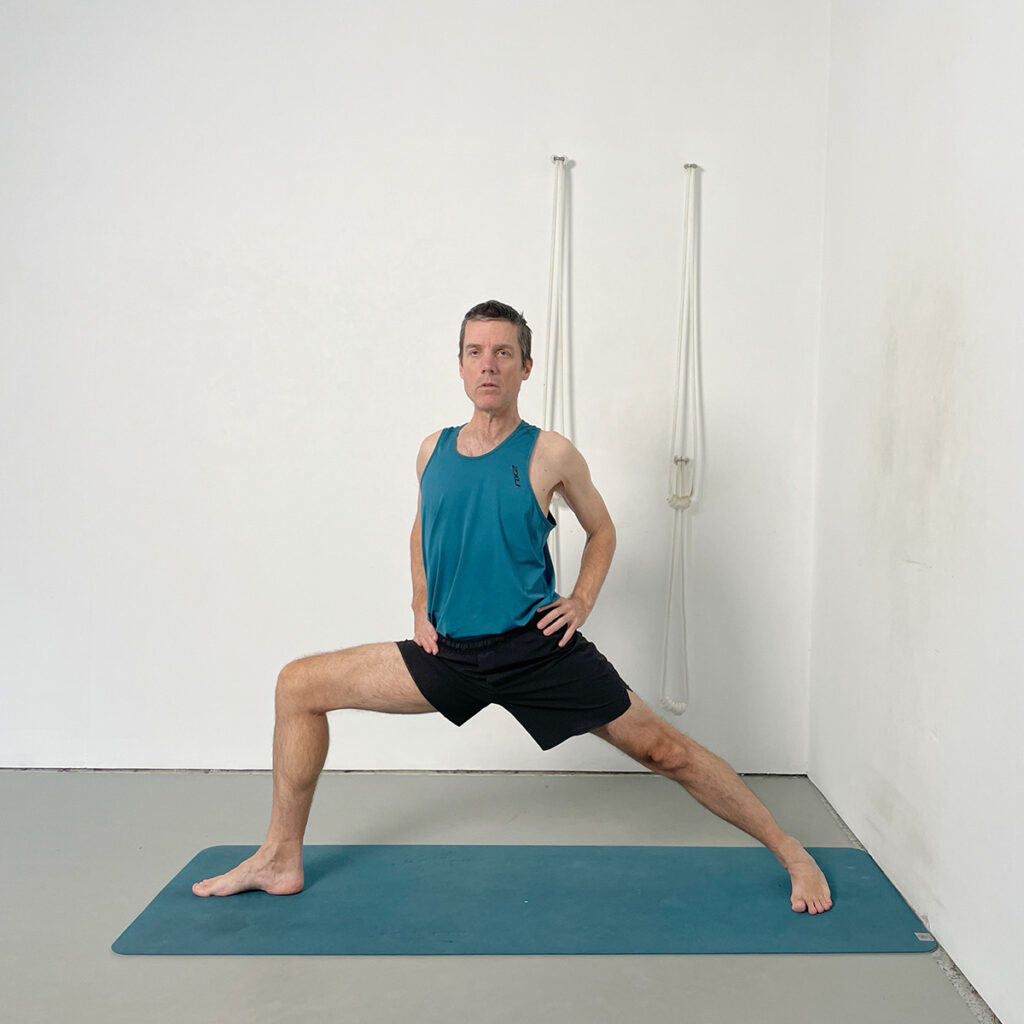
Pose 10: Parsvakonasana (Extended Side Angle Pose – Forearm Variation)
This introductory variation of Parsvakonasana uses the forearm on the thigh to support your body weight and allow improved access to the hip alignment. It’s an excellent entry point for building confidence in this dynamic standing pose when practicing yoga at home.
Key Instructions:
- From a wide stance, turn the front leg out, the back foot in slightly, and bend the front knee over the ankle.
- Place the forearm of the front arm on the thigh, just above the knee — close to the elbow.
- Keep the opposite hand on the hip to guide rotation of the chest upward.
- Avoid collapsing weight into the forearm — instead, gently press the forearm against the thigh to lift the chest.
- Sink the front hip socket lower without losing contact through the back heel.
- Turn the head to look up, and roll the top shoulder back to open the front body.
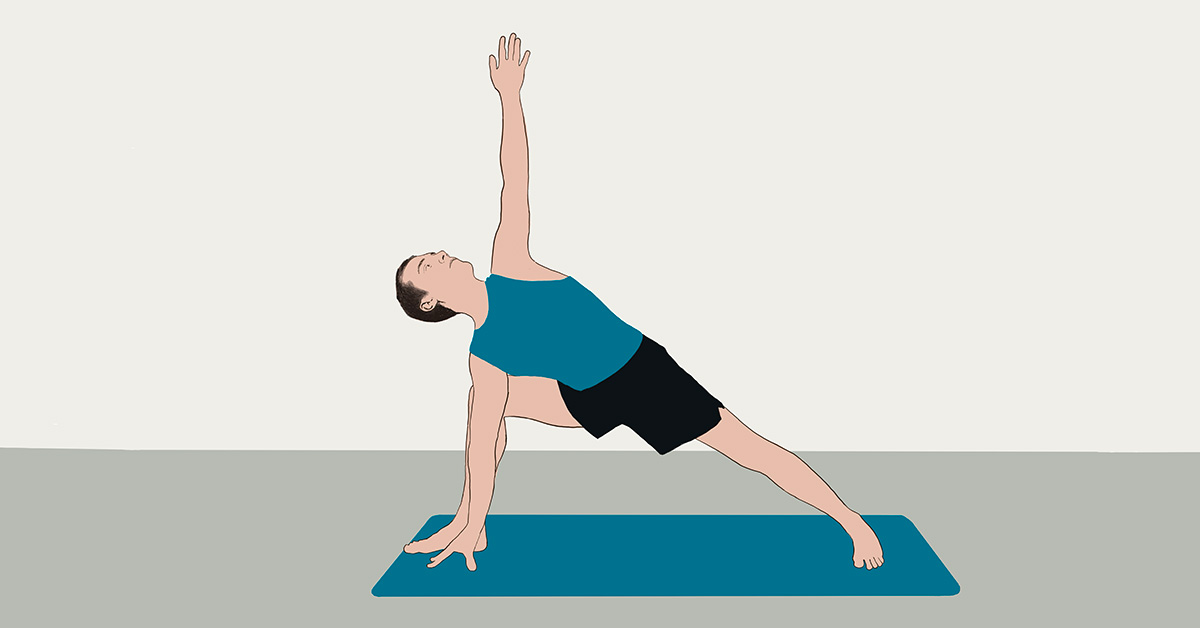
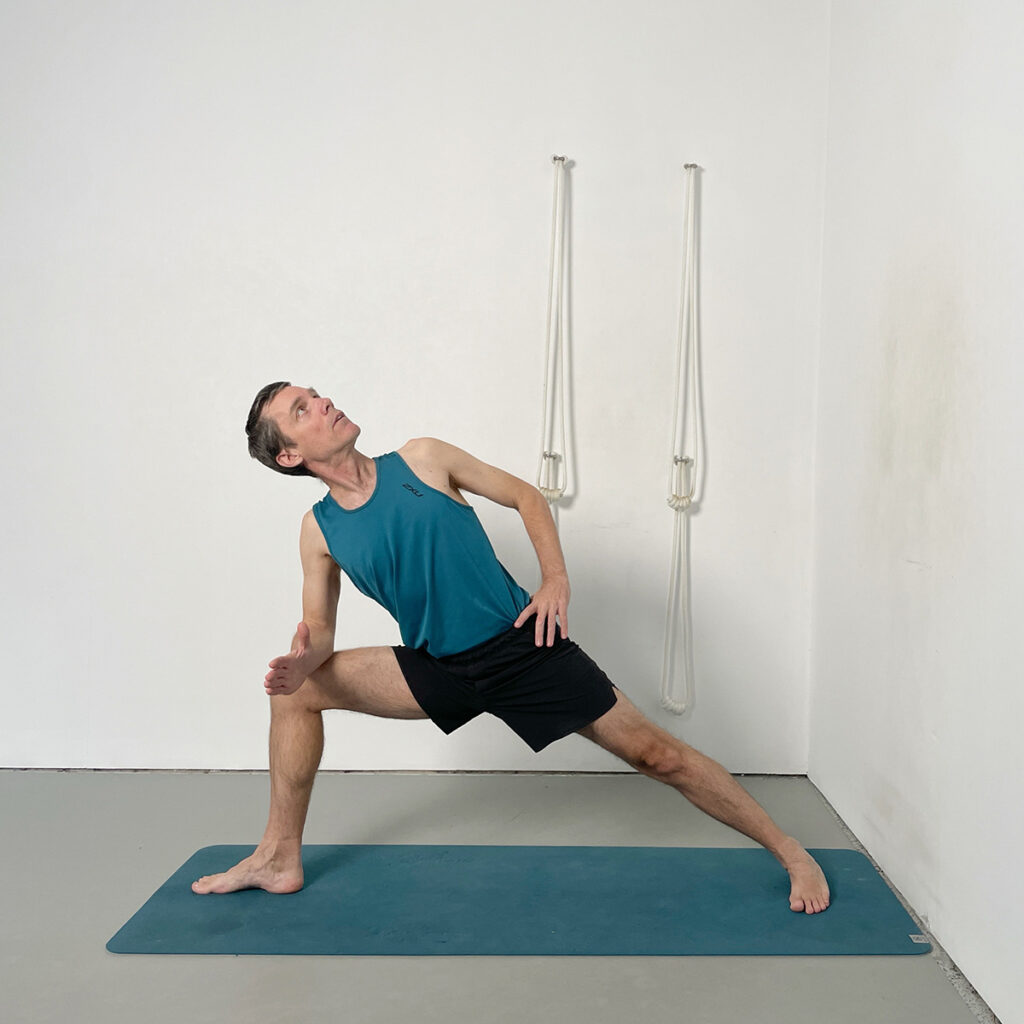
Pose 11: Parsvakonasana (Extended Side Angle Pose – Full Version)
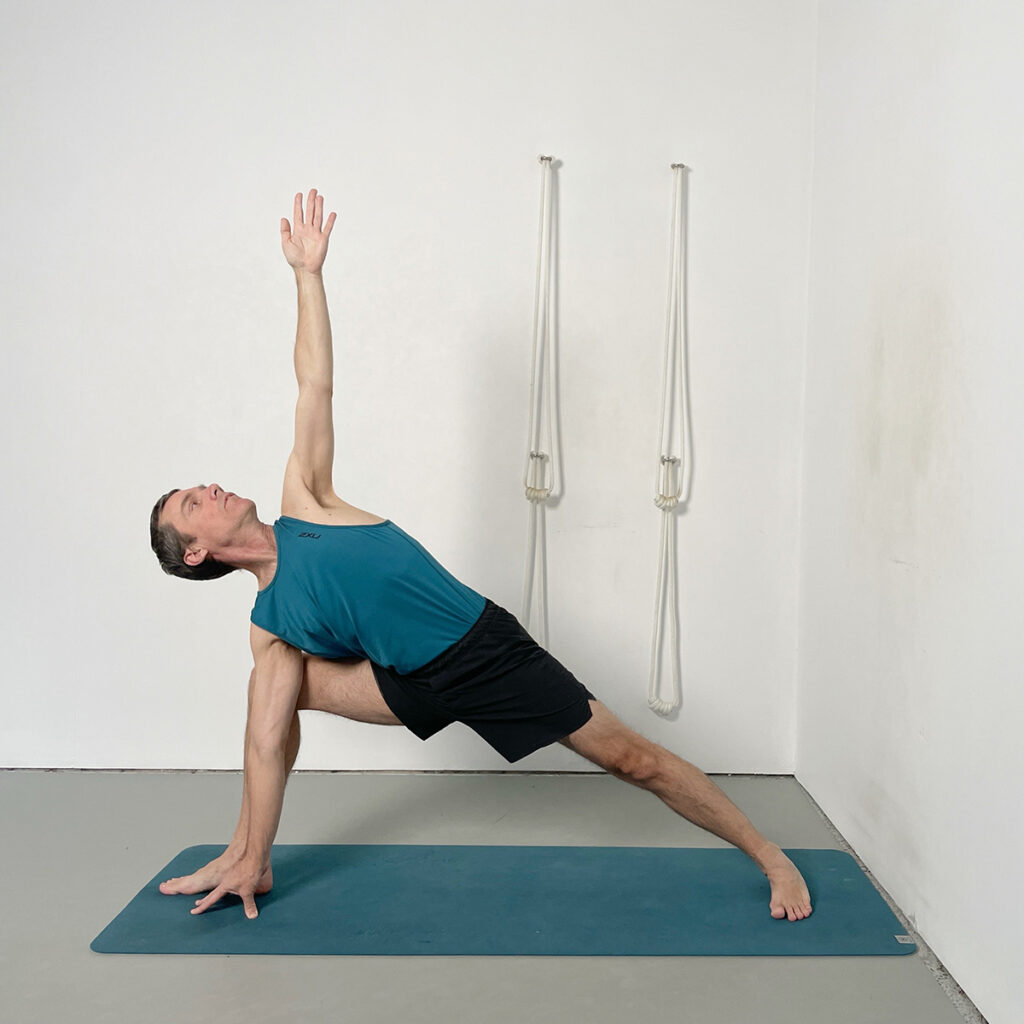
In this full version of Parsvakonasana, the front hand comes down to the floor beside the inner heel, while the top arm extends vertically. This deepens the lateral extension through the spine while developing strength in the legs and mobility in the hips and shoulders.
Key Instructions:
- Begin from the same wide-legged setup as before, with the front leg bent and the knee over the ankle.
- Place the front fingertips to the floor beside the inner heel, keeping the arm pressed gently against the knee for stability.
- Press the back heel firmly into the floor and keep the back thigh drawing back.
- Deepen the front hip socket forward and downward, resisting the tendency to collapse into the bottom side.
- Roll the top shoulder back and lift the top chest up away from the floor.
- Extend the top arm vertically, and turn the gaze upward toward the top hand.
Pose 12: Parsvottanasana (Pyramid Pose – Concave Spine Variation)
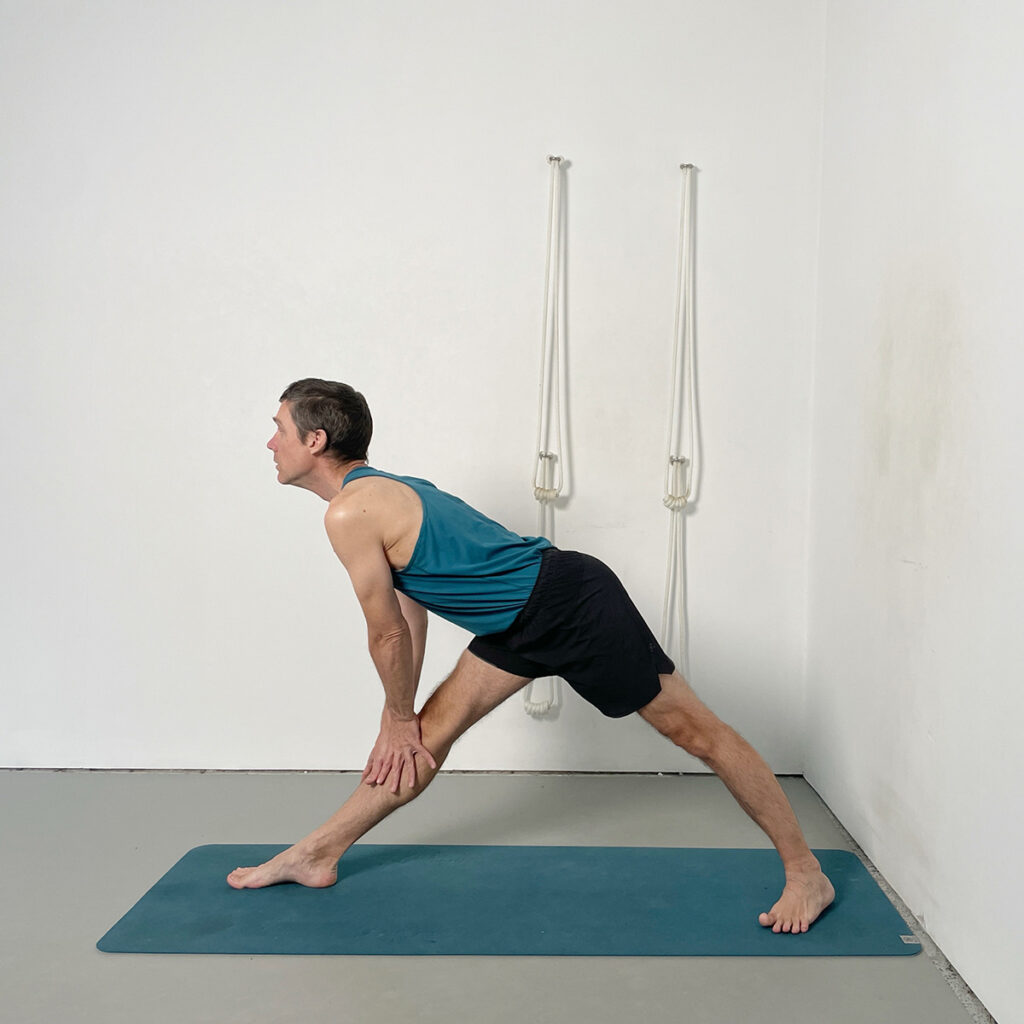
This concave spine variation of Parsvottanasana focuses on developing length through the spine and opening in the chest without requiring a deep forward bend. With the hands placed on the front leg, it teaches controlled extension, hip alignment, and balance – an ideal approach to this key standing pose for yoga at home practice if props aren’t available.
Key Instructions:
- From a wide stance, turn the back foot in and the front leg out.
- Keep the spine straight and the chest open as you begin to fold forward.
- Place the hands onto the front shin for support.
- Press the back heel firmly down and turn the inner groin of that leg back.
- Lengthen the sternum forward.
- Keep the head lifted and the back ribs moving in as the chest moves forwards.
Pose 13: Prasarita Padottanasana (Wide-Legged Forward Bend – Hands on Shins Variation)
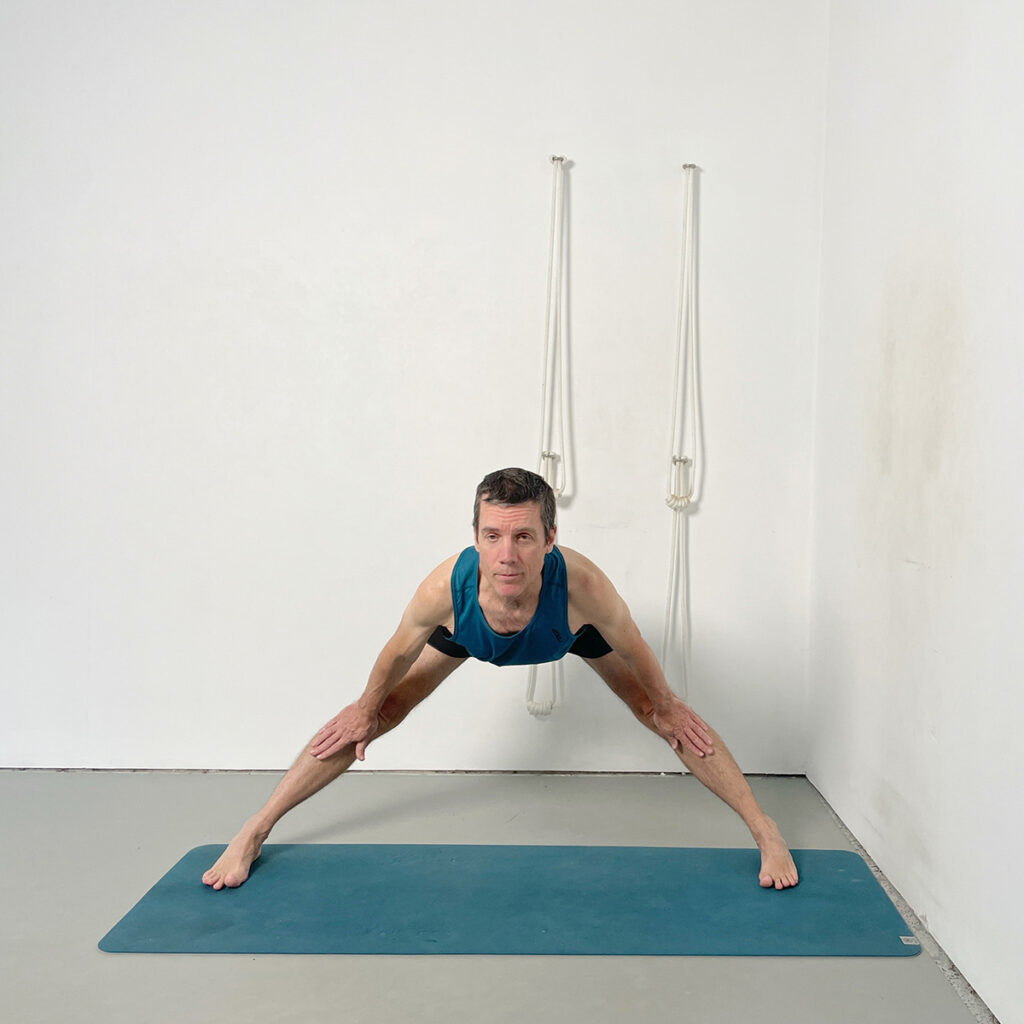
This variation of Prasarita Padottanasana is a supportive alternative to the classic version where the hands reach the floor. Placing the hands on the shins allows you to maintain length in the spine while still gaining the benefits of a wide-legged forward bend. It’s particularly helpful for improving hamstring flexibility and spinal extension without compromising alignment or balance.
Key Instructions:
- Step the feet wide apart and ensure they are parallel.
- Press the big toe bases and outer heels firmly into the floor.
- Bend forwards from the hips and place the hands onto the shins, just below the knees.
- Use the contact of the hands to shins to support and straighten your spine.
- Lengthen the chest forward.
- Keep the spine concave, lifting the head and moving the back ribs in.
Pose 14: Prasarita Padottanasana (Wide-Legged Forward Bend – Hands to Floor)
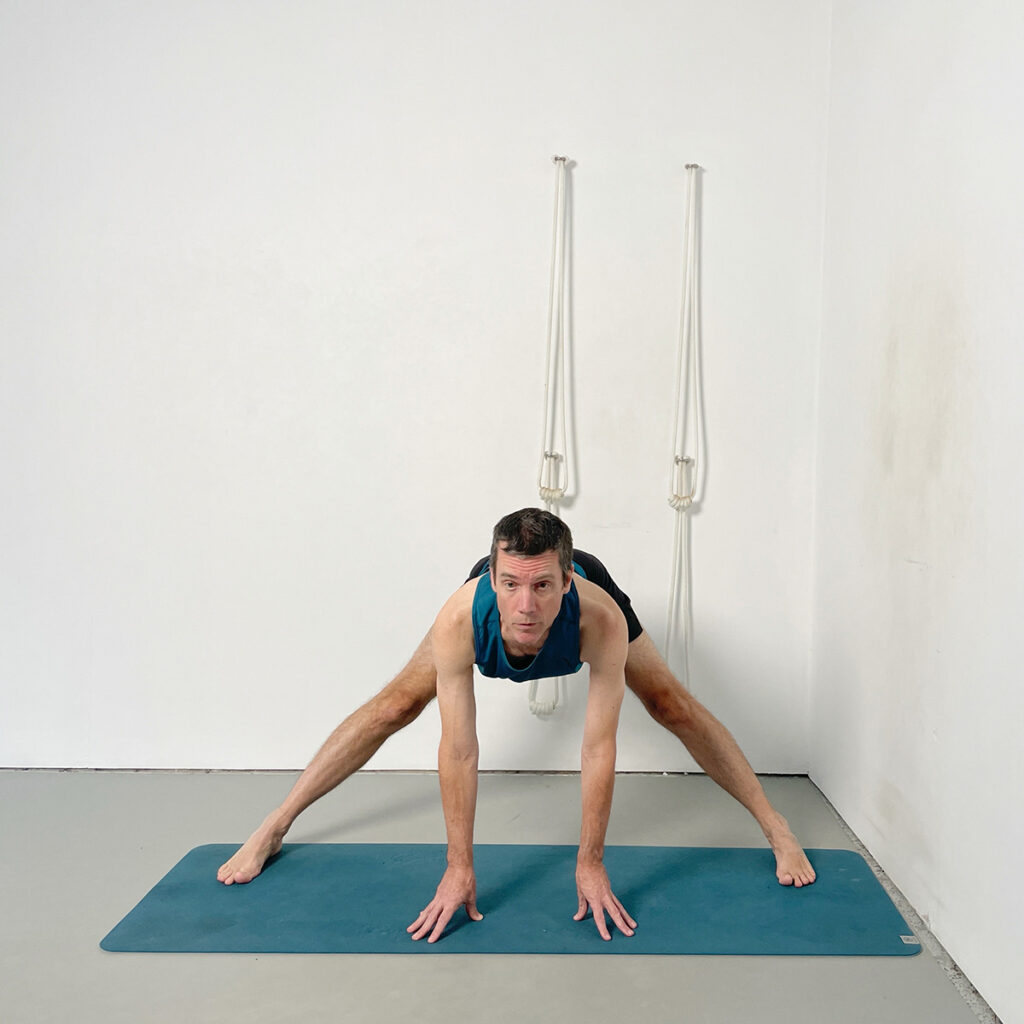
In this classic version of Prasarita Padottanasana, the hands are brought all the way to the floor, deepening the forward extension and increasing the intensity of the hamstring and inner thigh stretch. It builds on the previous variation while encouraging greater spinal length and grounded stability.
Key Instructions:
- Begin from the wide-legged stance, keeping feet parallel and big toe bases and heels pressing firmly down.
- Move from the previous stage with hands on the shins, and now place the fingertips to the floor directly under the shoulders.
- Press the soles of the feet firmly to the floor so the hands can remain light in their contact – do not collapse onto them.
- Draw the back ribs into the body and lift the sternum forward to maintain spinal extension.
- Use the action of the hands pressing into the floor as if dragging it back, to help the chest move further forward.
- If mobility is limited, remain with the earlier shin-support stage (Pose 13)
Pose 15: Parvatasana in Vajrasana (Mountain Pose Arms in Hero Pose)
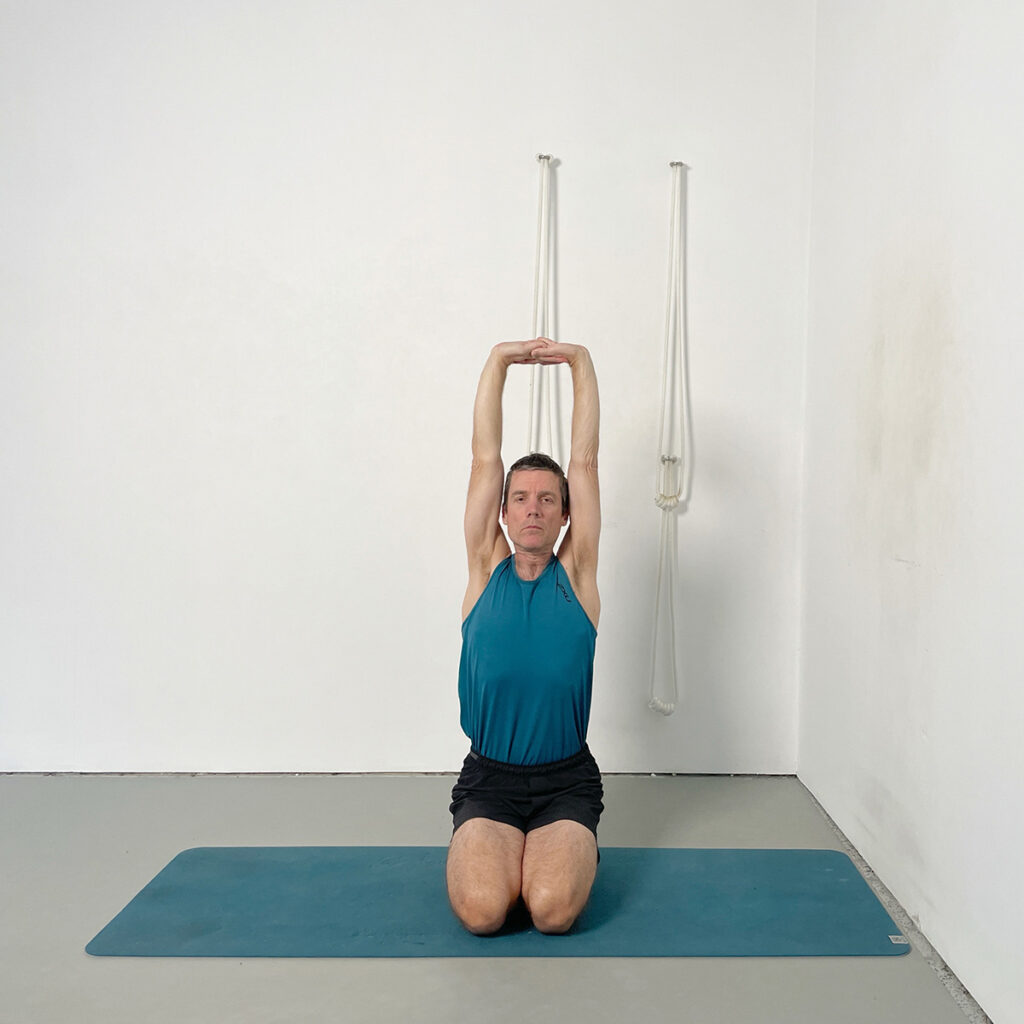
Parvatasana in Vajrasana combines the stability of a seated base with the dynamic lift of an overhead arm extension. This pose helps lengthen the spine, broaden the chest, and energise the upper body, offering a balanced counterpoint to the standing poses practiced earlier in the sequence.
Key Instructions:
- Sit in Vajrasana with the knees and feet together, pelvis resting on the heels.
- Interlock the fingers and first place the hands onto the crown of the head.
- Draw the elbows back and the shoulders down away from the ears.
- Straighten the arms overhead, lifting the wrists and elbows upwards.
- Raise the armpit chest, side ribs, and waist while keeping the tailbone moving in and down.
- Maintain the lift as you draw the elbows slightly back and move the upper chest forward.
Pose 16. Savasana (Corpse Pose)

Śavāsana is the final resting pose of this sequence, allowing the body and mind to absorb the effects of the practice. By releasing effort and turning awareness inwards, you create the conditions for deep relaxation and nervous system restoration. Attention is gently guided through the body — from the feet, to the hands, to the eyes — gradually dissolving tension and leaving you refreshed and balanced.
Key Instructions:
- Lie flat on your back with the legs extended and feet slightly apart, letting them roll outward naturally.
- Place the arms by your sides, palms facing up, with space between the arms and the body.
- Lengthen the back of the neck and release the shoulders down toward the floor.
- Let the facial muscles soften completely, releasing the jaw, tongue, and eyes.
- Maintain a smooth, even breath, letting the whole body rest quietly and evenly on the floor.
- Stay in the pose for several minutes, allowing the body to relax deeply and the mind to settle.
Start Your Iyengar Yoga Journey
Your membership gives you full access to every course and class on Yoga Selection — including the 30-Class Beginner Course and our library of 900+ classes.
Start Free TrialNo commitment. Cancel anytime.
Deepen Your Practice with the 30-Class Beginner Course – Included in Your Membership
This structured program is the perfect next step in your home yoga journey. Across 30 progressive classes, you’ll build a strong foundation in Iyengar Yoga — starting with standing poses and gradually exploring seated poses, twists, backbends, and restorative practices. Each class guides you step by step, giving you the clarity and structure to grow with confidence.
And because it’s included in your Yoga Selection membership, you’ll also gain unlimited access to our full library of 900+ classes and every other course we offer — all in one membership.
Explore More Beginner-Friendly Sequences
Continue building your home practice with these related articles:
10 Essential Iyengar Yoga Poses for Beginners
Yoga for Beginners – The Ultimate Online Course
Frequently Asked Questions
Can I practice Iyengar yoga at home without props?
Yes. This sequence is designed to be practiced using only a yoga mat, making it accessible for home practice. Clear alignment cues help you gain the benefits of Iyengar yoga without needing props.
Is this yoga at home class suitable for beginners?
Absolutely. The sequence introduces essential standing poses step by step. Each pose can be adapted for your level, so it is ideal if you are new to yoga or starting an Iyengar yoga journey.
How long does the Yoga at Home class take?
This complete sequence takes about 40 minutes. It balances strength, flexibility, and focus while being short enough to fit into your daily schedule.
Do I need to buy the 30-Class Beginner Course separately?
No. When you join Yoga Selection, you get unlimited access to the 30-Class Beginner Course and every other course and class in the library — all included in your membership.
What is the benefit of practicing yoga at home with online classes?
Practicing yoga at home gives you flexibility and consistency. With online Iyengar yoga classes, you get expert instruction, structured sequences, and the freedom to practice at your own pace.
About Rod Stennard
Rod Stennard – Founder of Yoga Selection
Rod Stennard is the founder of Yoga Selection, the first online yoga platform dedicated entirely to Iyengar Yoga. A certified Iyengar Yoga teacher since 2002, Rod has practiced yoga since 1992 and studied under senior teachers from around the world, including members of the Iyengar family in Pune, India.
Rod launched Yoga Selection in 2016 to bring structured, high-quality Iyengar Yoga training to a global audience. As a pioneer in the field of online yoga education, he is passionate about making this method accessible to all, through rigorous, inclusive, and thoughtfully designed classes. His work continues to support students of all levels in over 50 countries.
Learn more about Rod’s mission and teaching approach on our About Us page.