This tutorial-style class offers a clear, step-by-step guide to kicking up to the wall in preparation for Sirsasana (Headstand). Practised with the head off the floor, it lays safe foundations for inversion work and builds the strength and confidence needed for advanced poses like Pincha Mayurasana. You’ll begin with non-inverted upper-body strengthening, then isolate and integrate key leg actions before progressing from stepping up the wall to the full kicking action in manageable stages. Along the way, we address common challenges and offer refinements to help you avoid lower-back compression, improve shoulder engagement, and maintain clear alignment – a safe, structured pathway toward this milestone pose.
Table of Contents
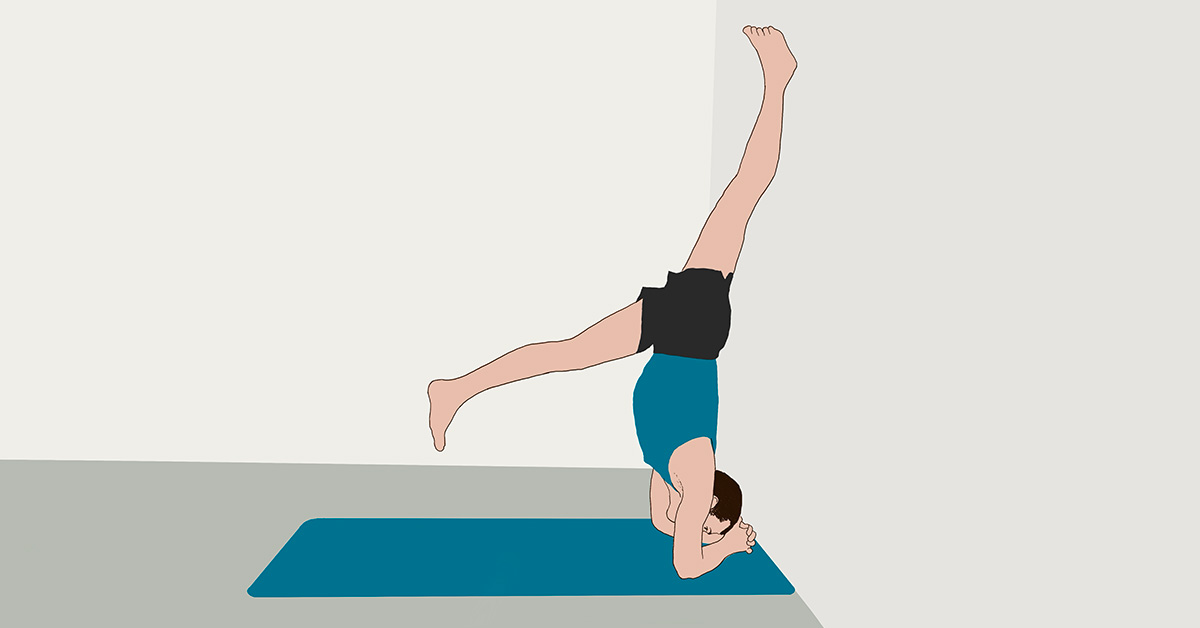
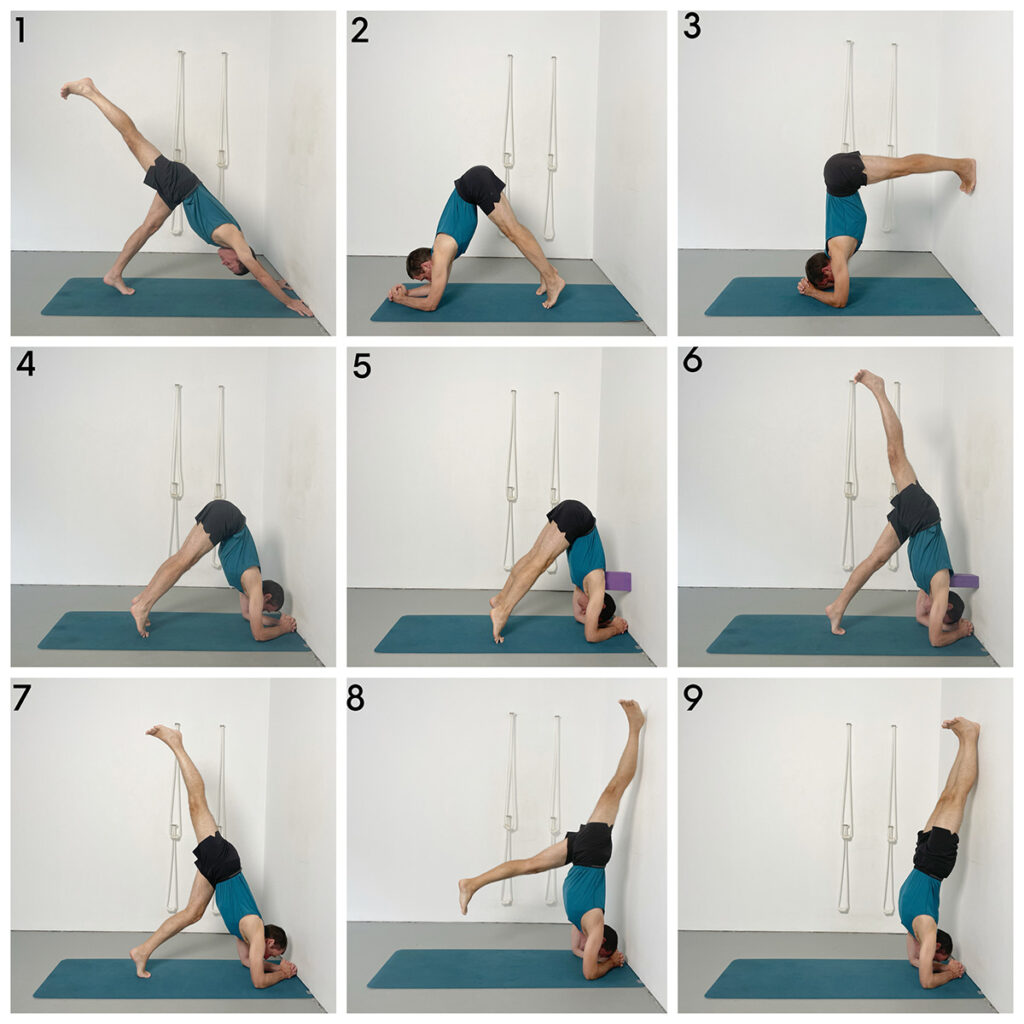
- Sequence Overview: 9 Stages to Kick Up to the Wall
- Stage 1 – Downward Facing Dog Pose at the Wall (One Leg Raised)
- Stage 2 – Headstand Preparation with Feet to the Floor
- Stage 3 – Headstand Preparation with Feet to the Wall
- Stage 4 – Headstand Preparation with Knuckles to the Wall
- Stage 5 – Headstand Preparation with Block in the Back
- Stage 6 – Leg Raises with Block Support
- Stage 7 – First Hopping Action (Head Off Floor)
- Stage 8 – Kick Up: Heel to Wall, Then Both Feet
- Stage 9 – Staying Up: Alignment, Refinement and Lift
- Headstand Preparation: FAQs
Free Class: Headstand Preparation – Kick Up to the Wall
Learn Headstand Preparation Step-by-Step with Yoga Selection
Get full access to every course and class — including Headstand, Shoulderstand, Handstand, Forearm Balance, the 30-Class Beginner Course, and our library of 900+ classes.
Start Free TrialNo commitment. Cancel anytime.
Sequence Overview: 9 Stages to Kick Up to the Wall
This overview shows the progression of the sequence. Follow the step-by-step stages below.
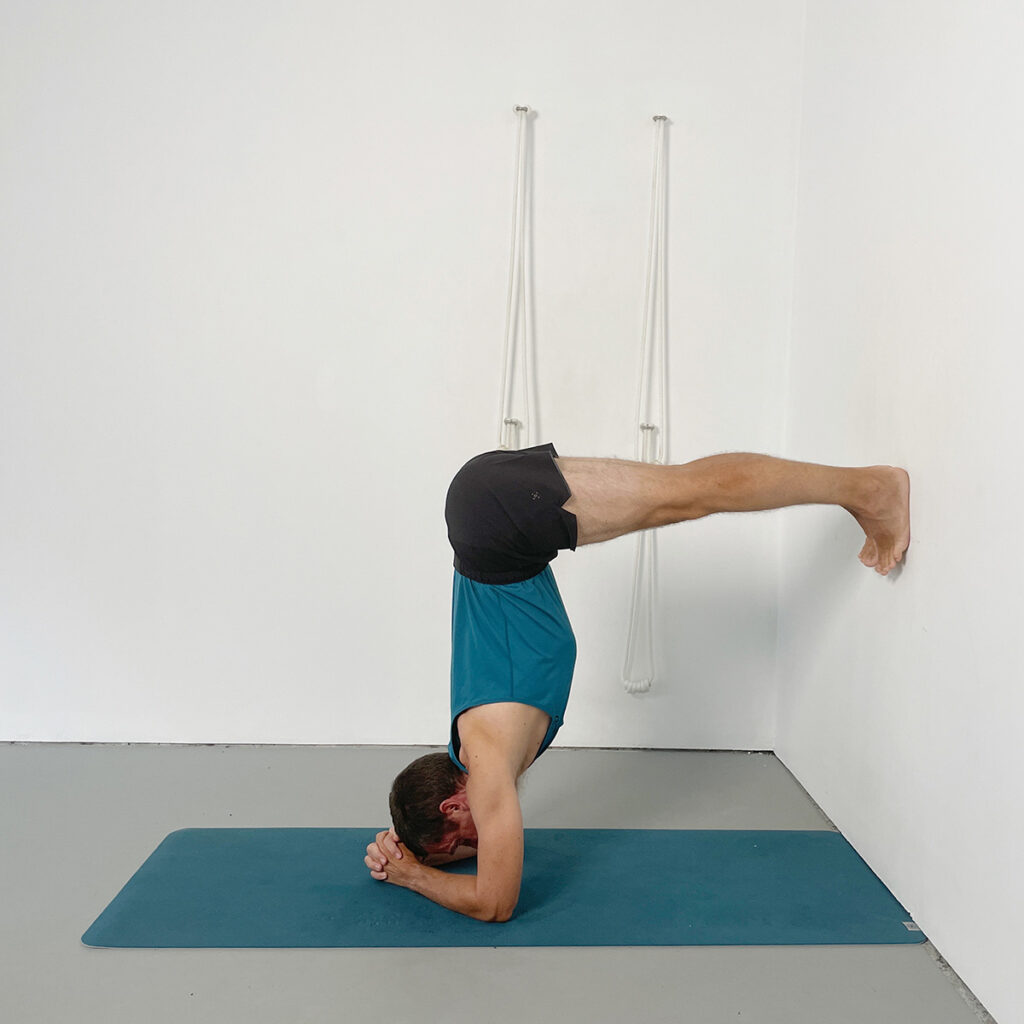
Stage 1 – Downward Facing Dog Pose at the Wall (One Leg Raised)
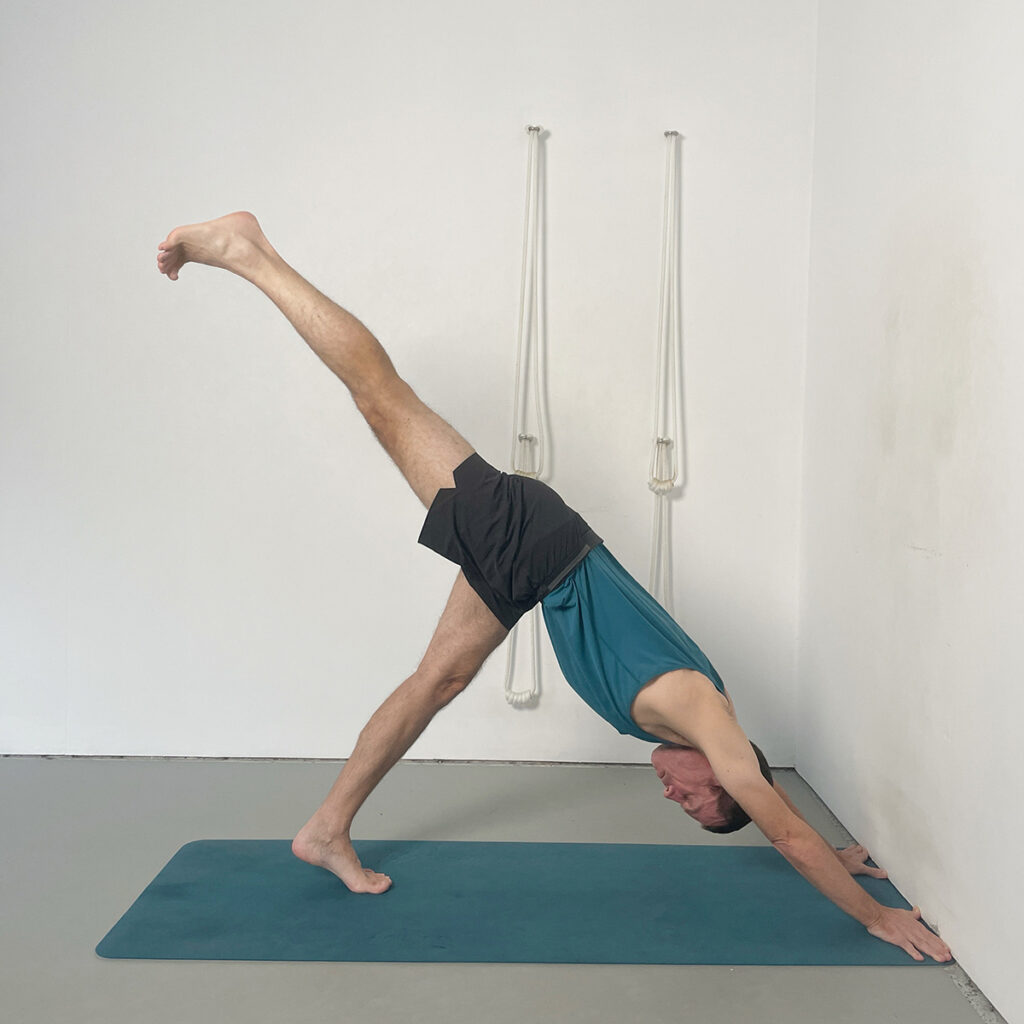
This initial pose helps prepare the body for the headstand preparation sequence that follows. It develops awareness of hip placement and balance in space – an essential foundation for learning to kick up to the wall. The pose also introduces the key action of keeping the leading leg straight and active, with the heel pointing directly upwards, establishing the alignment and strength required for the later inversion work.
Instructions
- Place your hands shoulder-width apart with the thumbs and index fingers touching the wall.
- Press back into Downward Facing Dog Pose, lifting the hips up and back.
- Bring the feet together so the big toes and inner heels touch.
- Without dropping the left hip, raise the right leg up.
- Keep the right knee completely straight and the right heel pointing directly to the ceiling.
- Keep the right buttock firm as you lift the leg higher.
- Maintain even pressure of both thumbs into the wall and keep the hips level.
- Lower the right leg and repeat on the left side
Stage 2 – Headstand Preparation with Feet to the Floor
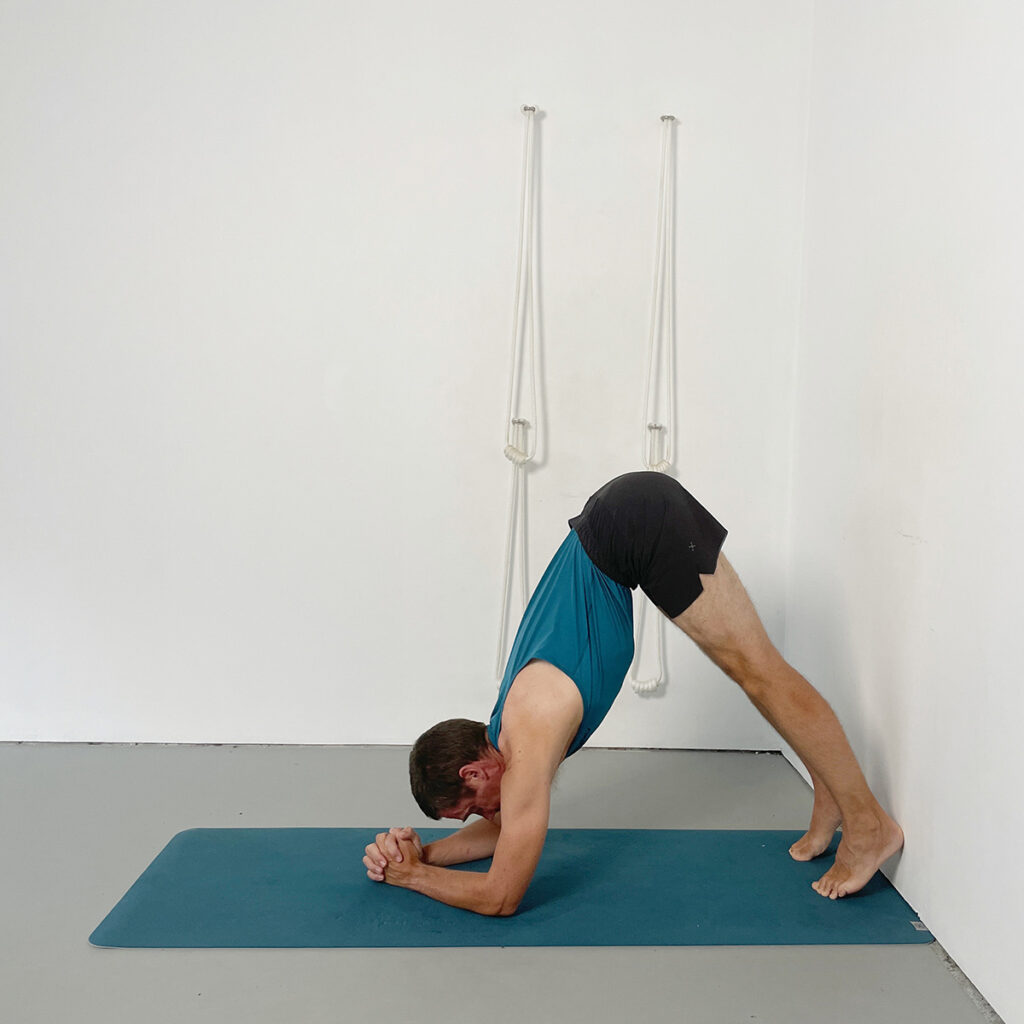
In this variation, the head remains off the floor, allowing you to build the strength and technique needed for inversion work without placing any load on the neck. It gives you the opportunity to learn essential actions for supporting your body weight safely with the arms and shoulders. By focusing on lifting through the shoulders rather than collapsing into them, you establish the foundation of strength and alignment required for the later stages of headstand preparation.
Instructions
- Interlock your fingers and place your forearms on the mat, with the elbows shoulder-width apart.
- Keep the knees on the floor and press the outer wrists down—the section of the wrist near the heel of the hand—and feel how this lifts the shoulders up and back.
- Straighten the legs and raise the hips, maintaining that lift through the shoulders as the forearms stay grounded.
- Hold briefly to establish the feeling of shoulder support, then step the feet back and rest.
- Repeat with the opposite interlock of the fingers, again emphasising pressing through the outer wrists to keep the shoulders lifting.
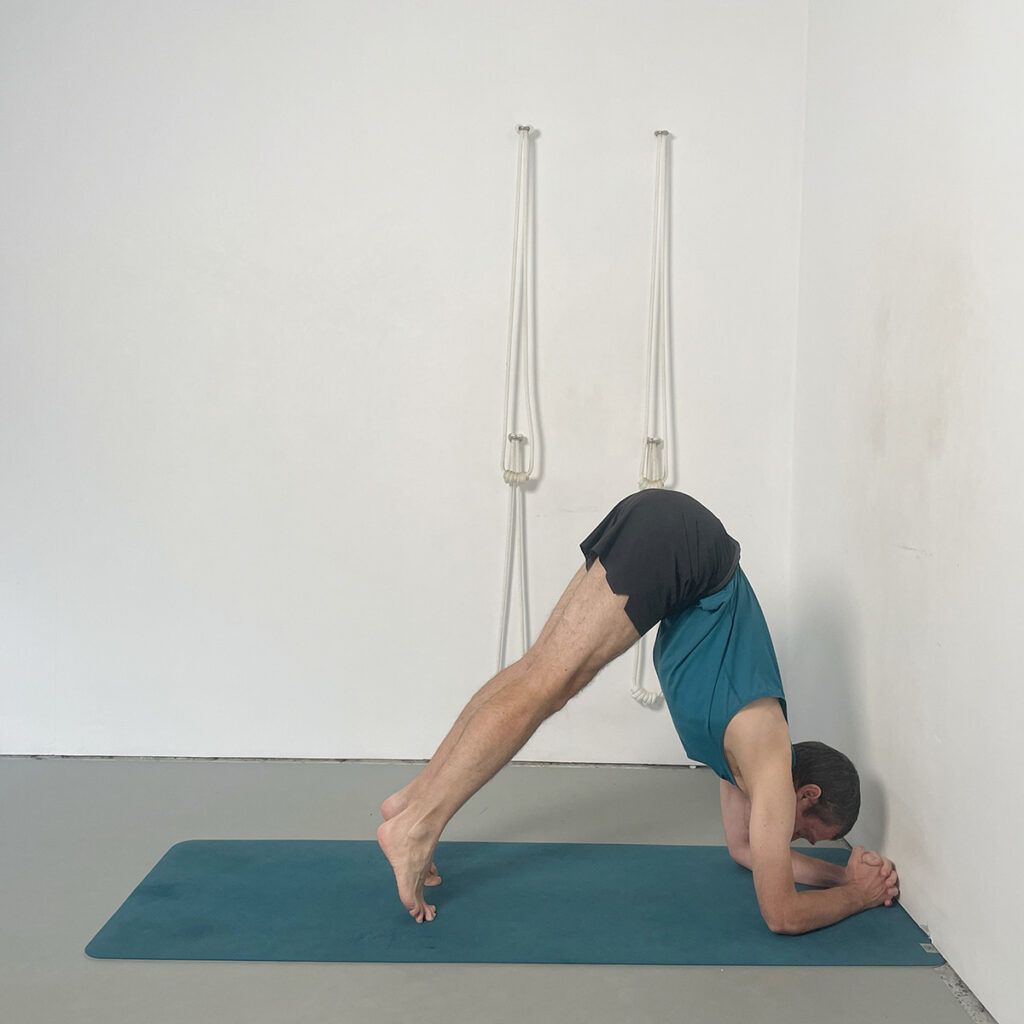
Stage 3 – Headstand Preparation with Feet to the Wall
This pose begins to bridge the gap between the floor-based preparatory work and the inversion itself. With the head still off the floor, you start to experience being partially upside down while maintaining full protection for the neck. Placing the feet on the wall helps you gauge distance, orientation, and shoulder lift, all while strengthening the upper body. It’s an important stage for becoming familiar with spatial awareness in preparation for kicking up later.
Instructions
- Sit on the floor with your legs straight and heels touching the wall.
- Mark the spot where your hips are – this gives you a leg-length distance from the wall.
- Turn around, placing your elbows at that mark with your forearms on the floor, fingers interlocked.
- Keep the outer wrists pressing down and the head off the floor.
- Straighten the legs and lift the hips, keeping the heels in contact with the wall.
- Press the forearms firmly into the mat and lift through the shoulders, maintaining even pressure.
- Step both feet up the wall so the ankles are at hip height.
- Press the heels into the wall and lift the back of the pelvis upwards.
- Maintain the lift through the shoulders and spine for several breaths before releasing down.
Stage 4 – Headstand Preparation with Knuckles to the Wall
This stage reintroduces the forearm setup facing the wall to prepare you for the action of kicking up into the full inversion. The aim is to bring the pelvis closer to the wall while simultaneously drawing the back ribs away from the wall. This dual action helps strengthen the shoulders and upper back while teaching how to position the pelvis correctly – a key element for achieving lightness when kicking up later.
Instructions
- Interlock the fingers and place the knuckles lightly touching the wall, with the elbows shoulder-width apart.
- Keep the head off the floor and the outer wrists pressing down to maintain lift through the shoulders.
- Straighten the legs and come up onto the toes, walking the feet in closer toward the elbows.
- As you walk in, press the forearms down and draw the back ribs away from the wall.
- At the same time, bring the pelvis towards the wall, lifting it higher without letting the shoulders drop.
- Maintain the shoulders lifting and back ribs moving away from the wall as the pelvis moves in.
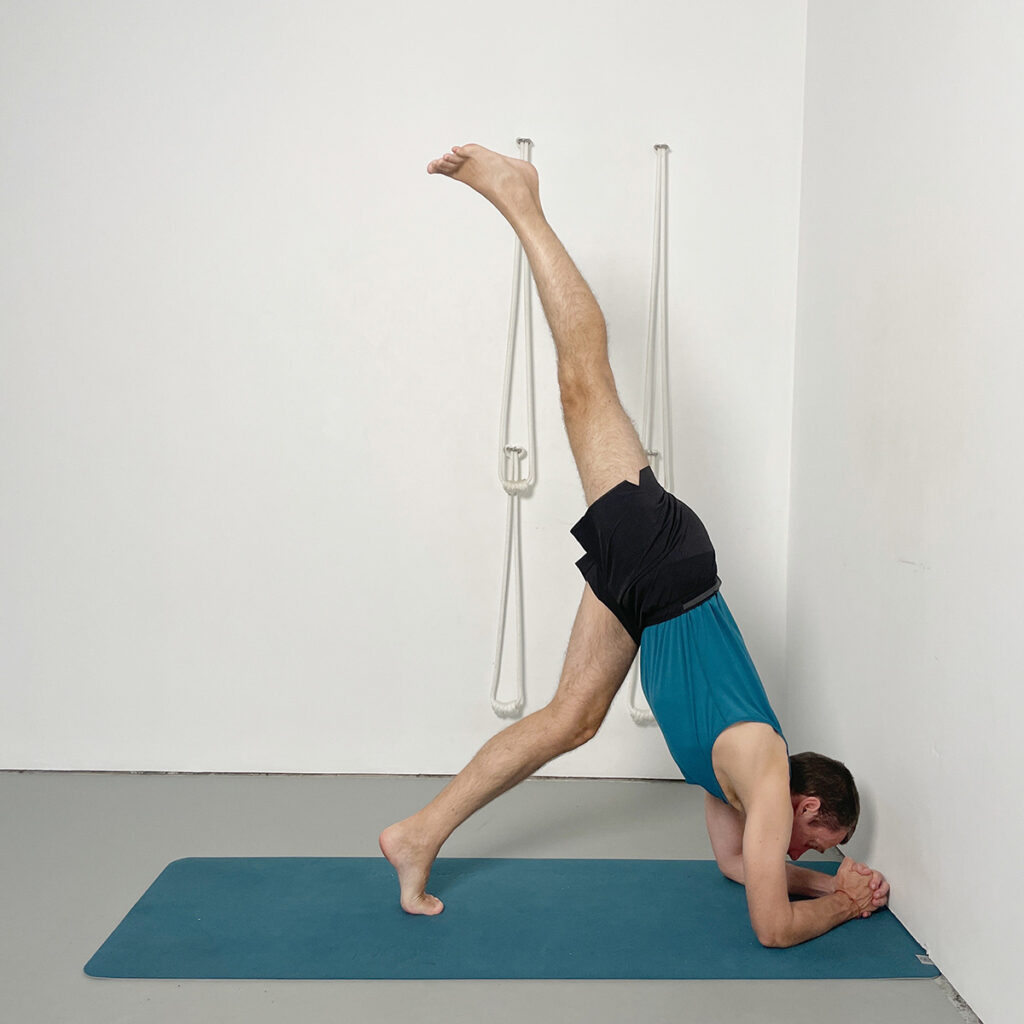
Stage 5 – Headstand preparation with Block in the Back
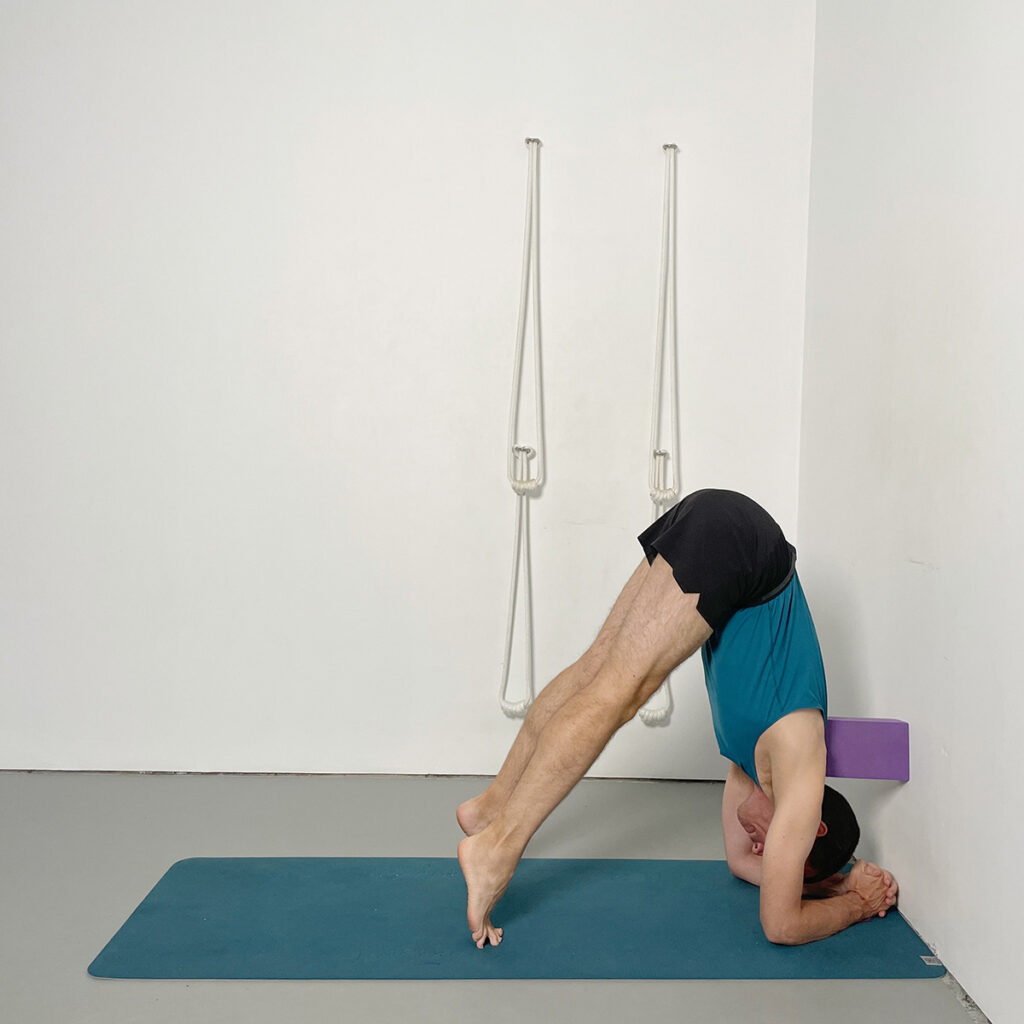
The next couple variations introduce the yoga block as a support for the upper back, helping you strengthen and stabilise the shoulder region while maintaining lift through the spine. The head remains off the floor, so you can continue developing the essential upper-body strength for inversions without any strain on the neck. The block reinforces the action of the shoulders lifting and supports correct positioning of the upper back, a key element in safe headstand preparation.
Instructions
- Measure your starting distance by placing the elbows about one block-length away from the wall.
- Hold the block with your fingertips and thumb tips, keeping it lightly pressed to the wall.
- Straighten the legs and lift the hips, so the upper back contacts the edge of the block—it should touch just above the base of the neck.
- Once the block is securely held by your back, slide the hands down to interlock the fingers on the floor.
- Press the outer wrists down to lift through the shoulders and chest.
- Walk the feet closer to the wall, lifting the pelvis higher.
Stage 6 – Leg Raises with Block Support
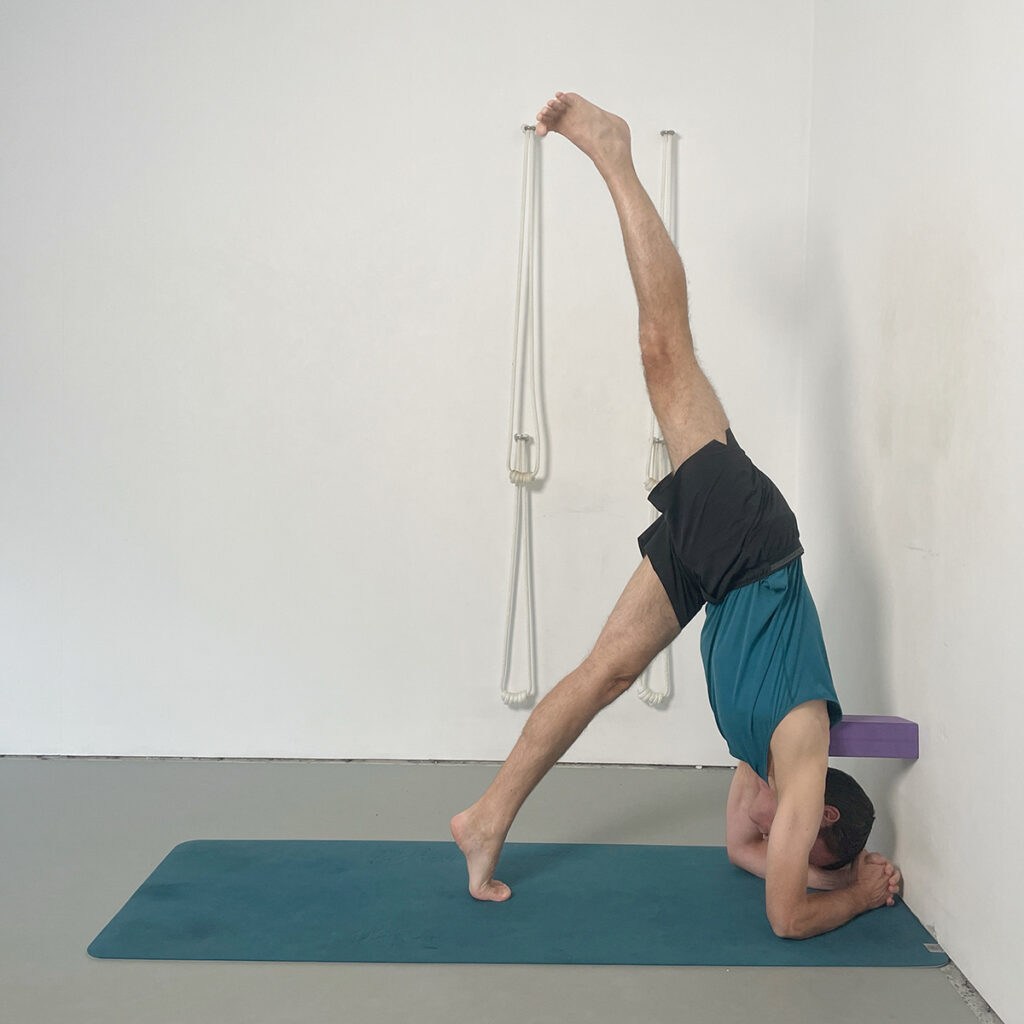
This pose continues directly from the previous stage, keeping the block positioned in the upper back. With the head off the floor, you begin raising one leg at a time to in preparation for the kicking action that will follow. The focus is on making the leading leg as straight and as long as possible, cultivating the lightness that will later help you kick up smoothly to the wall. The block provides reinforcement to keep the shoulders lifting and the upper back supported.
Instructions
- Keep the block held in place at the upper back.
- Press the outer wrists down to maintain lift through the shoulders.
- Straighten the legs and lift the pelvis up, keeping the head off the floor.
- Bring the feet together, then raise the right leg up with the knee completely straight and the heel pointing directly upwards.
- Hold briefly, feeling the length and lightness in the raised leg, then lower it slowly.
- Repeat by lifting the left leg, again keeping the leg long and active from the buttock through to the heel.
- Throughout, maintain pressure through the forearms and keep the shoulders lifting.
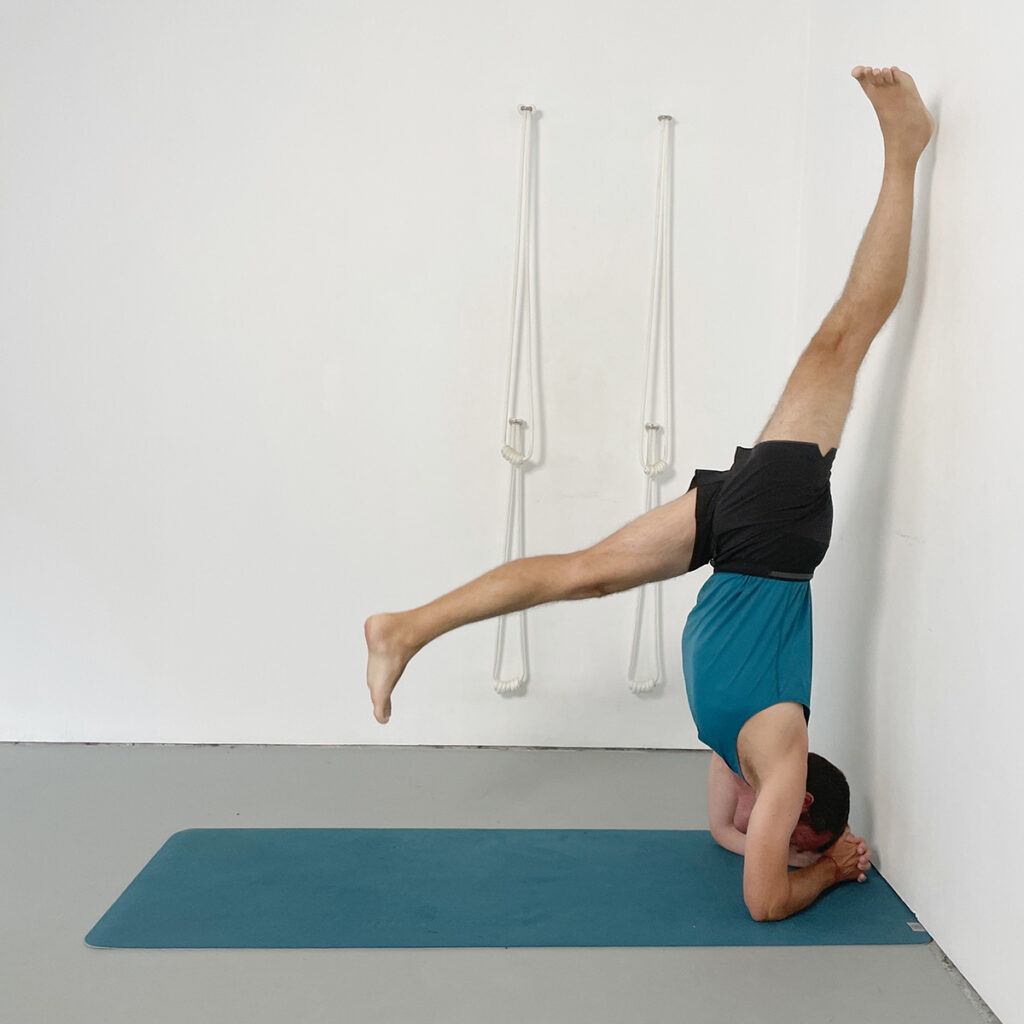
Stage 7 – First Hopping Action (Head Off Floor)
This stage introduces the coordinated hop without going all the way up to the wall. The aim is to learn the timing and kick upward (not toward the wall), keeping the leading leg straight with the heel pointing directly up, and to kick off and land with the same foot.
Instructions
- Set up with fingers interlocked and knuckles lightly touching the wall, head off the floor; elbows shoulder-width; outer wrists pressing down to keep the shoulders lifting.
- Walk the feet in and lift the hips without the shoulders dropping.
- Choose your preferred leading leg and raise it with the knee straight; heel pointing directly up.
- Use the other foot with a hopping action to lightly kick off and land with the same foot.
- At this stage focus more on kicking upwards to the ceiling rather than to the wall.
- Take five progressive hops: start low, then slightly higher each time; aim to eventually touch the wall with the heel.
Stage 8 – Kick Up: Heel to Wall, Then Both Feet
Building on the hop, you now touch the wall with the heel and then progress to lifting the second leg so both feet meet the wall – still with the head off the floor.
Instructions
- Return to the same forearm setup at the wall; shoulders lifting from outer wrist pressure; head off the floor.
- Walk in lifting the pelvis upwards and towards the wall.
- Lead with your preferred leg: knee fully straight, heel pointing directly up.
- Kick up to touch the wall with the heel; if steady, lift the second leg so both feet meet the wall.
- Keep the action controlled – avoid throwing the second leg too early; allow a small pause so the pelvis is already moving towards the wall before it follows.
- At the moment of kick-off, transfer weight from the kicking foot to the outer wrists.
- Keep the knee of the leading leg straight and make a big arc with the heel upwards to generate momentum.
Stage 9 – Staying Up: Alignment, Refinement and Lift
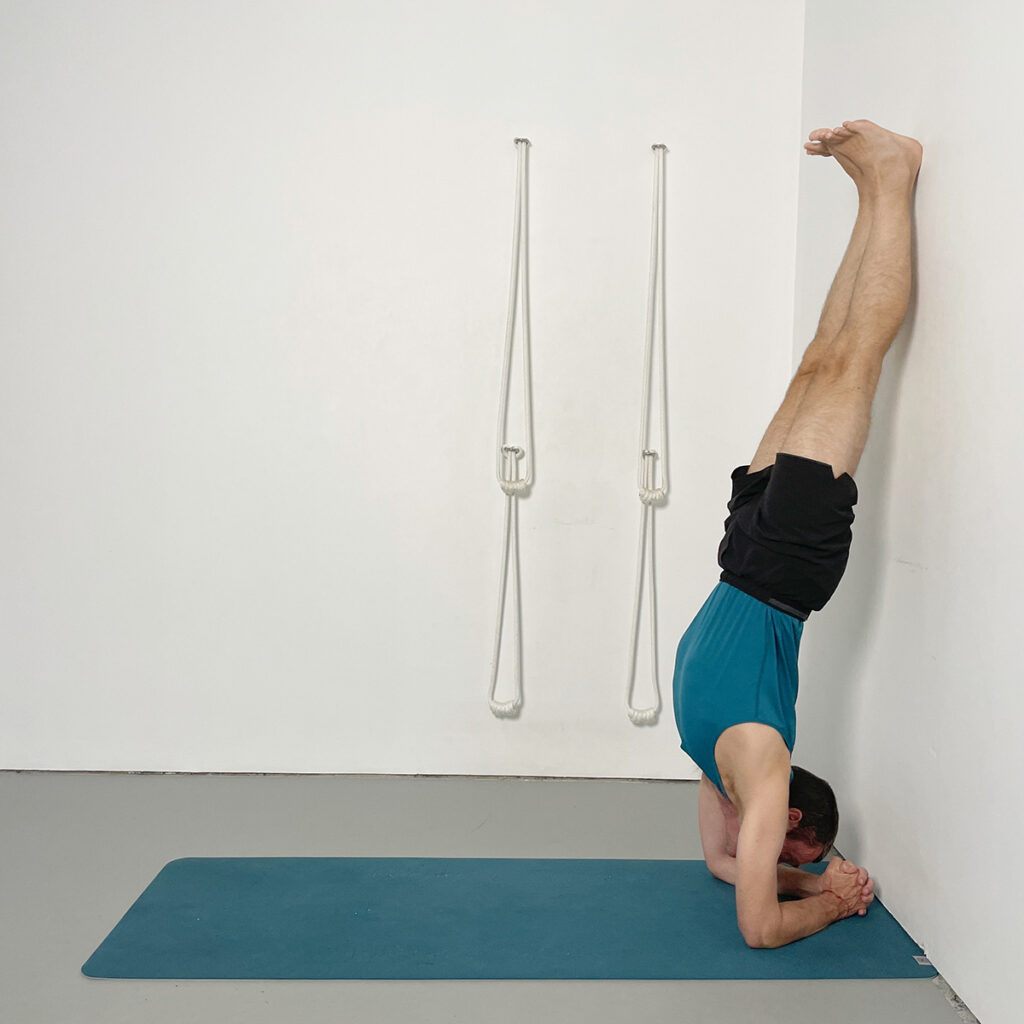
Now you kick up and remain in the full inversion with both feet on the wall and head off the floor. The focus is to protect the lower back by maintaining lift through the shoulders and the back of the pelvis, using the legs actively.
Instructions
- Kick up to both feet on the wall.
- Press the outer wrists down to lift the shoulders; build that lift through the front ribs to the back of the pelvis.
- Keep the lower back comfortable by lifting the back of the pelvis (avoid the legs hanging).
- Use the legs: grip the kneecaps, draw the tailbone in and up, and lift through the four corners of the feet.
- To avoid toppling to one side press both forearms evenly down as you kick off.
- If needed, practice in a room corner for containment.
- Once confident, alternate the finger interlock and practice leading with the opposite leg
Next Steps:
How to do Sirsasana (headstand) Step-By-Step Guide
Headstand Preparation: FAQs
Is this headstand preparation safe for my neck?
Yes. The head stays off the floor throughout. You first build arm and shoulder strength, so there is no neck loading or strain.
What props do I need?
A wall and one foam or cork block. (A wooden block can be used with extra care.) Clear space to either side of your mat.
Which leg should lead when I kick?
Start with your preferred leg. Keep the knee completely straight and the heel pointing directly up. Later, practise with the other leg for balance.
I drift to one side when I kick up—how can I fix this?
Check for even outer-wrist pressure at kick-off. If needed, practise in the corner of a room for gentle containment.
How long should I stay up when both feet reach the wall?
Hold briefly—around up to 10 breaths—with the head off the floor. Keep the shoulders lifting and the back of the pelvis lifting to protect the lower back.
When should I move on to classical headstand (Sirsasana)?
When you can kick up with control, maintain shoulder lift, and stay briefly with comfort. Then progress to classical Sirsasana with the head supported.
Learn Headstand Preparation Step-by-Step with Yoga Selection
Get full access to every course and class — including Headstand, Shoulderstand, Handstand, Forearm Balance, the 30-Class Beginner Course, and our library of 900+ classes.
Start Free TrialNo commitment. Cancel anytime.
Share This Article:
Final Thoughts
This head-off-the-floor preparation provides a safe, step-by-step pathway to learning how to kick up into headstand. Practise regularly, consolidate each stage, and when this sequence feels steady, continue with our Sirsasana (Headstand) step-by-step guide for the full pose.
Rod Stennard – Founder of Yoga Selection
Rod Stennard is the founder of Yoga Selection, the first online yoga platform dedicated entirely to Iyengar Yoga. A certified Iyengar Yoga teacher since 2002, Rod has practiced yoga since 1992 and studied under senior teachers from around the world, including members of the Iyengar family in Pune, India.
Rod launched Yoga Selection in 2016 to bring structured, high-quality Iyengar Yoga training to a global audience. As a pioneer in the field of online yoga education, he is passionate about making this method accessible to all, through rigorous, inclusive, and thoughtfully designed classes. His work continues to support students of all levels in over 50 countries.