Tight hamstrings are one of the most common challenges faced by yoga practitioners—particularly in forward bends and poses that require coordinated action between the legs, pelvis, and spine. In Iyengar Yoga, this issue is addressed methodically, using props and sequencing to safely improve flexibility while maintaining spinal integrity. Hamstring tightness can limit access to key asanas, contribute to postural imbalances, and increase strain in the lower back. However, with careful practice and intelligent use of support, it is possible to create meaningful and lasting change.
In this article, we’ll explore the impact of tight hamstrings, the benefits of improving mobility in this muscle group, and a step-by-step breakdown of yoga poses specifically designed to lengthen the hamstrings. This approach blends anatomical insight with practical guidance and includes a free 60-minute Yoga for Tight Hamstrings instructional class that you can follow along with at home.
Table of Contents
- What Are the Hamstrings?
- Why Are Hamstrings Often Tight?
- The Benefits of Flexible Hamstrings
- Free Class: Yoga for Tight Hamstrings (60 Minutes)
- Pose-by-Pose: Key Techniques from the Class
- 1. Adho Mukha Virasana
- 2. Uttanasana with Blocks
- 3. Uttanasana with a Belt
- 4. Utthita Hasta Padangusthasana I
- 5. Utthita Hasta Padangusthasana II
- 6. Upright Baddha Konasana
- 7–8. Janu Sirsasana: Upright & Forward
- 9–10. Trianga Mukhaikapada Paschimottanasana
- 11–12. Dandasana and Paschimottanasana
- 13–14. Upavistha Konasana
- 15. Chair Malasana
- 16. Supported Savasana
- Conclusion
What Are the Hamstrings?
The hamstrings are a group of three muscles located at the back of the thigh: the biceps femoris, semitendinosus, and semimembranosus. They span from the sit bones (ischial tuberosities) at the base of the pelvis to the bones of the lower leg (tibia and fibula). Functionally, they are responsible for bending the knee and extending the hip—essential movements in walking, running, and many yoga poses.
Why Are Hamstrings Often Tight?
Tight hamstrings can arise from a combination of lifestyle factors and biomechanical tendencies. Common reasons include:
- Sedentary habits: Sitting for long periods keeps the hamstrings in a shortened position, leading to tightness over time.
- Athletic activities: Sports like running, cycling, and weightlifting heavily recruit the hamstrings without always balancing their flexibility.
- Genetic predisposition: Some individuals naturally have less flexibility in the posterior chain of the body.
- Postural imbalances: Weakness or tightness in surrounding muscle groups, such as the hip flexors and glutes, can increase tension in the hamstrings.
- Injury or scar tissue: Previous strains or injuries can cause localised shortening and thickening of the hamstrings, limiting range of motion.
Understanding the root causes can help tailor a practice that not only stretches the hamstrings but addresses underlying structural issues.
In yoga, the flexibility of the hamstrings plays a critical role not only in forward bends but also in maintaining correct posture in standing poses, seated poses, and inversions. Tightness in these muscles can restrict pelvic movement, compromise spinal alignment, and create compensatory patterns elsewhere in the body.
The Benefits of Flexible Hamstrings
Improving hamstring flexibility is not just about touching your toes. The benefits extend to:
- Protecting the lower back: Flexible hamstrings allow the pelvis to tilt forward more easily during forward bends, reducing strain on the lumbar spine.
- Enhancing posture: Balanced hamstring length supports better alignment of the spine and pelvis in standing and seated positions.
- Improving performance: Whether in yoga or other activities, greater hamstring flexibility enhances ease of movement and reduces the risk of injury.
- Reducing compensation patterns: When the hamstrings are overly tight, other muscles, such as the lower back or calves, often compensate. Flexibility helps restore natural, efficient movement patterns.
In the Iyengar Yoga approach, developing flexibility is always integrated with cultivating strength and alignment, ensuring that gains in range of motion support rather than destabilise the body.
Free Class: Yoga for Tight Hamstrings (60 Minutes)
You can follow the entire sequence at home with a few simple props: yoga blocks, a belt, a bolster or folded blankets, and a chair.
To accompany this article, we’ve provided a free 60-minute Iyengar Yoga for Tight Hamstrings class focused specifically on improving hamstring flexibility in a safe and structured way.
This class is designed for all levels, offering clear, progressive instructions that:
- Use props to safely access deeper hamstring stretches without risking lower back strain.
- Build awareness of the connection between the legs, pelvis, and spine.
- Show how upright versions of classic forward bends can serve as stepping stones to deeper forward extensions.
- Integrate strengthening actions to support healthy hamstring mobility over time.
You can follow the entire sequence at home with a few simple props: yoga blocks, a belt, a bolster or folded blankets, and a chair.
Unlock 900+ Iyengar Yoga Classes
Access full-length classes and structured courses for flexibility, posture, and overall strength. New videos added weekly.
Start Free TrialCancel anytime.
Pose-by-Pose: Key Techniques from the Yoga for Tight Hamstrings Class
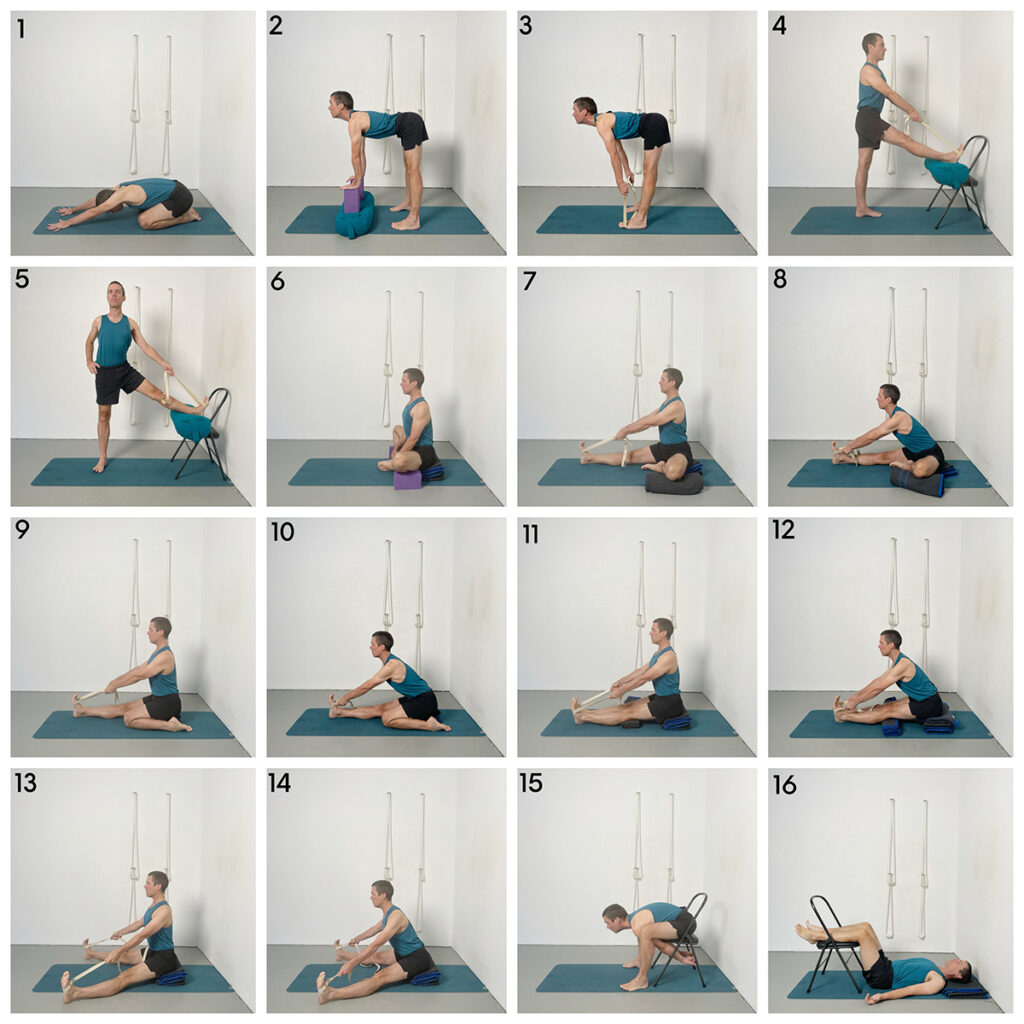
Below you’ll find a detailed breakdown of 16 key poses featured in the sequence, each matched to a corresponding image from the visual grid.
Each pose is introduced with a clear Pose Objective and Focus, followed by Key Instructions to help you practice with awareness, precision, and safety.
(For easy navigation, use the anchor links in the Table of Contents to jump between poses.)
1. Adho Mukha Virasana (Downward-Facing Hero Pose)
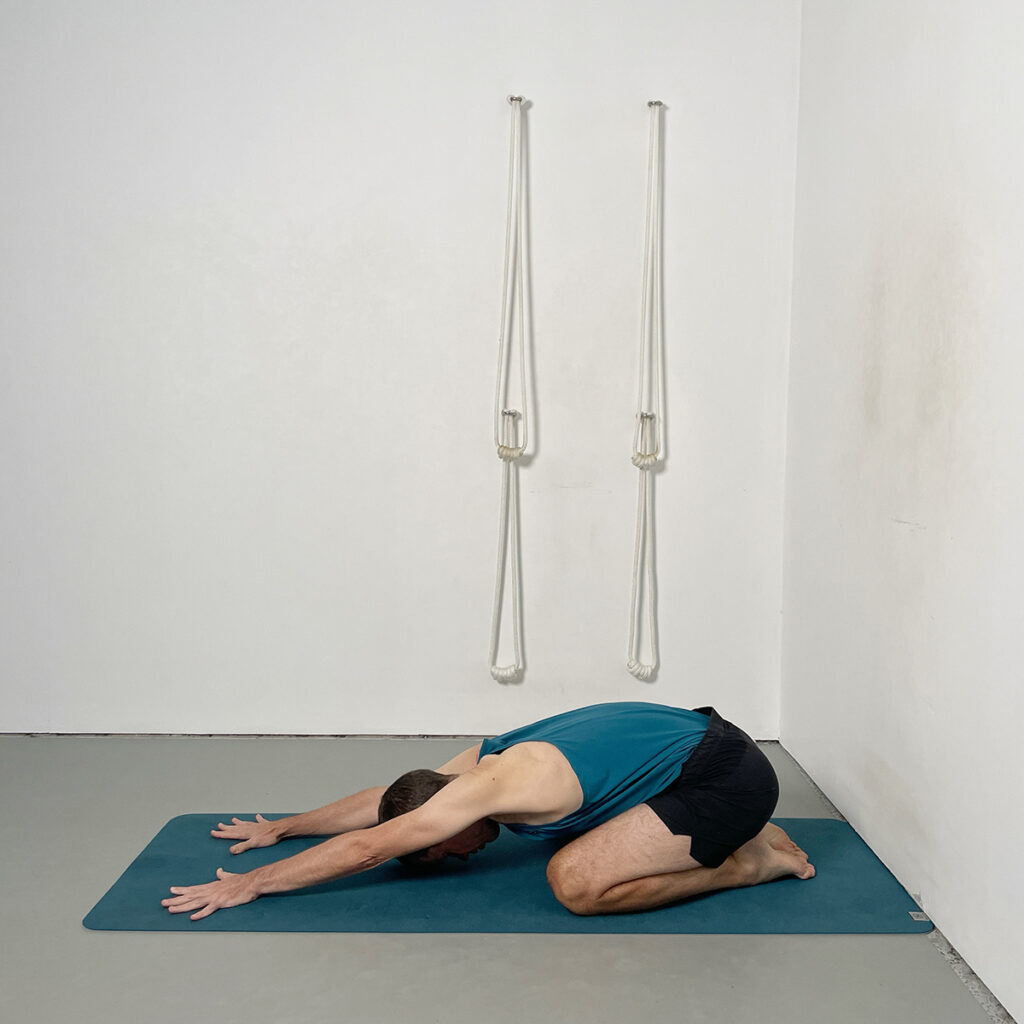
Pose Objective and Focus:
This pose opens the sequence with a gentle spinal release and introduces foundational actions used throughout the class. It establishes breath awareness, quiet focus, and a sense of length between the hips and rib cage. It begins the process of creating space along the back body—especially helpful for students with hamstring-related lower back tightness.
Key Instructions:
- Extend the arms forward while simultaneously drawing the outer hips back to create traction through the spine.
- Ground the shins and tops of the feet into the floor to anchor the lower body.
- Broaden the back ribs and soften the chest downward without collapsing the sternum.
- Let the breath expand through the side ribs, maintaining equal length on both sides of the torso.
- Allow the head and neck to release completely, supported if needed.
2. Uttanasana with Blocks (Standing Forward Bend with Support)
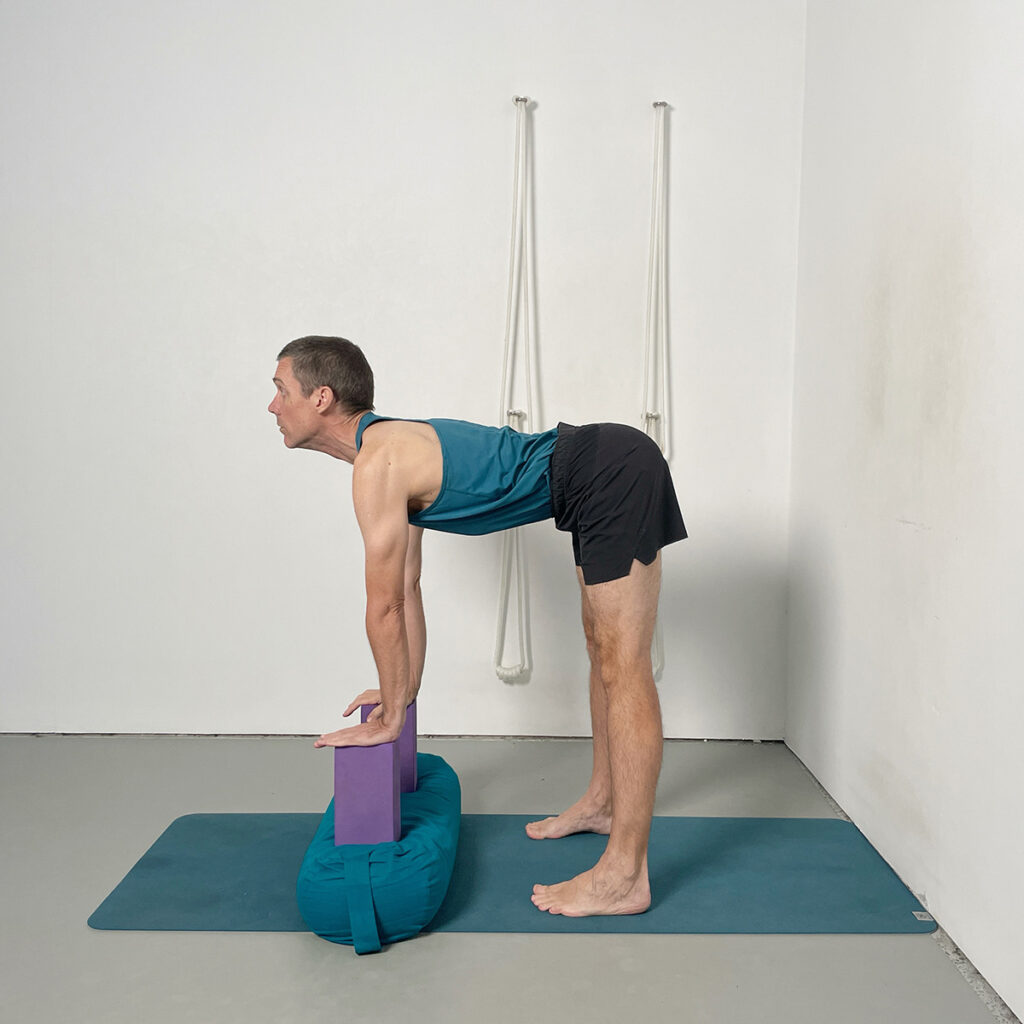
Pose Objective and Focus:
This supported version of Uttanasana is used early in the class to begin stretching the hamstrings while protecting the spine. The use of blocks helps reduce over-rounding in the back and encourages spinal length by bringing the floor closer to the hands. It introduces the concept of initiating forward bends with leg activity and trunk extension rather than spinal collapse.
Key Instructions:
- Place hands shoulder-width on blocks and step the feet slightly wider than hip-width for stability.
- Press the big toe bases firmly down and lift the kneecaps without locking the knees.
- Extend the front of the torso from the pubic bone to the sternum to avoid collapsing the spine.
- Lightly press into the blocks to guide length through the spine rather than bearing weight through the arms.
- Keep the hips positioned directly above the ankles to maintain structural balance in the pose.
3. Uttanasana (Standing Forward Bend) – Using a Belt
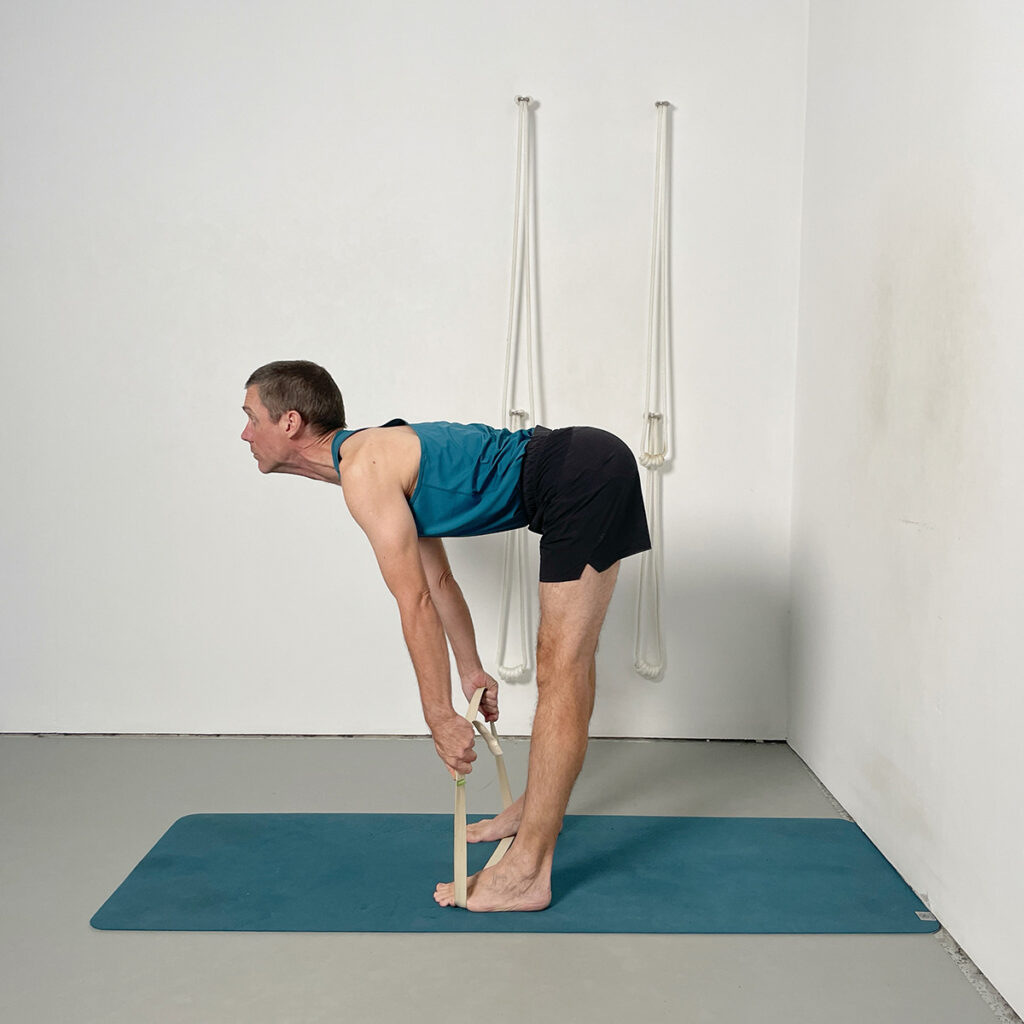
Pose Objective and Focus:
This variation of Uttanasana builds on the previous version using blocks, introducing a belt for added leverage. The belt allows practitioners to maintain an extended spine while working more deeply into the hamstrings. It encourages length through the front body and teaches how to access the pose through leg work rather than arm strength.
Key Instructions:
- Stand with feet slightly wider than hips and loop a belt under the balls of the feet, holding the ends in each hand.
- Begin by bending the knees slightly to allow for spine lengthening, then progressively straighten the legs while keeping the chest open.
- Press the big toe bases down and lift the inner arches to stabilise the legs.
- Pull gently on the belt to draw the chest forward and lengthen the front of the torso, from pubic bone through to sternum.
- Avoid pulling the shoulders toward the ears—keep the shoulder blades drawn down the back and broaden the collarbones.
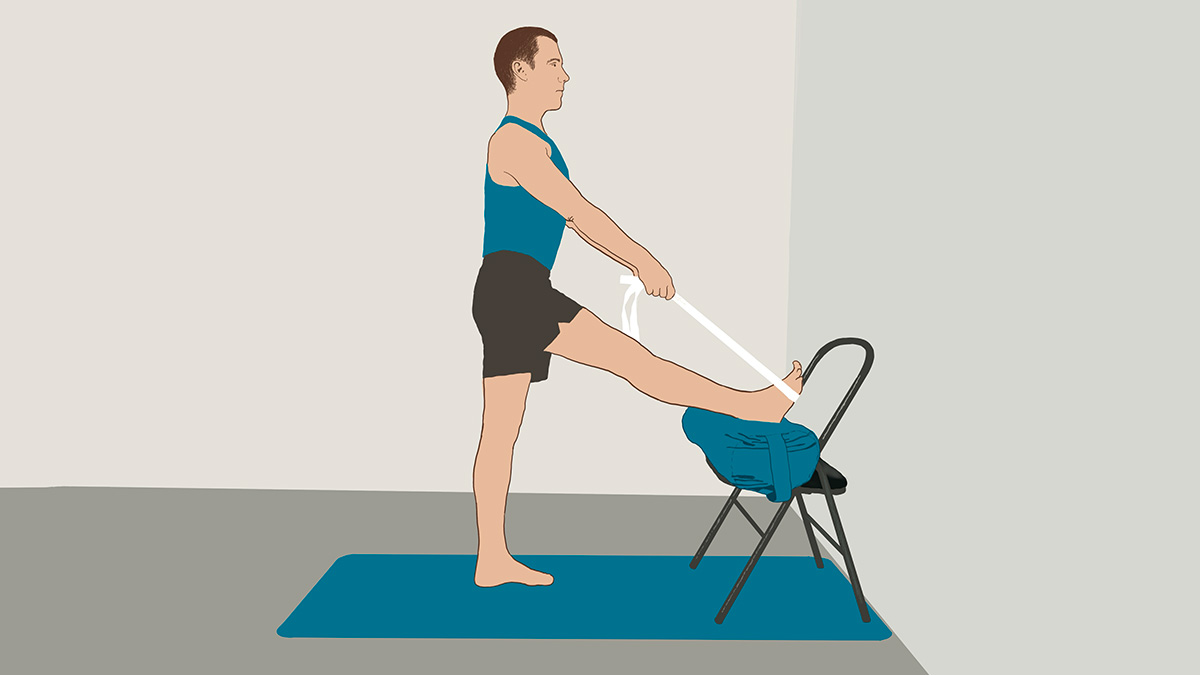
4. Utthita Hasta Padangusthasana I (Standing Hand to Big Toe Pose – Yoga for Tight Hamstrings Variation)
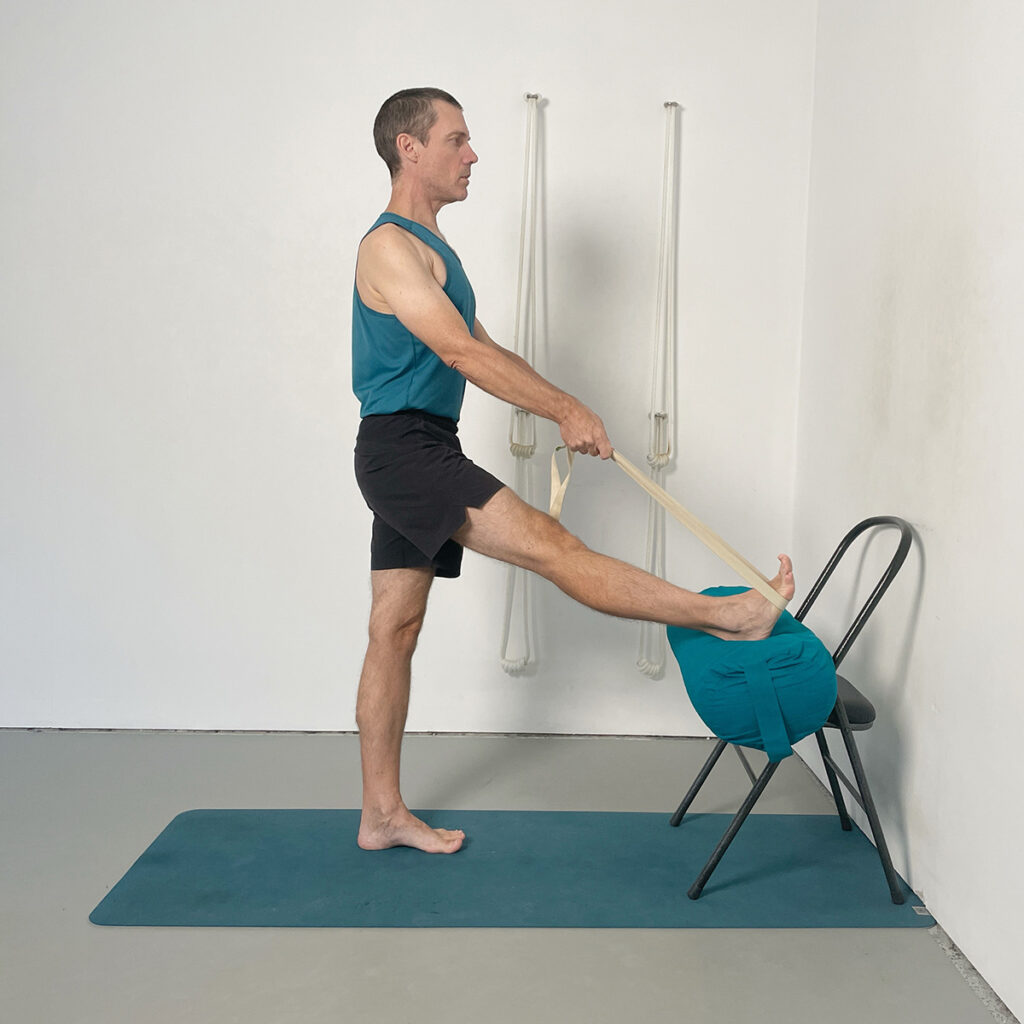
Pose Objective and Focus:
This standing pose strengthens the legs while actively lengthening the hamstrings. Using the belt to support the raised leg reduces strain and helps maintain spinal lift and chest openness.
Key Instructions:
- Stand in Tadasana and loop a belt around the ball of one foot, lifting the leg to rest the heel on a bolster or chair seat.
- Keep the standing foot facing forward and the standing leg straight by lifting the kneecap.
- Press the big toe base of the lifted foot into the belt while pulling back gently to create resistance.
- Square the pelvis by drawing the outer hip of the lifted leg downward and turning the inner thigh of the standing leg back.
- Use the belt to help straighten the spine, draw the back ribs in, and lift the chest, maintaining even shoulder alignment.
5. Utthita Hasta Padangusthasana II (Leg to the Side on Chair)
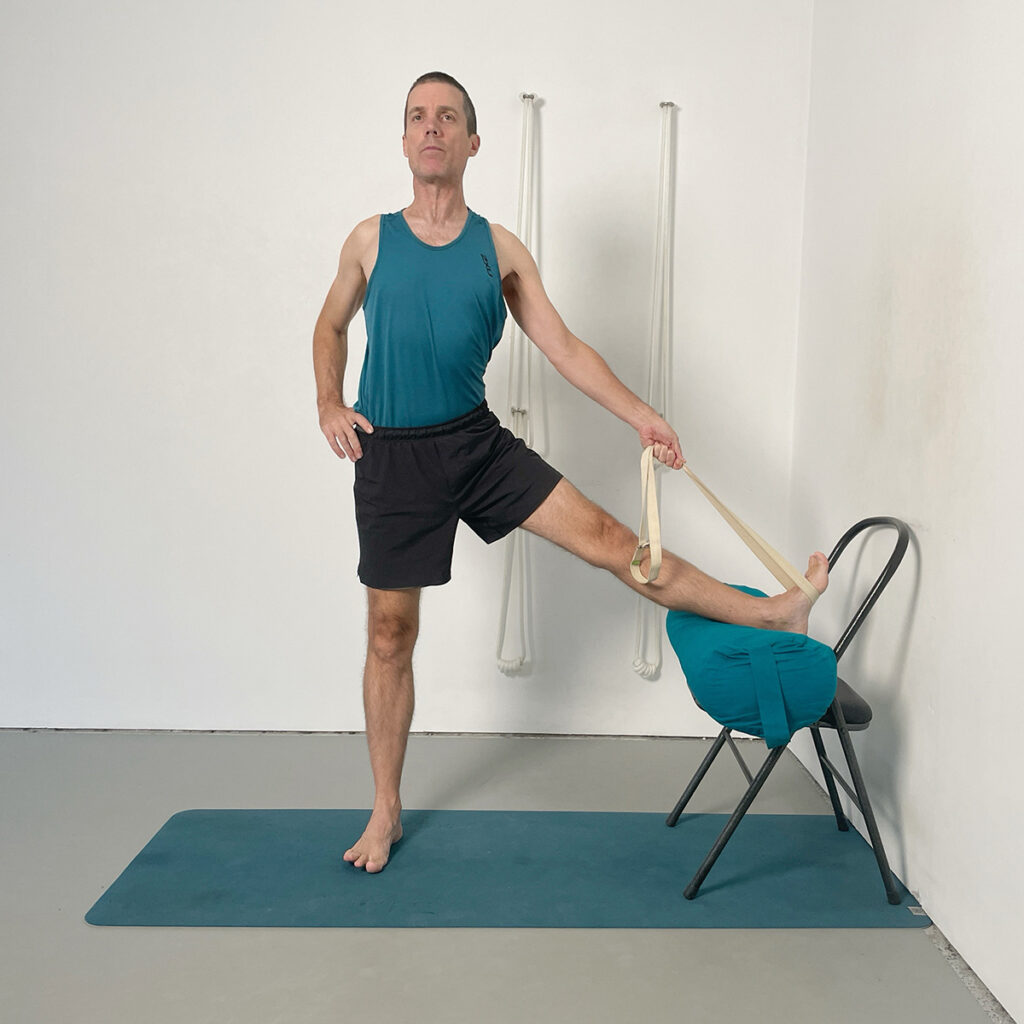
Pose Objective and Focus:
This variation of the standing leg stretch shifts the emphasis to the inner thigh and groin (adductors). By taking the leg out to the side while maintaining an upright spine, the pose helps to expand hip mobility, improve balance, and deepen awareness of pelvic alignment.
Key Instructions:
- Begin in the upright leg stretch with the heel supported on the chair or bolster and the belt looped around the ball of the foot.
- Keeping both legs straight, slowly guide the lifted leg out to the side while holding the belt in the same-side hand.
- Stabilise by anchoring the standing leg down and ensuring the pelvis remains level — avoid tilting or collapsing to one side.
- Press the big toe base of the lifted foot firmly into the belt and lift the chest up to maintain spinal extension.
- Draw the outer hip of the lifted leg down to keep both sides of the waist evenly long.
6. Upright Baddha Konasana
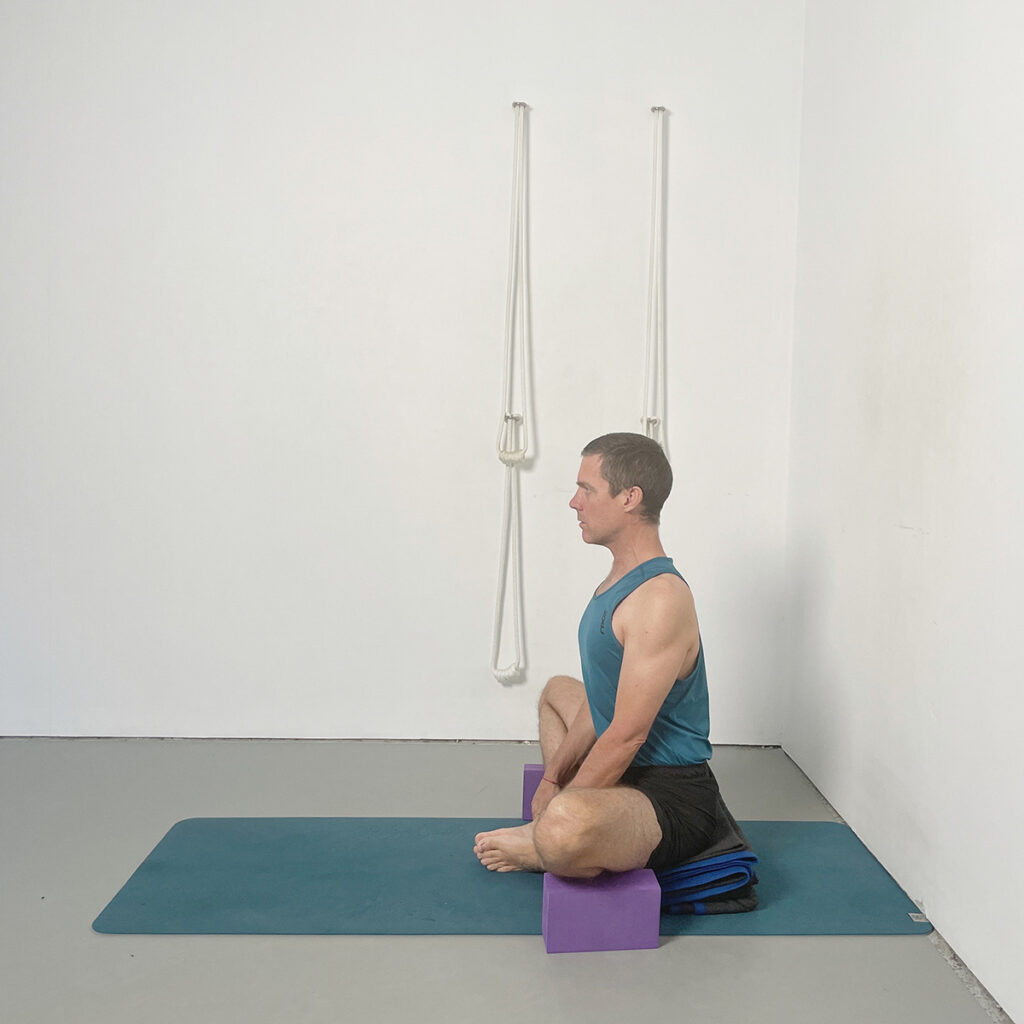
Pose Objective and Focus:
This seated pose helps open the inner thighs and groins while encouraging vertical lift through the spine. Practising Baddha Konasana with the spine upright (rather than folded forward) is particularly effective for developing the strength and awareness required to balance hip mobility with spinal elongation—key for both hamstring flexibility and overall pelvic alignment.
Key Instructions:
- Sit on a folded blanket or bolster to allow the spine to ascend freely.
- Join the soles of the feet together and let the knees drop outward, using support under the thighs if needed.
- With the hands holding the feet or resting beside the hips, press down gently to lengthen upward through the sides of the trunk.
- Roll the shoulders back and broaden across the collarbones while maintaining a soft, steady gaze.
- Avoid rounding the lower back—use height and support as needed to keep the lumbar spine lifted and balanced.
7–8. Janu Sirsasana: Upright and Forward Variations
Pose Objective and Focus:
Janu Sirsasana (Head-to-Knee Pose) combines one straight leg with one bent knee, helping to isolate and target hamstring flexibility while gently opening the hips. Starting upright encourages spinal lift and alignment; moving into the forward bend maintains that integration while gradually increasing the hamstring stretch. This approach is especially valuable for students with tight hamstrings, as it promotes progressive opening without compromising the lower back.
Upright Stage (Pose 7):
- Sit on a folded blanket or bolster to help tilt the pelvis forward.
- Straighten the right leg and bend the left knee, drawing the left heel in toward the groin.
- Keep the pelvis facing directly forward—do not let the body rotate toward the bent leg.
- Extend both arms and hold the foot, shin, or use a belt if needed to maintain an upright spine.
- Press the sitting bones down and lengthen the trunk vertically without rounding the back.
Forward Extension Stage (Pose 8):
- Maintain the straightness of the right leg and keep the kneecap lifting.
- Begin to hinge forward from the hips while preserving the length in the front of the torso.
- Use a belt if you cannot reach the foot without collapsing the spine.
- Ground the bent leg’s knee and keep it supported if it tends to lift.
- Soften the face and throat, and move gradually, stopping before the back begins to round.
Continue Your Yoga Journey
Discover comprehensive Iyengar Yoga programs for strength, flexibility, and therapeutic practice—on demand, anytime.
Explore Membership OptionsTry free for 14 days. Cancel anytime.
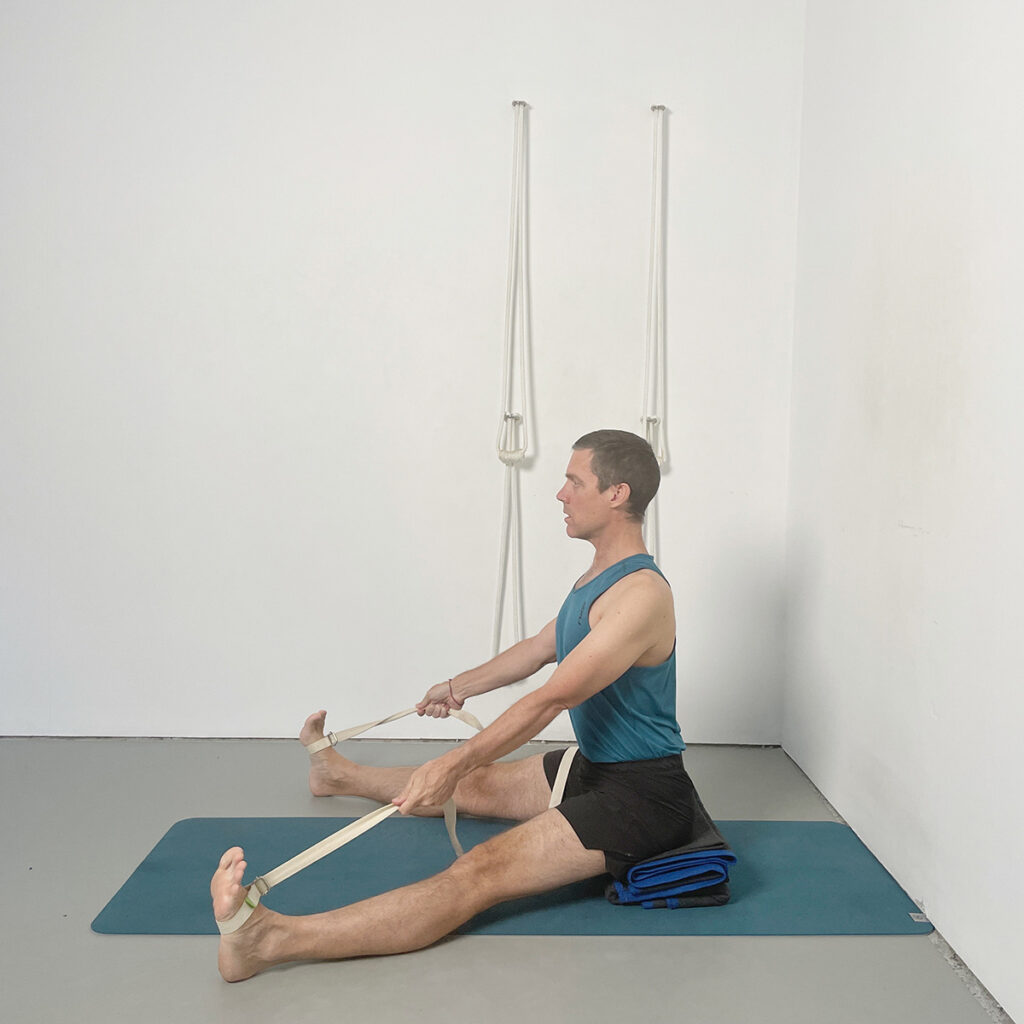
9–10. Triang Mukhaikapada Paschimottanasana: Upright and Forward Variations
Pose Objective and Focus:
Triang Mukhaikapada Paschimottanasana combines a classic hamstring stretch with a folded leg position that also targets the quadriceps and hip flexors. The upright phase helps cultivate balanced lift in the spine and length in the straight leg, while the forward variation encourages a deeper hamstring release. Careful attention to alignment ensures that the pose builds flexibility without compressing the lower back or overloading the knee of the bent leg.
Upright Stage (Pose 9):
- Sit on a folded blanket or bolster to level the pelvis and support the lumbar spine.
- Fold the left leg back alongside the thigh with the toes pointing straight behind (not turning out).
- Extend the right leg forward, aligning the centre of the heel with the centre of the pelvis.
- Place the fingertips beside the hips or onto blocks to assist in lifting the spine upright.
- Press down through both thighs and keep the pelvis level without collapsing into the bent-leg side.
Forward Extension Stage (Pose 10):
- Maintain firmness in the right leg by lifting the kneecap and pressing the thigh down.
- Begin to lean forward from the hips, not the waist, lengthening the front body as you move.
- Use a belt if the foot is out of reach, avoiding any rounding in the upper back.
- Keep the left knee grounded and consider support beneath the shin or foot if needed.
- Soften the face and throat and allow the breath to remain steady as the pose deepens gradually.
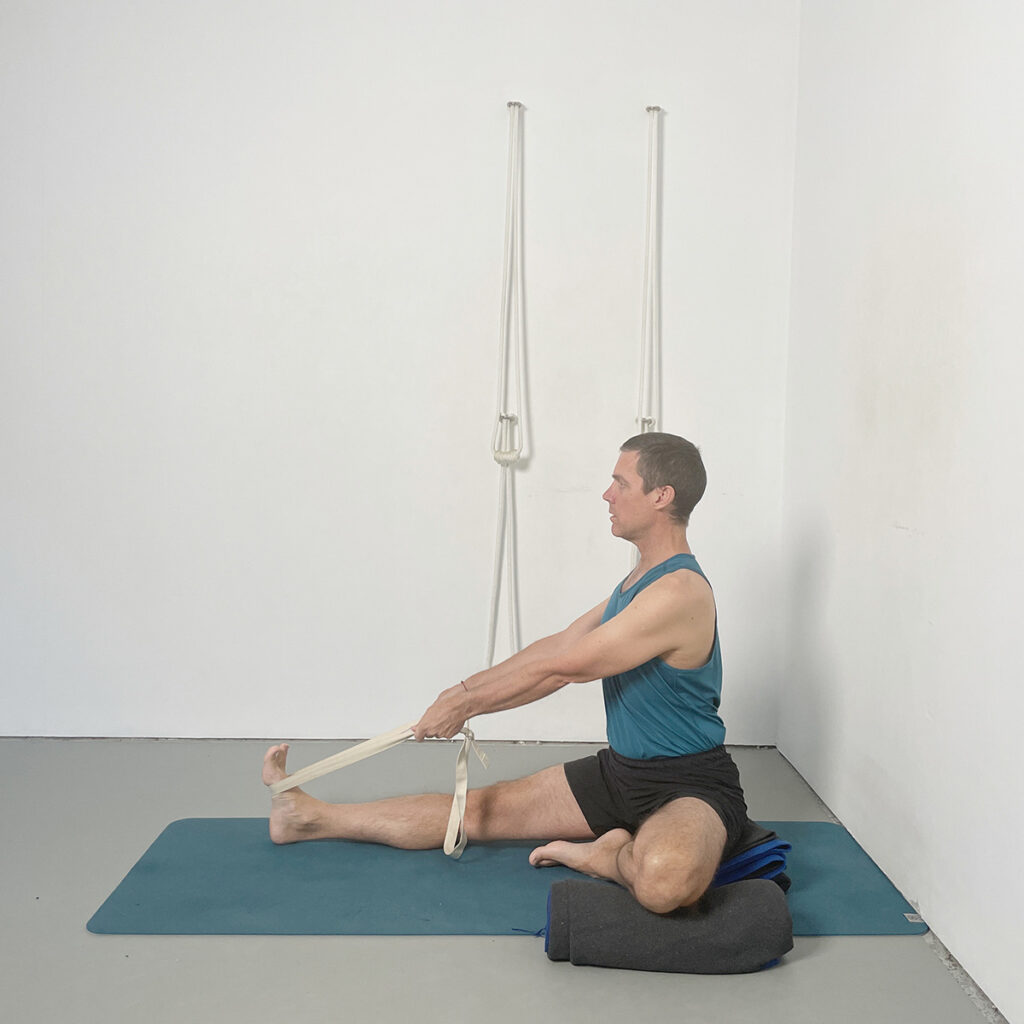
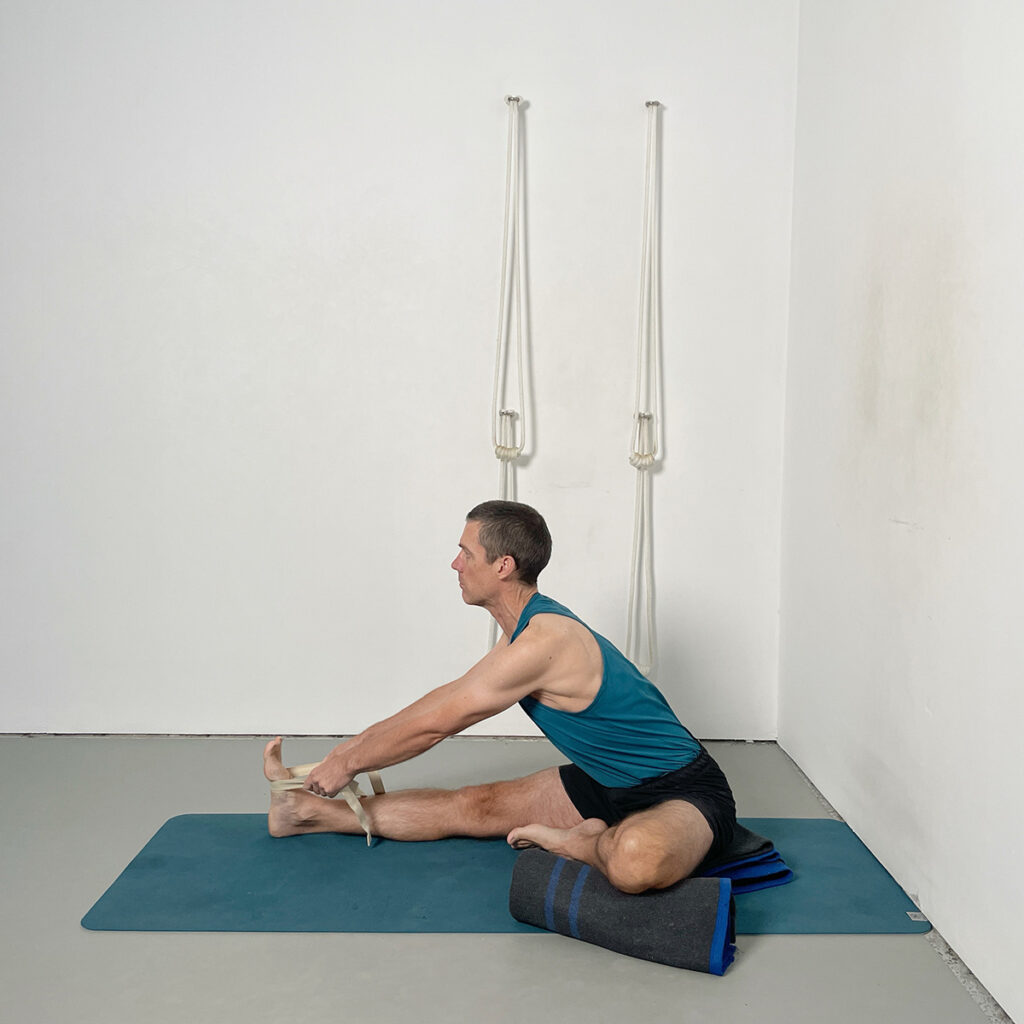
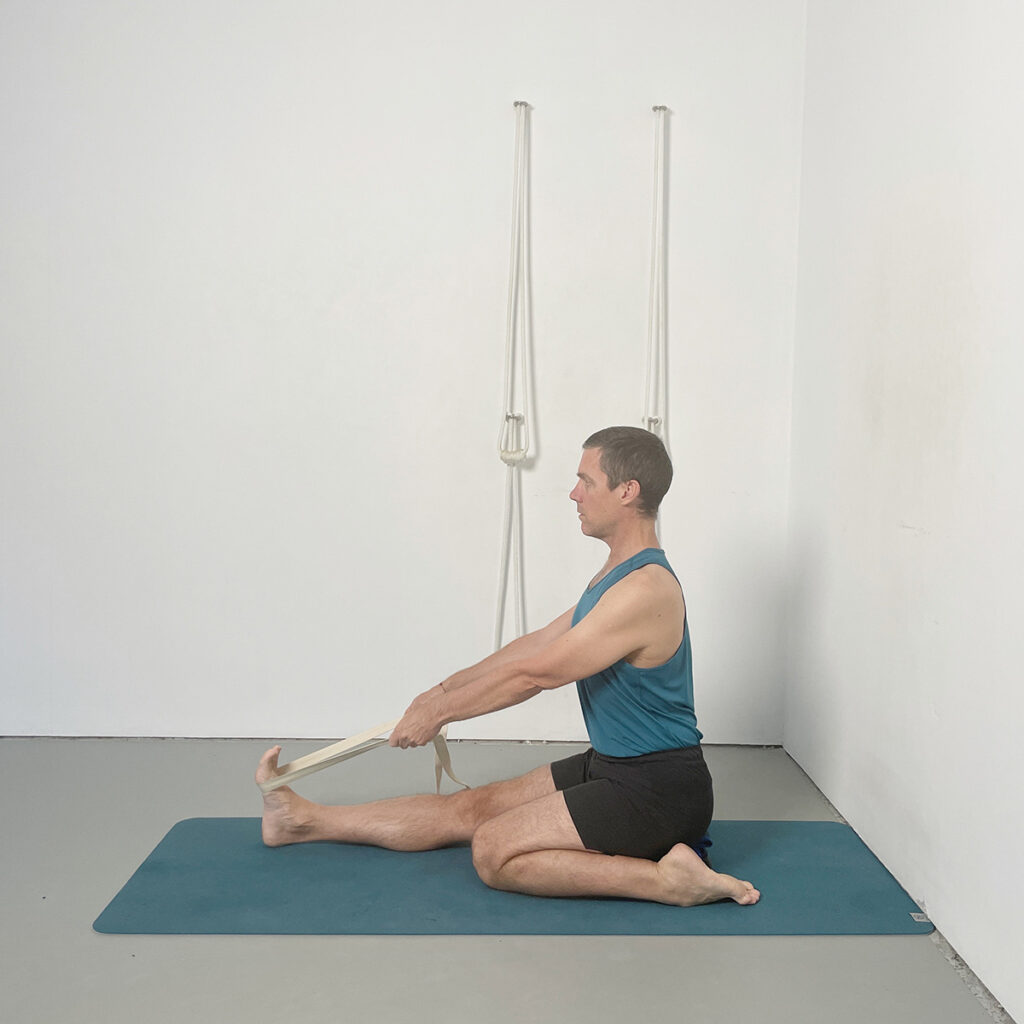
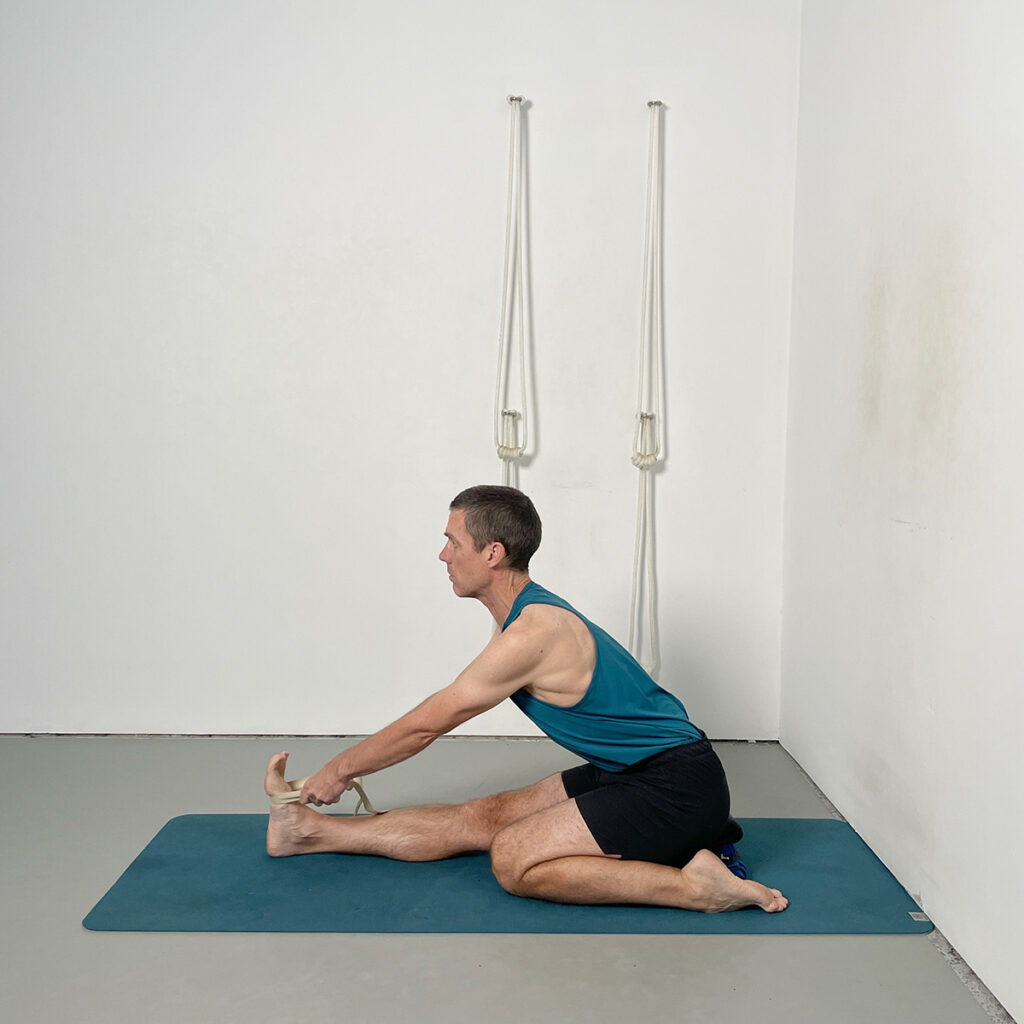
11–12. Dandasana and Paschimottanasana: Upright to Forward Bend
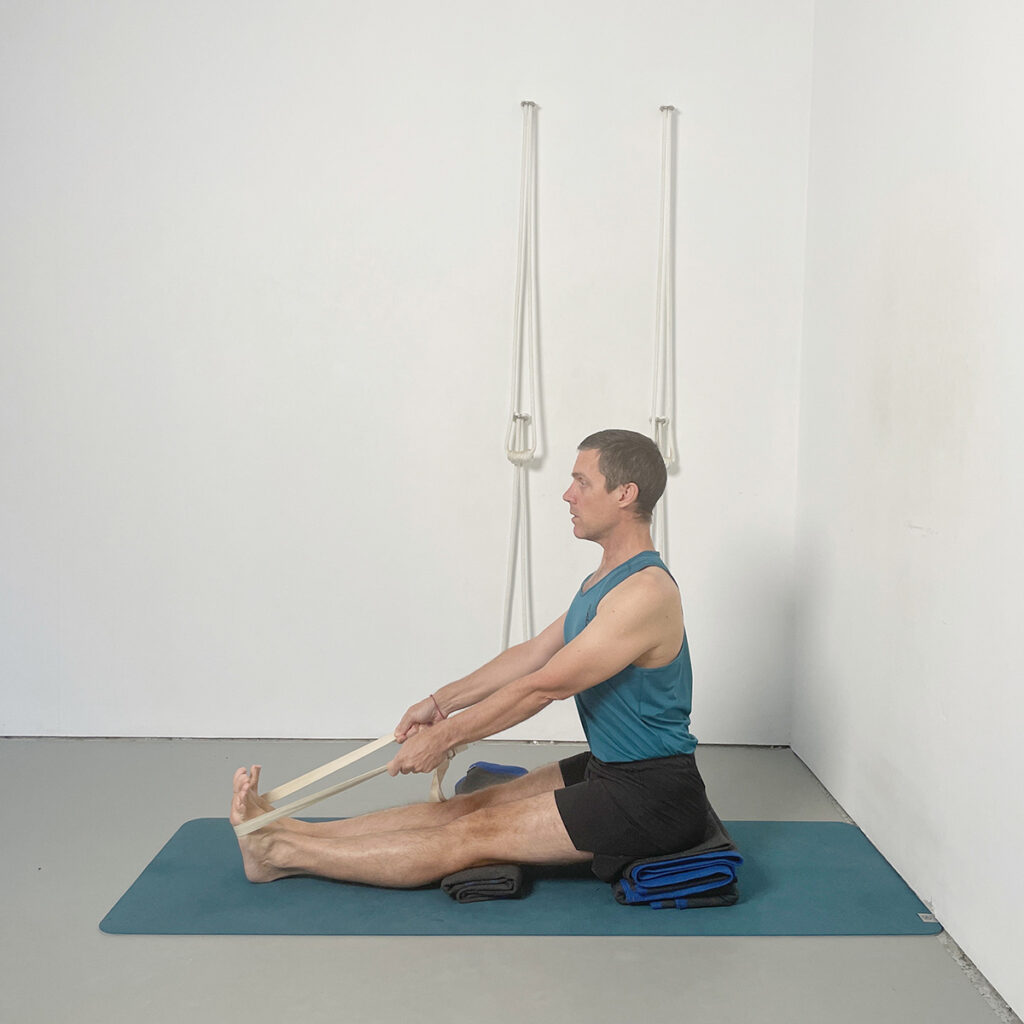
Pose Objective and Focus:
This classic progression from Dandasana to Paschimottanasana introduces a foundational relationship between the hamstrings and the spine. The upright version focuses on vertical lift, hip alignment, and spinal awareness. From this balanced base, the practitioner explores safe forward extension without compromising the spine or overstretching tight hamstrings. Props are used to promote stability and traction while maintaining key actions in the legs and trunk.
Upright Dandasana (Pose 11):
- Sit on a bolster or folded blanket to elevate the pelvis and assist spinal lift.
- Extend both legs straight forward, aligning the inner heels and activating the big toe bases.
- Place a rolled blanket under the knees to encourage leg work without straining the back.
- Use the hands beside the hips, pressing down to lift the spine and broaden the chest.
- Press the tops of the thighs and the final portion of the hamstrings into the support beneath.
Forward Bend into Paschimottanasana (Pose 12):
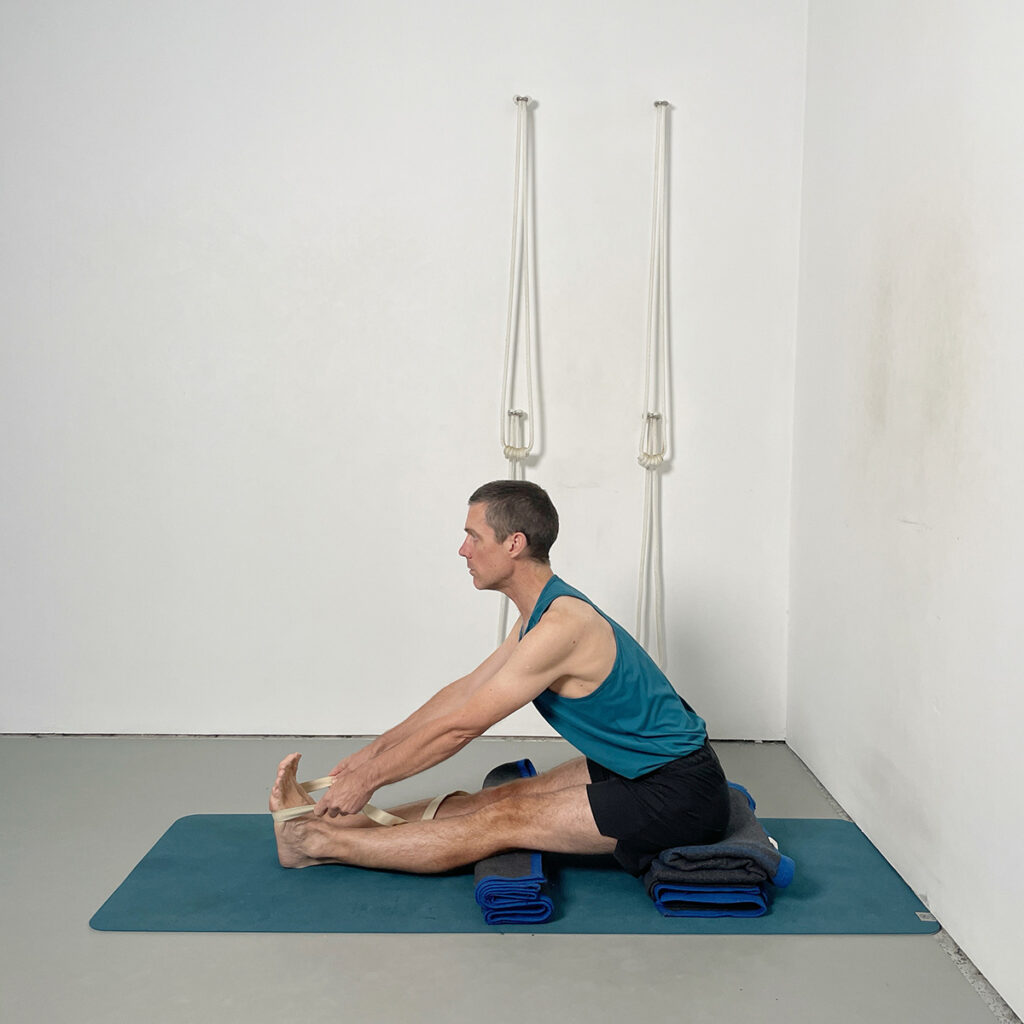
- Place a belt around the feet and slide the hands back along the belt with elbows slightly bent.
- Resist with the feet into the belt as you pull gently to help move the upper back in.
- Maintain a long front body—pubic bone to sternum—as you begin the forward movement.
- Avoid collapsing into the lower back; use the pressure of the legs and the belt for spinal support.
- Roll the shoulders back and lift the chest to preserve a spacious and integrated extension.
13–14. Upavistha Konasana: Upright to Forward Bend
Pose Objective and Focus:
This two-part Yoga for Tight Hamstrings approach to Upavistha Konasana (Wide-Angle Seated Forward Bend) balances hamstring lengthening with pelvic awareness and spinal alignment. The upright version builds the foundation by establishing lift in the spine and symmetry in the legs, while the forward extension teaches how to maintain structure and support as depth is gradually introduced. This method reduces lower back strain and allows practitioners to stay longer in the pose with safe alignment.
Upright Upavistha Konasana (Pose 13):
- Sit on a bolster or folded blanket to allow the pelvis to tilt forward.
- Extend the legs wide but not to their maximum—keep the thighs and feet evenly grounded.
- Flex the feet and press the big toe bases forward, keeping the inner thighs engaged.
- Place the hands behind or beside the hips and press down to lift the trunk vertically.
- Maintain evenness across the left and right sides of the waist and chest.
Forward Bend in Upavistha Konasana (Pose 14):
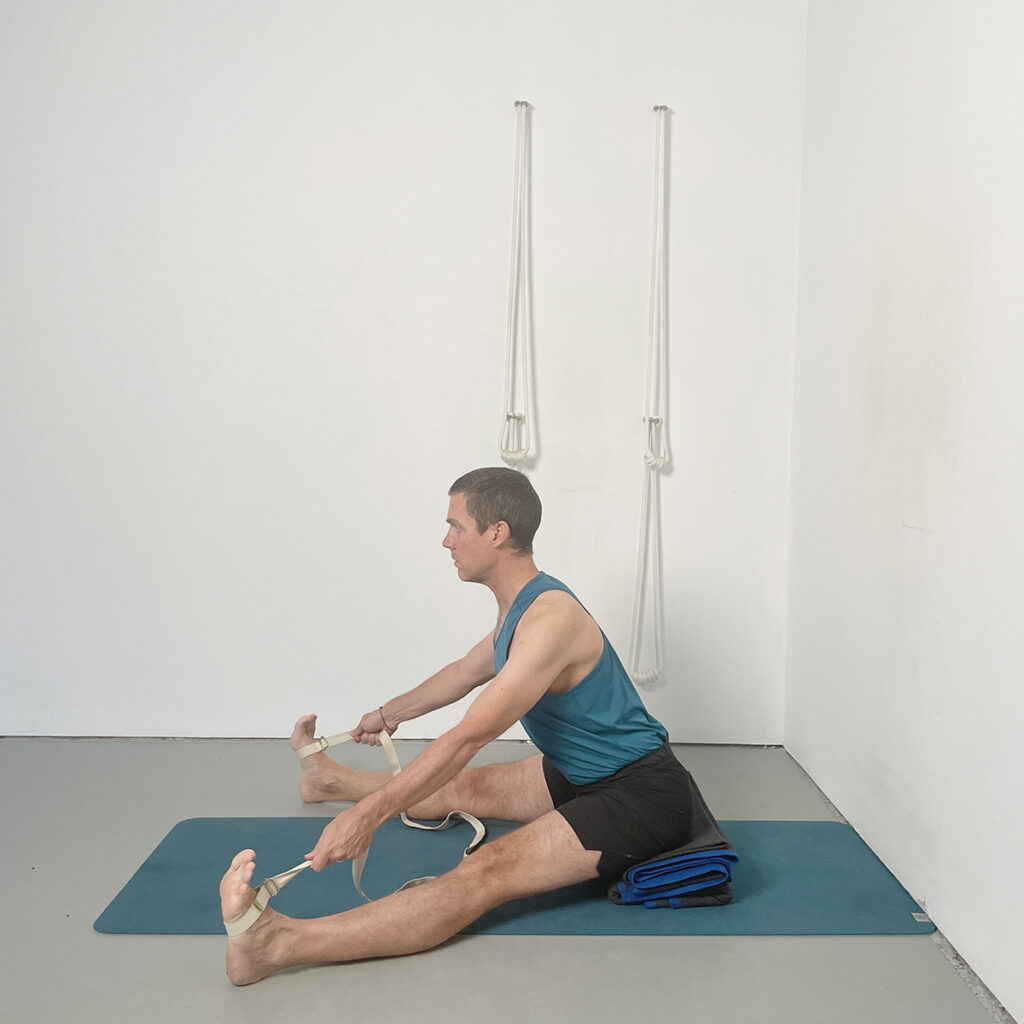
- Use a belt or blocks for the hands if reaching forward causes spinal rounding.
- Begin the forward movement by lengthening from the pubic bone to the sternum.
- Keep the thighs active and the kneecaps lifted to avoid collapsing in the pelvis.
- Extend forward only to the point where the spine remains long and the chest open.
- Soften the facial expression and stay in the pose with steady, rhythmic breathing.
15. Chair Malasana (Back-Releasing Variation)
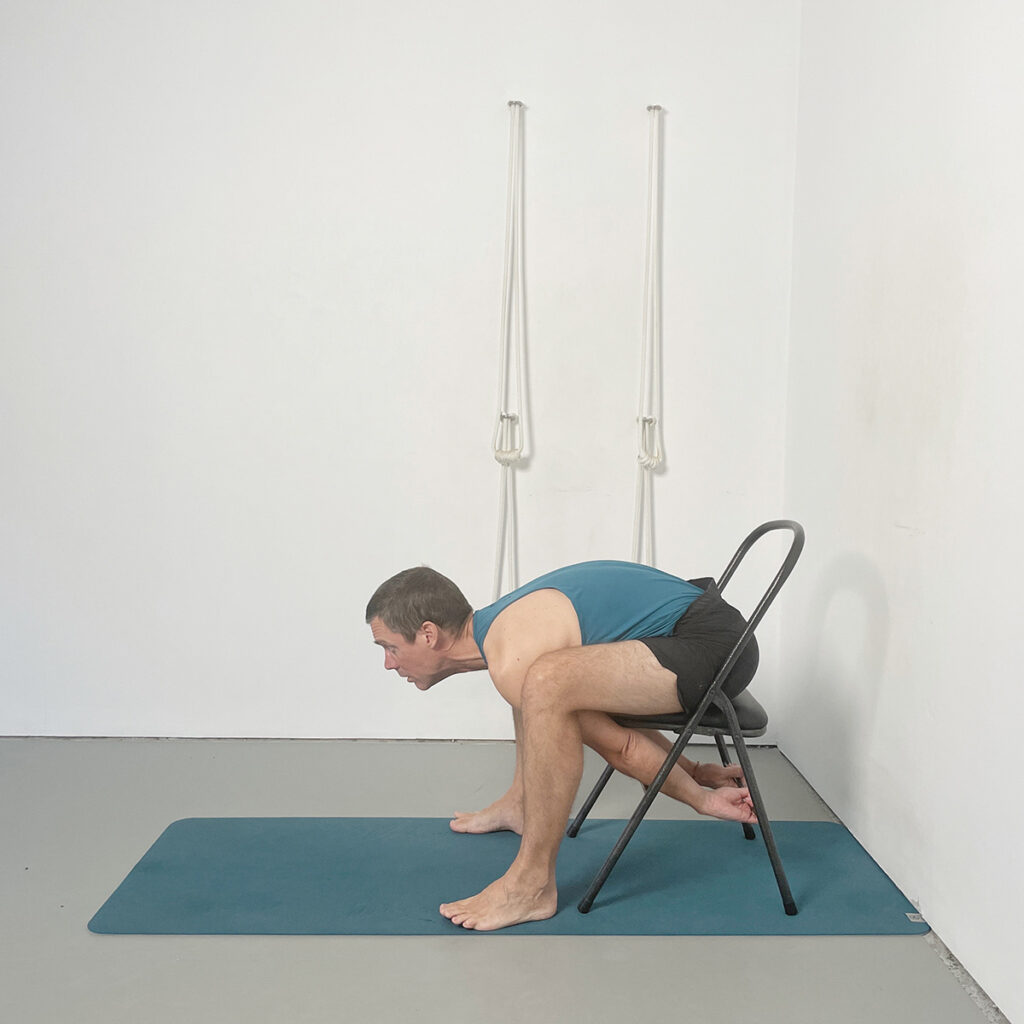
Pose Objective and Focus:
This supported version of Malasana (Garland Pose), practiced seated on a chair, is included at the end of the sequence to help release the lower back after deeper hamstring work. It uses gravity and passive forward folding to gently stretch the spine, relax the paraspinal muscles, and settle the nervous system. The support of the chair makes this variation accessible even for students with limited mobility or tight hips.
Key instructions:
- Sit well back in the chair, allowing the hips to pass slightly through the frame.
- Position the feet wider than hip-width, aligned under the knees, and firmly grounded.
- Lean forward from the hips, letting the torso rest between the thighs.
- Rest the hands on the floor, on blocks, or fold the arms and let the head hang.
- Soften the belly, jaw, and shoulders, and allow the back to passively decompress.
16. Supported Savasana with Legs on Chair
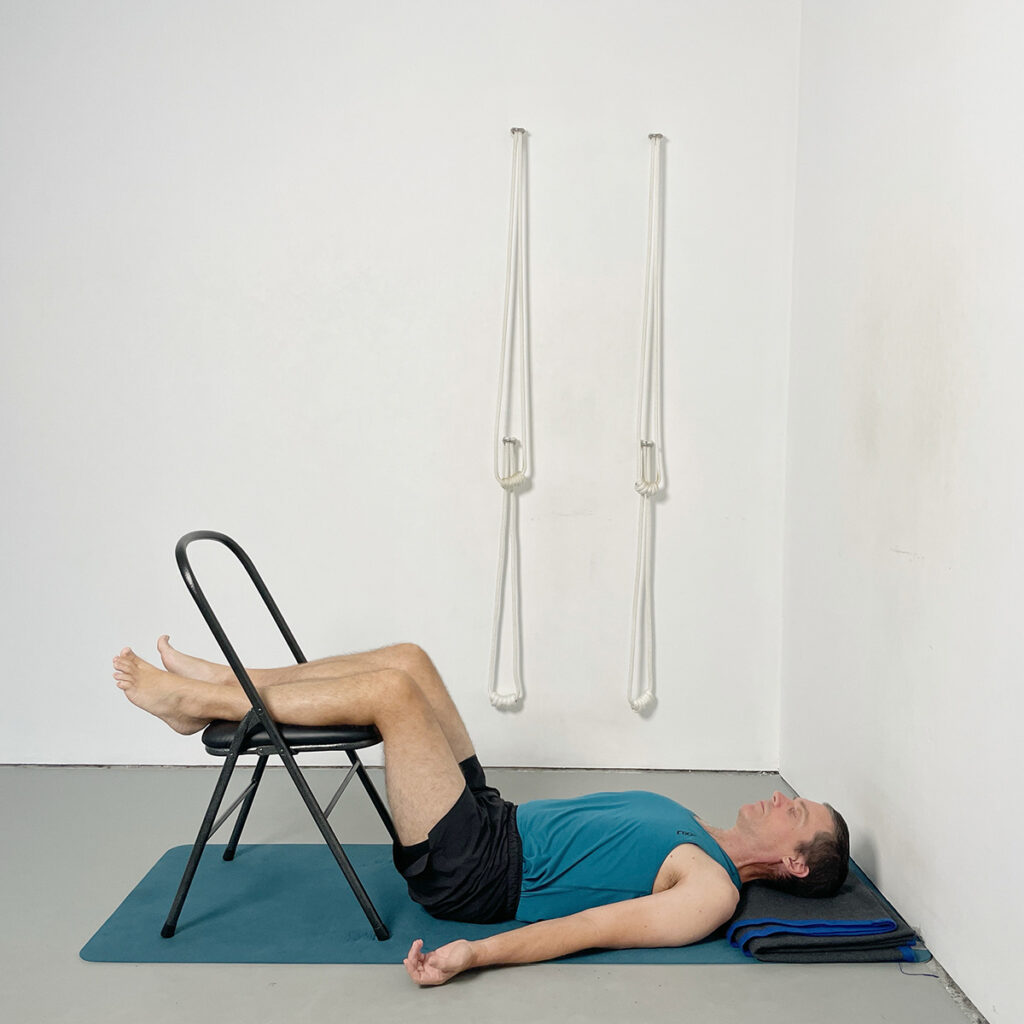
Pose Objective and Focus:
This variation of Savasana uses the support of a chair to release tension in the lower back and soften the abdominal region. Elevating the lower legs helps reduce lumbar lordosis, creating a gentle flattening of the lower spine and allowing the paraspinal muscles to fully relax. It’s an ideal pose to finish the sequence, helping to integrate the effects of hamstring work while promoting deep rest and nervous system downregulation.
Key instructions:
- Lie flat on your back with the calves supported horizontally on a chair.
- Position a folded blanket under the head to level the forehead and chin.
- Adjust the chair distance so that the knees are slightly forward of the hips.
- Soften the abdomen, release the lower back, and broaden across the upper chest.
- Let the arms rest comfortably by the sides with the palms facing up; stay for several minutes.
Conclusion
Practising yoga for tight hamstrings requires patience, precision, and an intelligent approach to alignment. By working methodically and using props where needed, you can gradually unlock greater flexibility in the hamstrings while protecting the lower back and improving overall posture. This step-by-step approach not only prepares you for deeper forward bends and seated poses but also fosters safer, more balanced movement patterns in daily life and other forms of exercise.
Start with the free 60-minute class linked above, revisit key poses as needed, and let your practice evolve progressively over time.
Ready to dive deeper? Explore Yoga Selection’s full library of classes and courses targeting flexibility, strength, and comprehensive yoga development.
Continue Your Yoga Journey
Discover comprehensive Iyengar Yoga programs for strength, flexibility, and therapeutic practice—on demand, anytime.
Explore Membership OptionsTry free for 14 days. Cancel anytime.
About Rod Stennard
Rod Stennard – Founder of Yoga Selection
Rod Stennard is the founder of Yoga Selection, the first online yoga platform dedicated entirely to Iyengar Yoga. A certified Iyengar Yoga teacher since 2002, Rod has practiced yoga since 1992 and studied under senior teachers from around the world, including members of the Iyengar family in Pune, India.
Rod launched Yoga Selection in 2016 to bring structured, high-quality Iyengar Yoga training to a global audience. As a pioneer in the field of online yoga education, he is passionate about making this method accessible to all, through rigorous, inclusive, and thoughtfully designed classes. His work continues to support students of all levels in over 50 countries.
Share:
See related posts: