
Now is the perfect time to finally get around to trying yoga. You don’t need to attend a yoga studio. Here are 10 poses to kickstart your practice at home. It should take you around 15 minutes.
These simple poses are perfectly suited to beginners. You don’t need any special equipment. For best results practice them each day for a week. Then observe how you feel. You will be starting to get a taste of the benefits yoga can bring.
Feel stronger and more energetic. Reconnect with your body and sharpen your mind. Feel more relaxed and less stressed. Try it now!
TADASANA
-Stand upright with your head, pelvis and ankles vertically aligned.
-Have your feet hip-width apart.
-Turn your toes and the fronts of your legs so that they face directly forwards.
-Arms by your sides, elbows straight, palms facing the sides of your legs.
Going Further:
-Balance your body weight evenly across the soles of your feet.

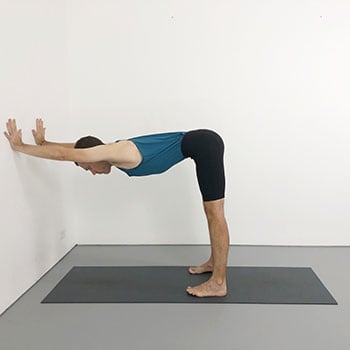
HALF DOG POSE
-Place your hands on a wall at hip height.
-Check that your hands are shoulder width with your fingers pointing straight up.
-Step your feet back so your body makes a right angle.
-Have your feet hip width and your toes and the fronts of your legs facing straight forwards.
Going Further:
– Keep your elbows lifting, move your back ribs down and your front ribs forwards.
UTTHITA HASTA PADASANA
-Step your feet apart so that the distance between your feet is the same as the length of your legs.
-Bring your hands to your hips.
-Ensure that your toes, kneecaps and front thighs face directly forwards.
-Press the outer edges of your feet down and lift the fronts of your thighs up.
-Press your thighs back whilst resisting the back of your pelvis forwards.
-Lift your chest.
-Without dropping your chest, extend your arms straight out to the sides.
-Keeping your hands level with your shoulders, lift your elbows upwards and contain your shoulder socket back and down into the body.
Going Further:
-Lift your chest along with your arms.

TRIKONASANA
-Step your feet apart so that the distance between your feet is equal to the length of one leg.
-Turn your left foot in and turn your whole right leg out to the side.
-Reach down and place your right hand on your right shin.
-Extend your left arm straight up.
-Hold for five even breaths and then repeat on the left side.
Going Further:
-Turn your chest up towards the ceiling, turn your back ribs downwards towards the floor.

VIRABHADRASANA II
-Step your feet apart a little wider for this pose. Make the distance between your feet a little wider than the length of one leg.
-Turn the left foot in and the whole right leg out.
-Bend your right leg so that your knee aligns with your ankle.
-Keep your shoulders over your hips.
-Extend both arms out to the sides.
-Look over your right arm.
Going Further:
-Look over the right arm without dropping your left arm.
-Hold for five breaths and then repeat on the left side.

PARSVAKONASANA
-Come again to the previous pose Virabhadrasana II.
-And now bring your right fingertips down to the floor beside your right inner heel.
-Extend your left arm straight up towards the ceiling.
-Hold for five breaths and then repeat on the left side.
Going Further
-Sink your right thigh bone down, move your right hip socket in and turn your chest towards the ceiling.

PRASARITA PADOTTANASANA
-Step your feet apart so that the distance between them is a little further than a leg length.
-Check that your toes and the front of your legs are facing directly forwards.
-Keeping your back straight, reach down and place your hands on your shins.
-Pause. If you are already at full capacity then stay at this point.
-To deepen the pose, try bring your fingertips to the floor underneath your shoulders.
Going Further:
-Press the outer edges of your feet down and move your chest forwards and away from your thighs.

DANDASANA
-Sit on a folded blanket or cushion with your legs straight and your feet apart hip-width.
-Check that your toes and kneecaps face directly upwards towards the ceiling.
-Have your hands placed beside your hips.
-Check that your shoulders are directly over your hips.
-Look straight ahead
Going Further
-Press the backs of your knees down towards the floor to lift your spine and chest upwards.

LEGS UP THE WALL
-Slide in close to the wall so that your sitting bones get as close as possible to the wall.
-Check that the back of your pelvis is in contact with the floor (if you have tighter hamstrings then you will need to leave a gap between yourself and the wall).
-Place your legs straight up the wall.
-Have your knees straight and legs together.
-Place your arms comfortably out to the sides, with your palms facing upwards.
Going Further
-Ensure that the soles of your feet are parallel to the ceiling above. Relax your abdomen completely.

SAVASANA
-Lie on your back with your legs hip-width apart.
-Place your arms out by your sides with your palms facing up.
-Shut your eyes and relax completely.
Going Further
-Allow your body to become completely still.
-Feel your body weight sink down into the floor.
-Allow your eyes to become completely still.
-Feel your eyes sink back into your skull.
-Breathe with a soft, smooth inhalation and exhalation.

Learn Iyengar yoga online with expert guidance.
Stream unlimited Yoga Selection classes and build a home practice that gets results.
Try it free for 14 days. Cancel anytime.