Improve Alignment and Technique with Chair-Supported Standing Poses
Standing poses are a foundation of yoga practice – known for developing strength, stability, and postural awareness. In this sequence, however, we take a fresh look at this classic asana group by introducing the support of a yoga chair. The chair is not used passively to reduce effort, but actively, as a tool to reveal hidden imbalances, highlight areas of restriction, and refine alignment.
This methodical, Iyengar-informed approach allows you to stay longer in each pose, observe more closely, and adjust with greater precision. For example, poses like Trikonasana and Parivrtta Ardha Chandrasana become less about muscular exertion and more about unlocking rotation, creating lateral space, and elongating the spine. The use of the chair provides both structure and support, giving you time to explore subtle adjustments that might otherwise be missed.
Although supportive, this is not a restorative class. It is designed for experienced students who are familiar with standing poses and ready to take their understanding further. You will work with precision and clarity, using the chair to enhance—not bypass—the essential actions of each pose.
Standing poses are a foundation of yoga practice. Explore our full standing pose guide here.
Free Class: Standing Poses with Chair Support
Practice alongside this free 40-minute Iyengar Yoga class, designed to help you refine alignment and deepen your experience of standing poses using a yoga chair. The video explores all 16 poses featured in this article, providing clear, methodical instruction ideal for experienced students ready to explore standing poses in a new way.
Want More Sequences Like This?
Join Yoga Selection to access over 900 classes and step-by-step Iyengar Yoga programs. New videos released every week.
Start Free TrialCancel anytime.
Table of Contents
- Free Class Video
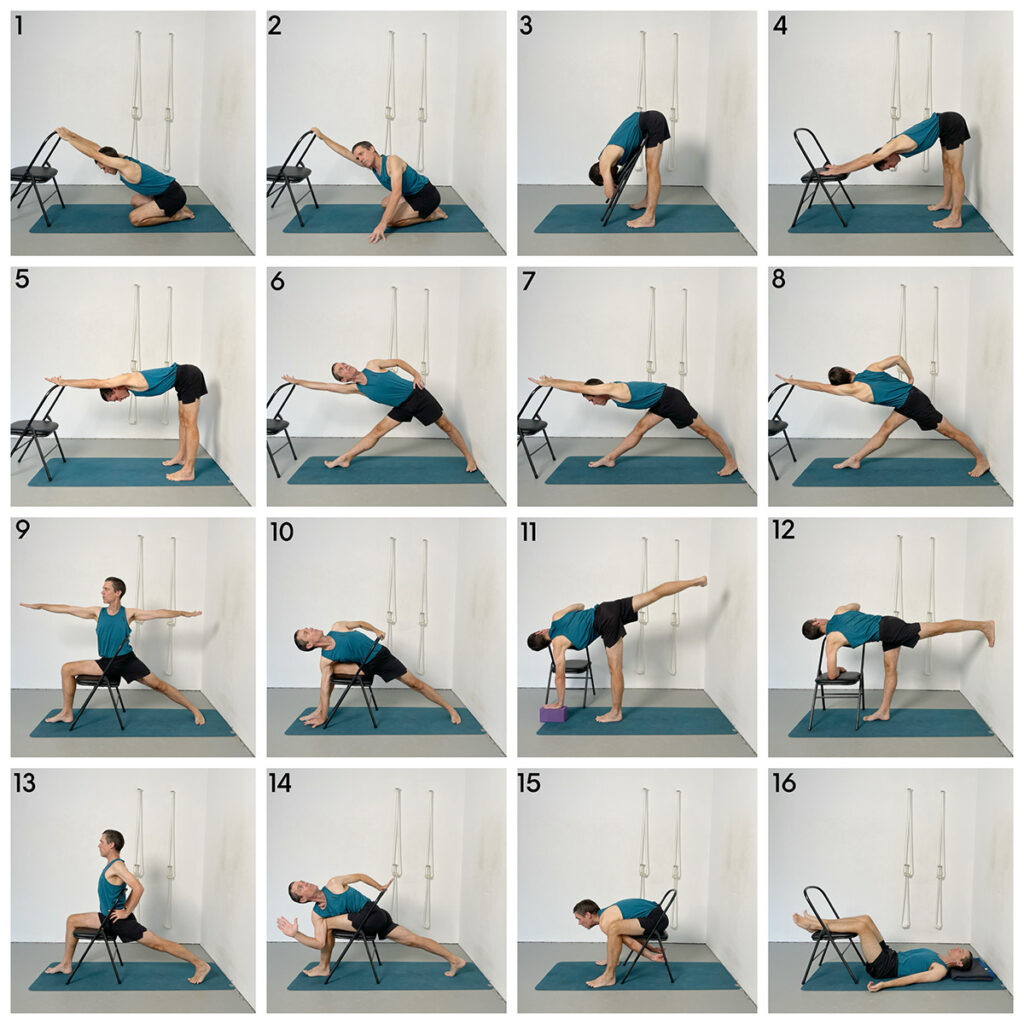
- 16 Yoga Chair Pose Variations from the Sequence
- Refining Standing Poses with a Chair
- Pose 1 – Adho Mukha Virasana Variation with Chair Support
- Pose 2 – Parivrtta Adho Mukha Virasana Using a Chair
- Pose 3 – Uttanasana with Chair Support
- Pose 4 – Ardha Uttanasana – Hands on Chair Seat
- Pose 5 – Ardha Uttanasana – Hands on Chair Frame
- Pose 6 – Trikonasana with Chair
- Pose 7 – Parsvottanasana
- Pose 8 – Parivrtta Trikonasana
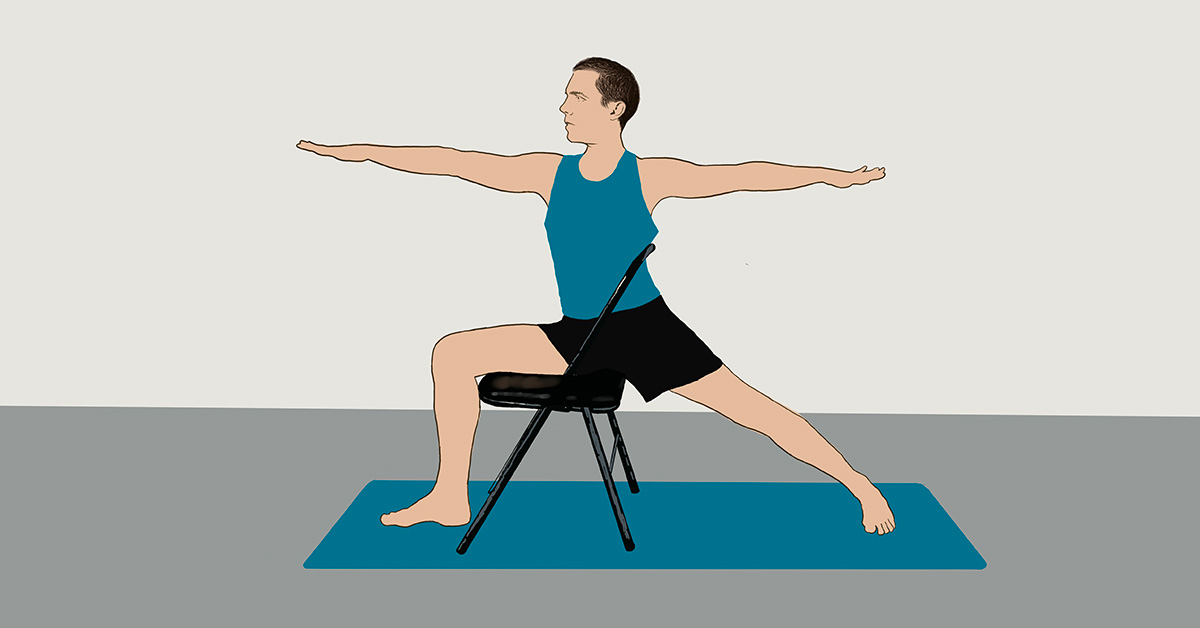
- Pose 9 – Virabhadrasana II with Chair
- Pose 10 – Parsvakonasana
- Pose 11 – Ardha Chandrasana
- Pose 12 – Parivrtta Ardha Chandrasana
- Pose 13 – Virabhadrasana I
- Pose 14 – Parivrtta Parsvakonasana
- Pose 15 – Malasana
- Pose 16 – Savasana with Chair
- Conclusion
16 Yoga Chair Pose Variations from the Sequence
Pose 1 – Adho Mukha Virasana (Downward Facing Hero Pose) Variation with Chair Support
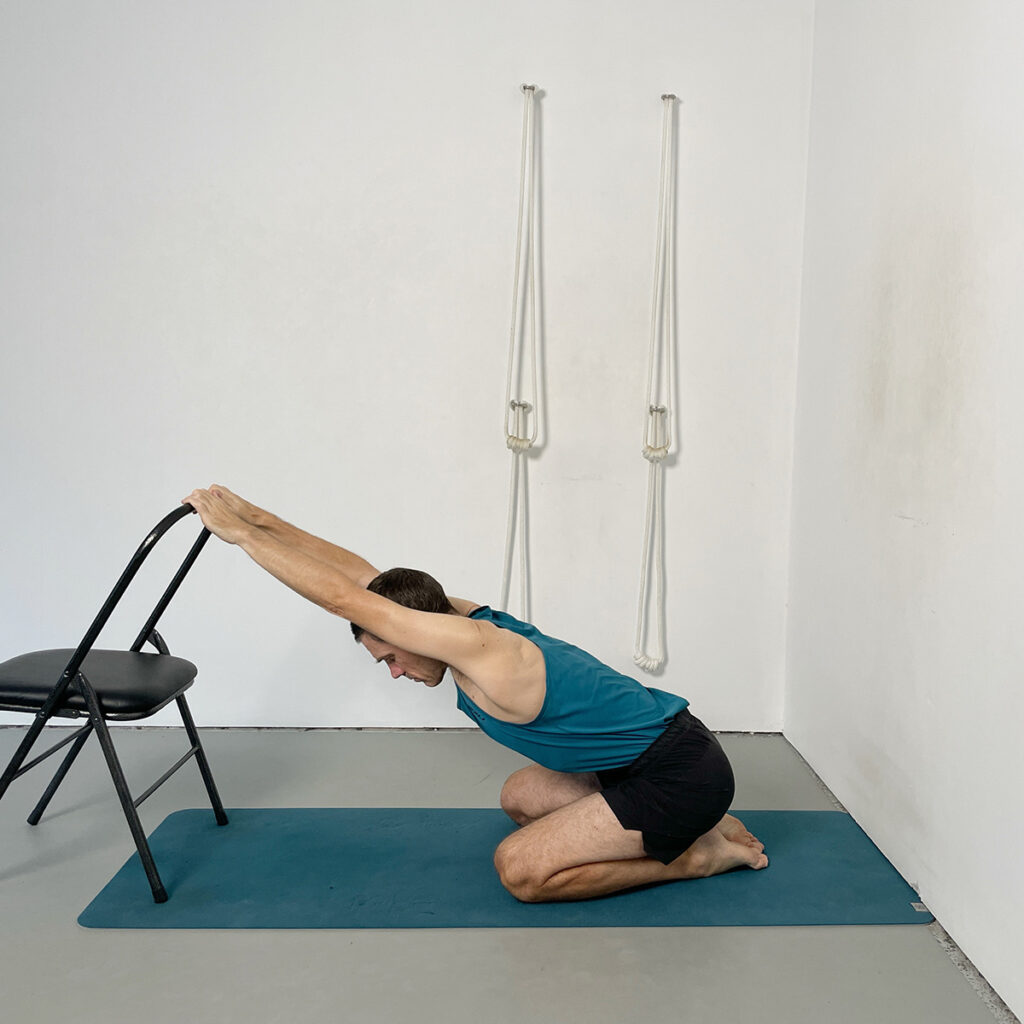
This variation of Adho Mukha Virasana uses a yoga chair to create length along the spine while anchoring the pelvis. The chair acts as an active tool for spinal traction rather than a passive support.
- Kneel with your big toes together and knees apart, and grip the top frame of the chair with your fingers (thumbs not wrapped).
- Extend the arms and push the chair forward to lengthen from the hands all the way back to the hips.
- Keep the hips grounded and descend the pubic bone and inner groins to elongate the front body.
- Simultaneously press down through the outer thighs and back pelvis to build containment through the back body.
- Notice the increased firmness through the shins, backs of the thighs, and heels as the pelvis becomes more grounded.
- Maintain even length and support on both sides of the spine as you hold the shape, preparing for the asymmetrical actions of the next pose.
This method draws on the intelligent use of props to refine technique. Learn more about yoga props here.
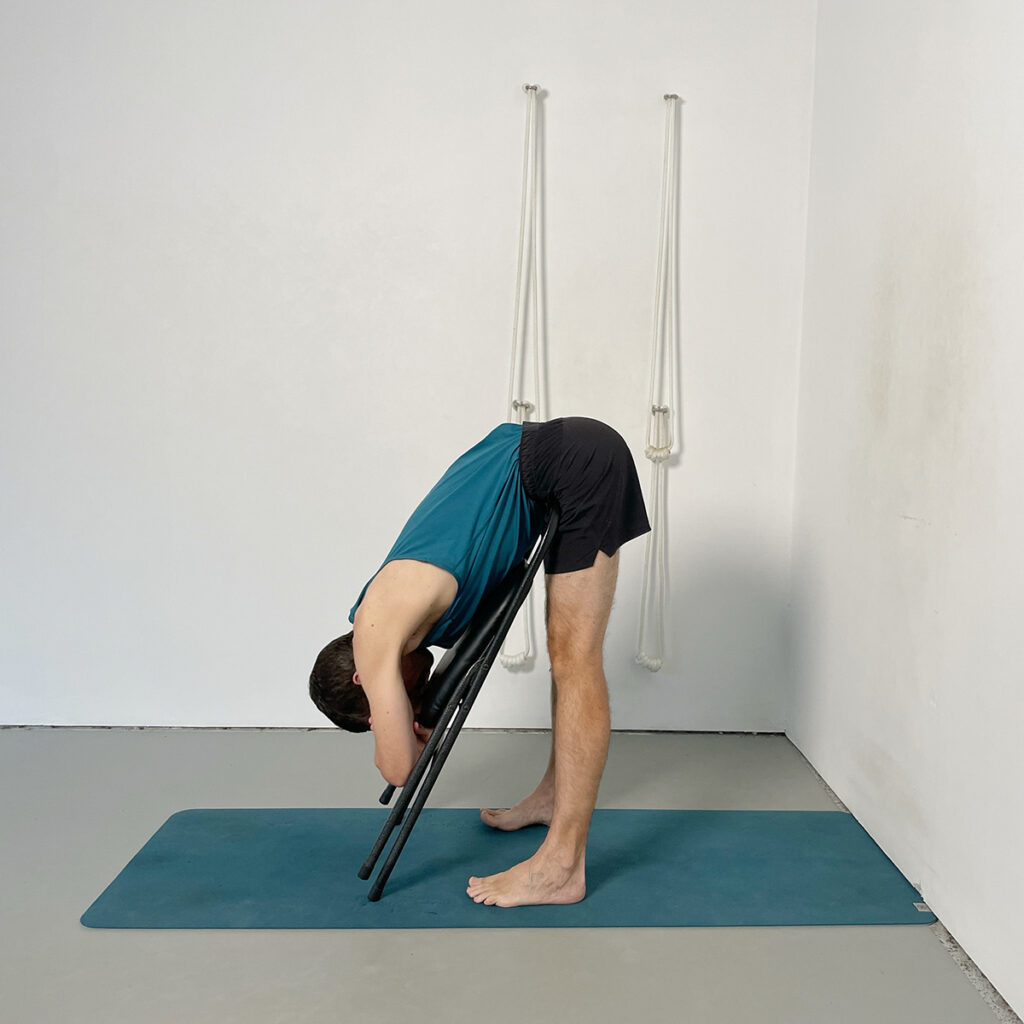
Pose 2 – Parivrtta Adho Mukha Virasana (Twisting Downward Facing Hero Pose) Using a Chair
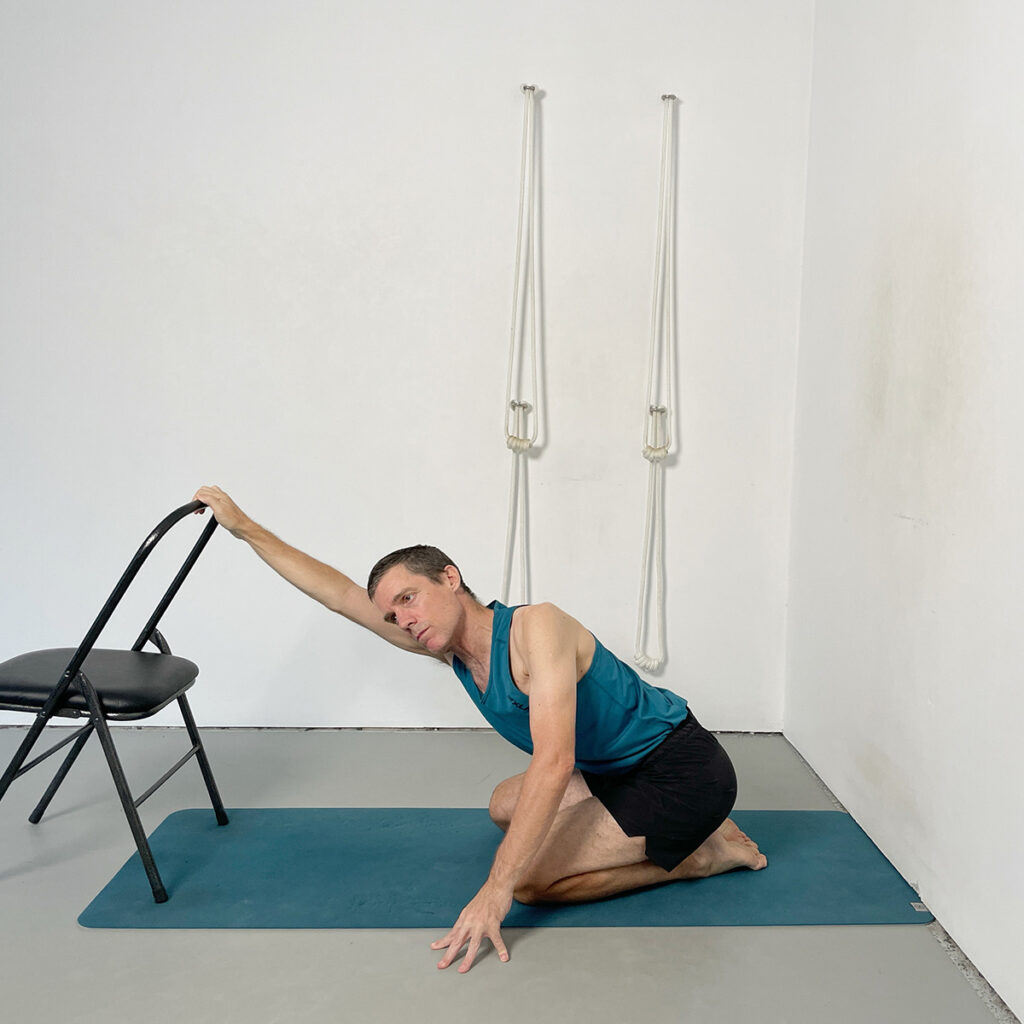
Building on the previous pose, this variation adds a gentle spinal rotation. With the pelvis still anchored, the twist is initiated from the lower abdomen and reinforced by the arms.
- Begin in the same setup as Pose 1 with the arms extended and hands gripping the top of the chair frame.
- Slide the right hand down to the floor beside the right knee.
- Keep the left hand on the chair to maintain traction as you begin to rotate the spine to the right.
- Allow the pubic bone and abdomen to guide the twist rather than forcing from the shoulders.
- Observe how the left ribs move away from the spine and the right ribs deepen into the twist.
- Turn the head only as a final action, keeping the rotation initiated from the base of the spine.
Pose 3 – Uttanasana (Standing Forward Bend) with Chair Support
This variation of Uttanasana uses the chair as a prop for traction and spinal containment. Rather than collapsing forward, the pose becomes an opportunity to lengthen the front of the body while stabilising and grounding the legs.
- Fold a yoga chair and wedge it into the pubic bone region, adjusting the distance so the body leans into the chair as much as the chair presses back into the body.
- Place the hands on the chair frame and press down firmly to lift the chest and lengthen the front of the spine — from the pubic bone through to the sternum and chin.
- Keep the legs vertical, with hips stacked directly over ankles, and press evenly through the soles of the feet.
- Use the resistance of the chair to contain the back body, especially around the thoracic spine, which often tends to bulge outwards in forward bends.
- As you move deeper into the pose, bend the elbows gradually while preserving the length through the front body and the containment in the back.
- Eventually release the arms and allow the spine to hang, experiencing a gentle traction effect in the lower back, supported by the stable contact at the pubic bone.
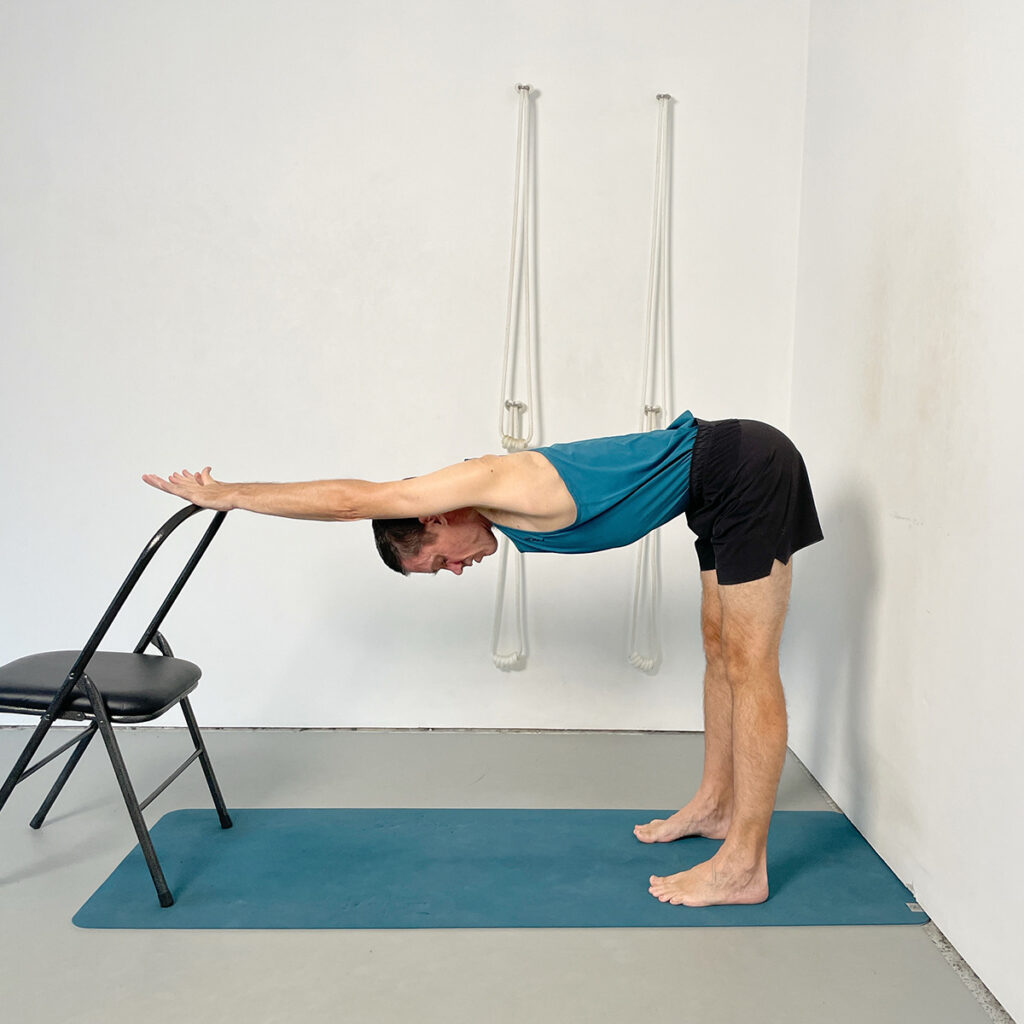
Pose 4 – Ardha Uttanasana (Half Forward Bend) with Hands on Chair Seat

This supported version of Ardha Uttanasana uses the seat of the chair to stabilize the pose and create space in the shoulders, spine, and legs. It reintroduces the standing pose alignment after the deeper forward bend in Pose 3, and builds the strength and direction needed for the standing sequence to come.
- Stand facing the chair and place your hands flat on the seat, stepping the feet back until the legs are vertical and the torso extends horizontally.
- Ensure the ankles are directly under the hips and the spine forms a long, straight line from the hands to the pelvis.
- Straighten the elbows and press the hands down firmly as if gently pushing the chair away.
- Grip the kneecaps and lift the thighs, pressing the tops of the thighs back and anchoring the heels down into the floor.
- Maintain the spinal length by actively reaching forward through the arms and back through the hips, while balancing the length of the front and back body.
- Focus on grounding the legs and stabilising the arms so the chest can move forward without collapsing.
If you struggle with stiffness in forward bends, you might also benefit from our yoga for tight hamstrings article.
Pose 5 – Ardha Uttanasana – Hands on Chair Frame
This variation builds directly on the previous pose, shifting the hand placement to the top of the chair. The altered leverage changes the action in the arms and shoulders while maintaining the same core structure, offering a refined opportunity to lengthen the spine and engage the legs more fully.
- Stand facing the chair with your hands flat on the top of the chair back, fingers draping over and palms pressing down.
- Step the feet back until the legs are vertical and the torso forms a horizontal line, as in the previous pose.
- Push the top of the chair away from you to increase the stretch through the arms, shoulders, and side ribs.
- Keep the knees firm and thighs lifting, anchoring the heels into the floor and pressing the tops of the thighs back.
- As the hands push the chair forward, allow the chest to move toward the floor, while keeping the back of the spine contained.
- Balance the front and back body by drawing the spine inward while lengthening it outward from the hips to the hands.
From Lateral Extension to Spinal Rotation
The next three poses form a progressive sequence, each building upon the spatial and rotational awareness of the last. The chair serves as a stabilising force and a point of leverage, allowing you to clarify alignment while exploring increasingly complex spinal actions. Starting with Trikonasana to establish lateral length and containment, the sequence moves into Parsvottanasana to cultivate forward extension, and culminates in Parivrtta Trikonasana to integrate rotation through the pelvis, spine, and shoulders.
Pose 6 – Trikonasana (Triangle Pose) with Chair
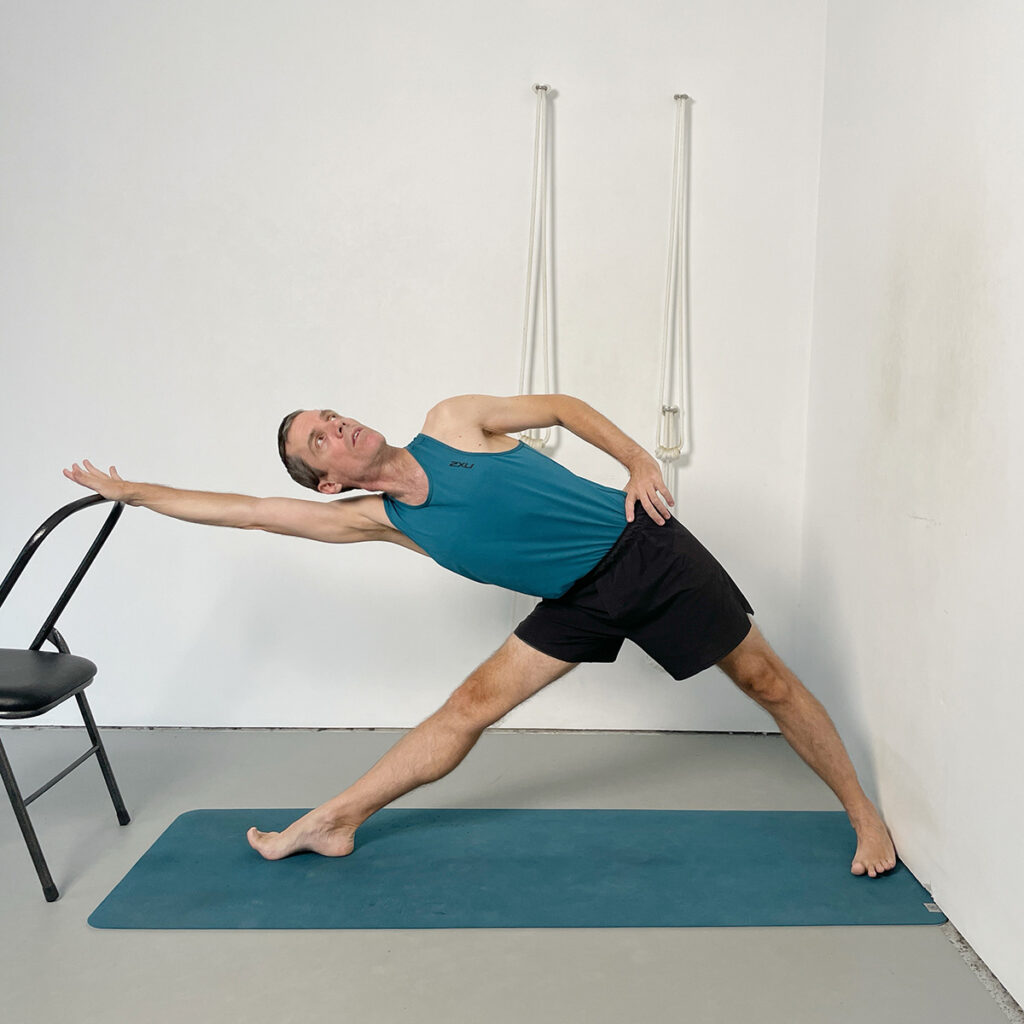
This variation of Trikonasana lays the groundwork for the twisting sequence to come. Using the chair to extend the front body while anchoring the legs, you begin to sense the opposing directions between the back leg and front hip, essential for the next two poses.
- Position the left heel at the wall, with the left foot turned slightly in. Step the right foot out to a full leg-length stance.
- Place the right hand on top of the chair back, palm flat, fingers draping over the edge. The left hand rests on the hip.
- As you push the chair away, draw the right thigh crease back into the body, lengthening the underside of the torso.
- Press the left heel down and draw the left thigh back to prevent the upper body from dipping too low.
- Keep the right side of the spine long while firming and containing the left side body.
- Press the right hand into the chair to move the right shoulder blade in, helping the left shoulder to turn back. Look up without collapsing the neck or bending the right elbow.
Pose 7 – Parsvottanasana (Pyramid Pose)
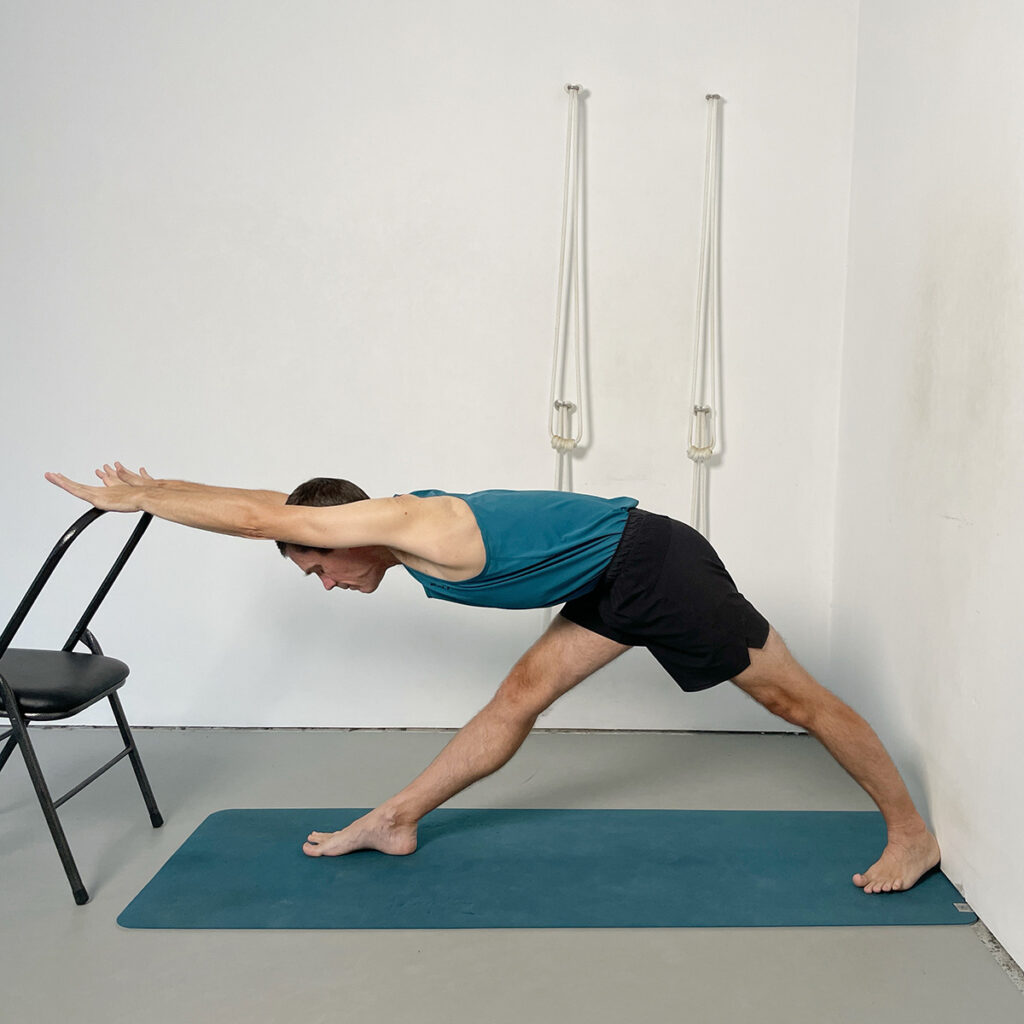
This variation introduces a more compact stance and begins to direct the body forward along a longitudinal plane. The chair allows you to maintain space and length while bringing the pelvis and spine into deeper cooperation.
- Rotate the chair so that the seat faces you and stand with the left heel to the wall, the left foot turned deeply in, and the right foot stepped out a full leg’s length.
- Place both hands on the top of the chair, gripping lightly, with the fingers over the top bar.
- As you press the chair away, draw the right thigh crease back and the left inner groin and shin back toward the wall.
- Press the left heel down to support the action of the right hip moving into the body, creating opposing length through the pelvis.
- Keep the spine long and level, resisting any twist or collapse. The pubic bone faces forward, remaining central.
- Use the resistance of the chair to refine alignment and lengthen the spine in both directions, from hands to hips and hips to feet.
Pose 8 – Parivrtta Trikonasana (Revolved Triangle Pose)
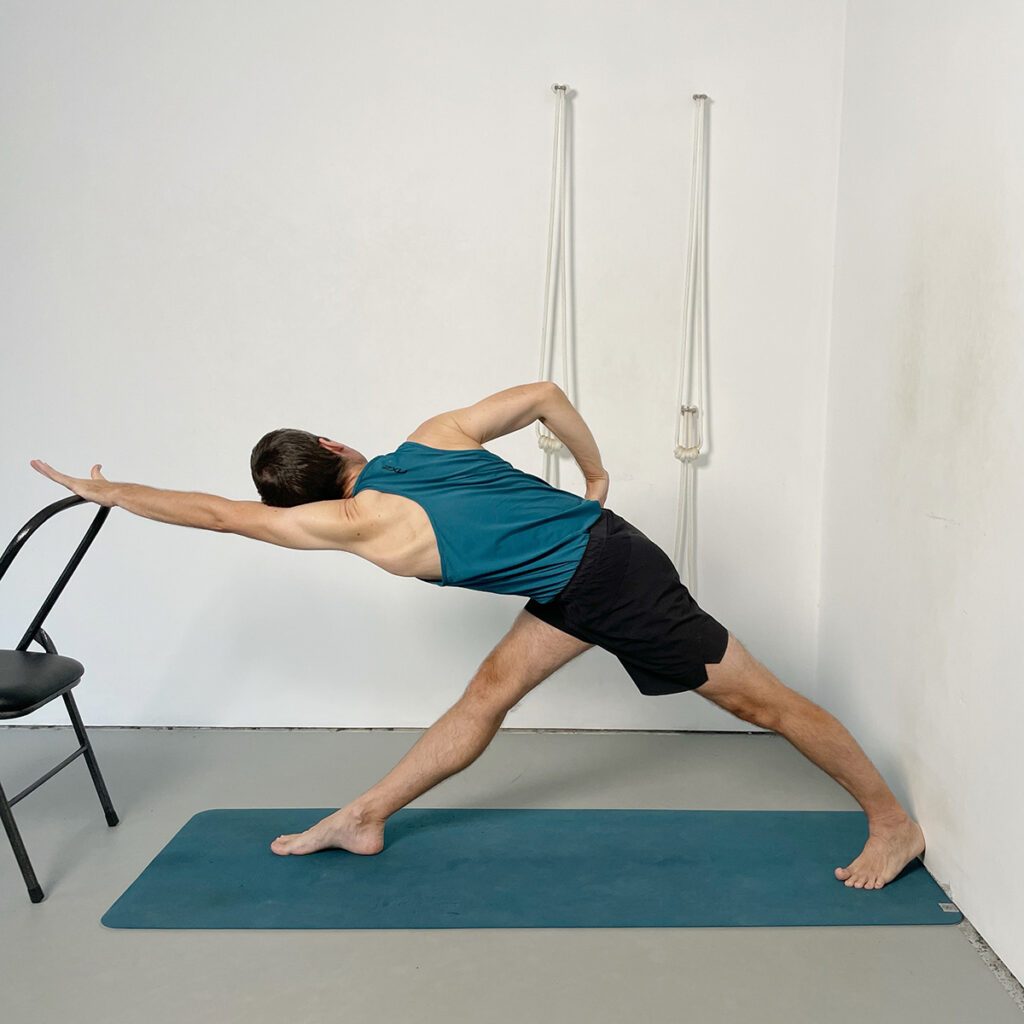
This variation builds directly on the foundation laid in Parsvottanasana. The stance remains the same, but the addition of a spinal twist creates a more complex interplay between the pelvis, waist, and upper body. The chair provides the necessary stability to refine and deepen the revolved action without collapsing into the pose.
- From your Parsvottanasana setup, bring the left hand to the centre of the chair back, palm flat. Place the right hand on your hip.
- Begin the twist by turning the left inner groin back, drawing the left buttock away from the right, and rotating the pubic bone to the right.
- As you do this, gradually press the chair further away to increase traction through the spine.
- Keep the right thigh crease anchored back and the right heel grounded, stabilising the pelvis as the spine rotates.
- Let the left back ribs turn down and away from the spine, initiating rotation through the thoracic spine.
- Finally, lift the right shoulder and turn the chest to the right, keeping the left elbow straight. The head turns last, looking upward without losing balance or spinal containment.
Want to go deeper into thoracic mobility? See our article on improving upper back mobility.
Refine Your Technique with Expert Guidance
Explore detailed Iyengar Yoga classes focused on precision, alignment, and progression. Suitable for experienced students and teachers alike.
Start Free TrialCancel anytime. No commitment.
Pose 9 – Virabhadrasana II (Warrior II) with Chair

In this variation, the front thigh is supported by the seat of the chair, allowing you to work with greater precision in the hips and legs. While the pose is often associated with muscular effort, the support of the chair highlights subtle alignment cues and the often-overlooked actions of the back leg and pelvis.
- Sit sideways on the chair with the right thigh supported by the seat and the left leg extended through the back of the chair, foot flat and heel grounded.
- Align the right heel with the centre of the mat and the left arch in line with it, adjusting the chair’s placement so the left leg can fully straighten.
- Allow the right thigh to release downward into the chair, but press the right outer heel into the mat to prevent the front knee from collapsing inward.
- Draw the right outer hip in and extend the right outer thigh back toward the wall behind you.
- Press the left outer heel down to move the left hip inward, stacking the pelvis and bringing the left shoulder over the hip.
- Extend both arms out at shoulder height, parallel to the floor, and turn your head to look past your right fingertips. Maintain lateral extension while anchoring through both legs.
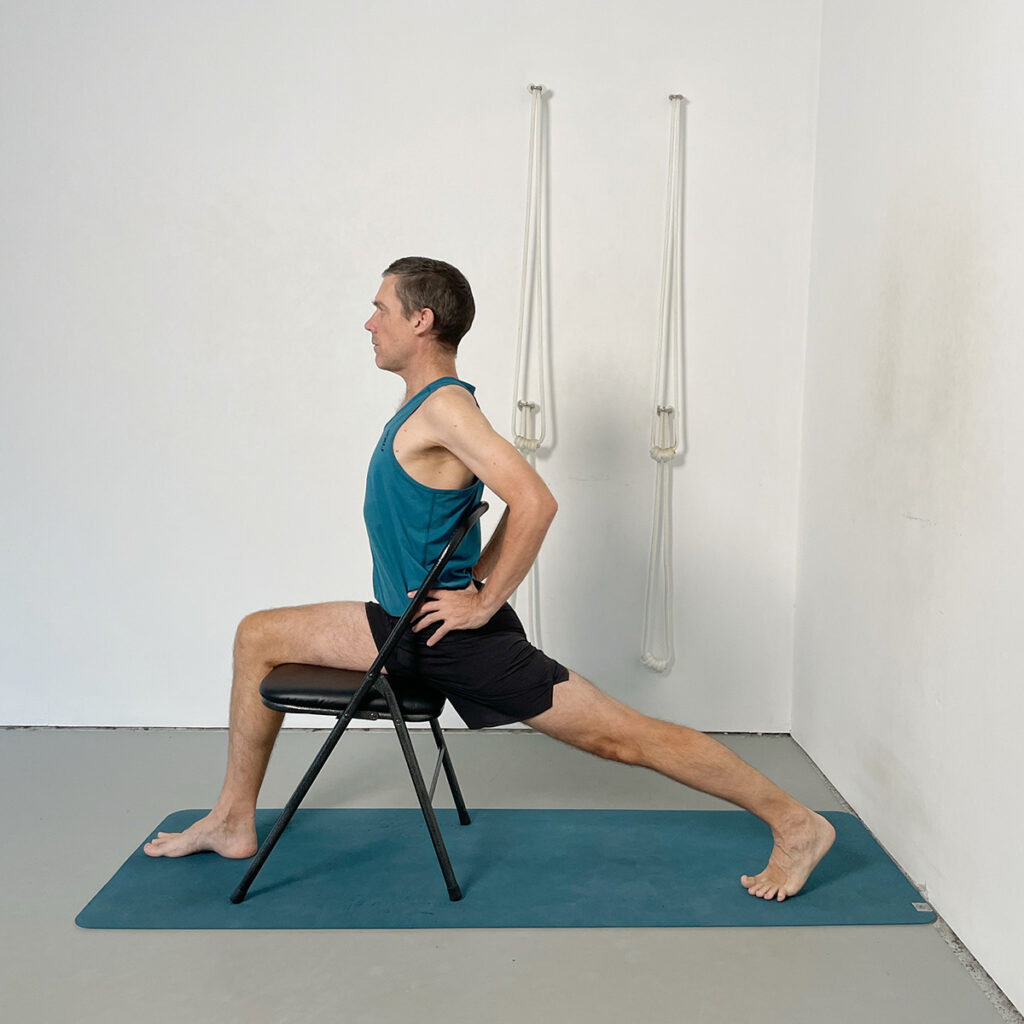
Pose 10 – Parsvakonasana (Extended Side Angle Pose)
This version of Parsvakonasana builds on the base of Virabhadrasana II. The seat of the chair supports the front thigh, allowing for greater descent of the torso and deeper integration of the side body. With one hand on the chair and the other reaching to the floor or block, the pose becomes a blend of support and effort.
- From the seated Virabhadrasana II setup, place your left leg through the frame of the chair, straightening it and grounding the left heel.
- Keep the right thigh supported by the seat, adjusting your position so the right knee remains directly above the ankle.
- Bring the left hand to the top of the chair back to stabilise, and place the right hand on the floor or a block beside the inner right foot. If needed, rest the forearm on the thigh.
- Use the left hand to press into the chair, helping lengthen the right side waist over the right thigh.
- Let the right waist descend and make contact with the thigh, then work to rotate the chest and shoulders upward.
- Walk the left hand slightly back along the chair, and grip firmly as if turning a steering wheel, using that traction to assist in spiralling the upper chest toward the ceiling.
- Keep the right elbow straight and the left hip grounded as you turn the head to look upward.
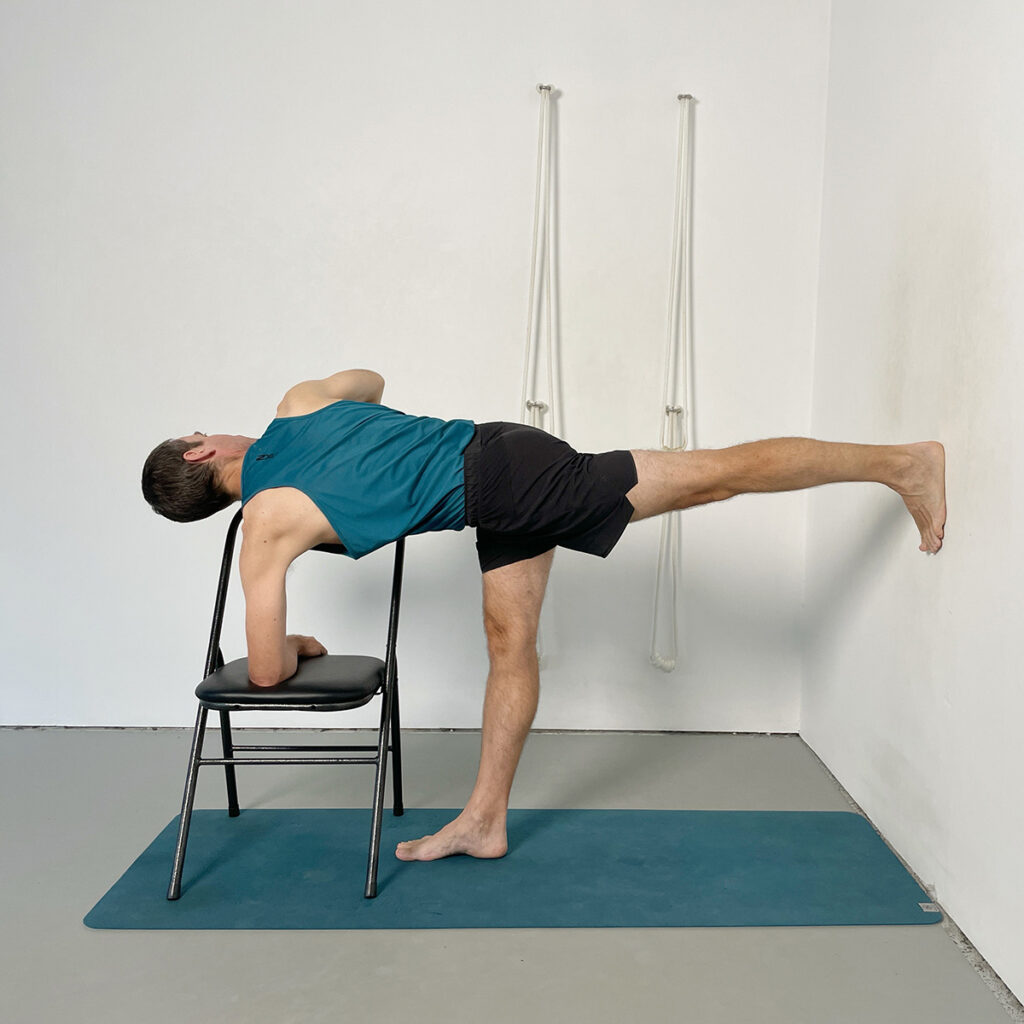
Pose 11 – Ardha Chandrasana (Half Moon Pose)
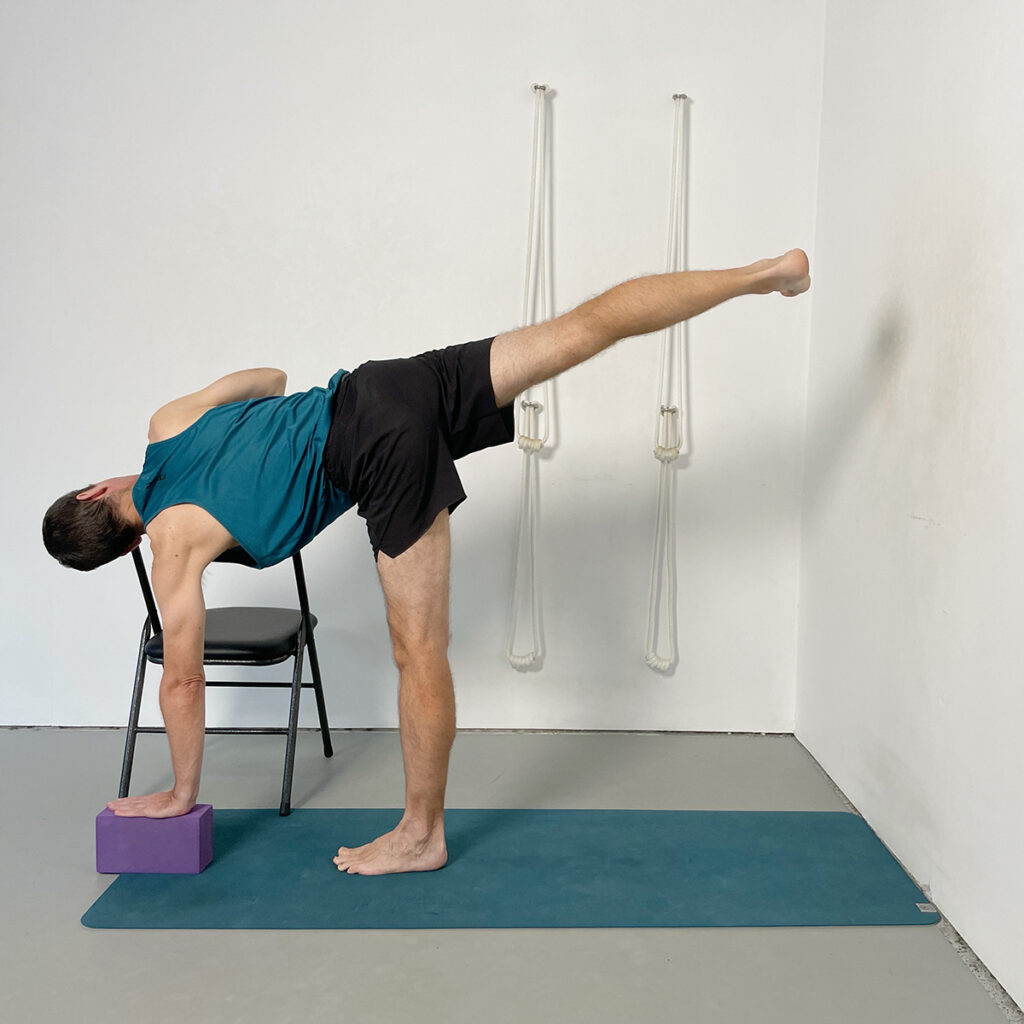
This supported variation of Ardha Chandrasana uses the chair as a stabilising anchor for balance, allowing you to stay longer in the pose and refine actions that are often rushed in the classical version. With the top hand resting on the chair back, your attention can turn toward leg stability, pelvic alignment, and shoulder rotation — all without compromising balance.
- Begin from a Trikonasana setup with the left heel at the wall and the right foot forward. Place a block under the right hand, roughly a foot in front of the right foot and slightly to the outer edge.
- Shift weight into the right foot and lift the left leg, placing the right hand on the block and the left hand on top of the chair back, which stands just left of your mat.
- Keep the standing leg firm, gripping the right kneecap and pressing into the four corners of the foot.
- Extend the left leg strongly out and back, engaging the left buttock to stabilise the limb and prevent it from swinging forward or back.
- Resist the temptation to over-rotate or sag — instead, keep the torso contained, lifting the left shoulder up and away from the ear.
- Once the body is steady and aligned, turn the head slowly to look upward. The support of the chair helps prevent compensatory movements in the spine or neck.
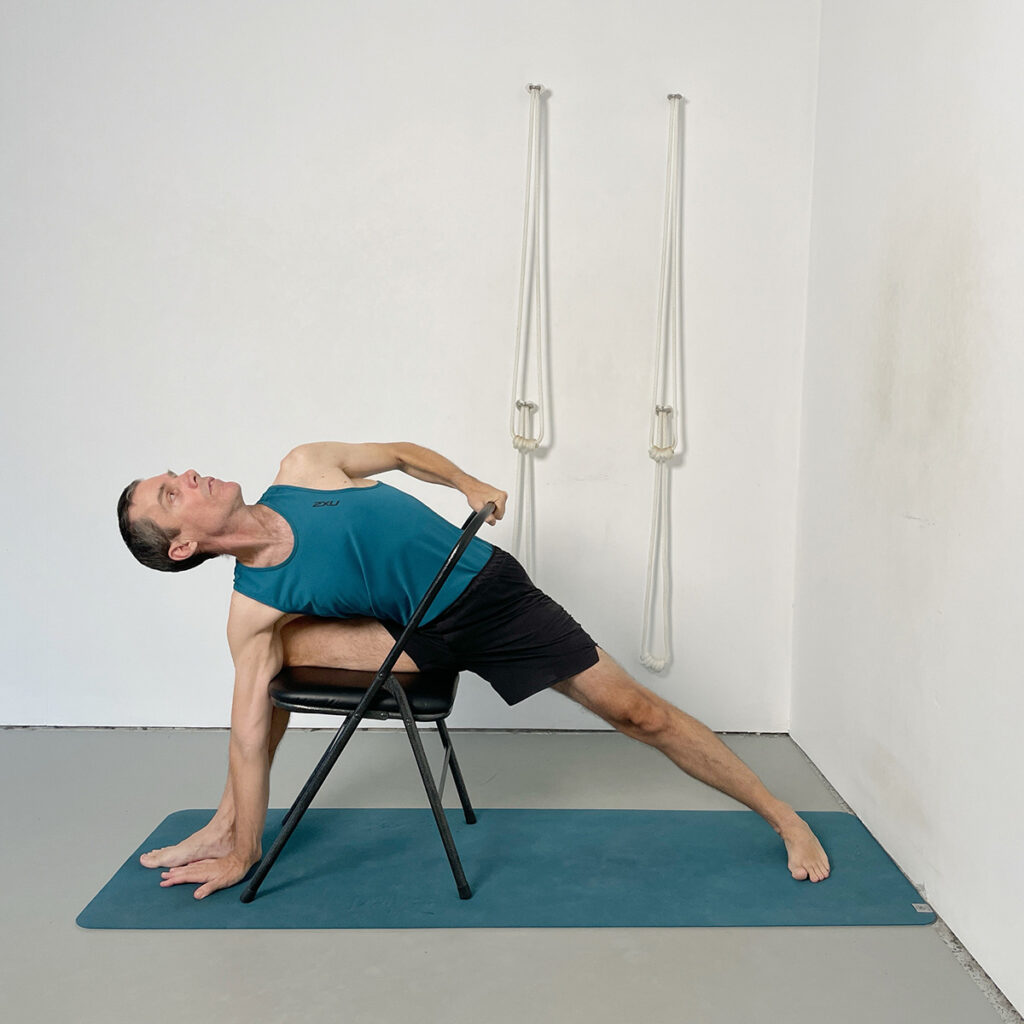
Pose 12 – Parivrtta Ardha Chandrasana (Revolved Half Moon Pose)
In this revolved variation of Ardha Chandrasana, the chair provides key support that makes the complex twisting action more accessible. With one forearm on the chair seat and the opposite hand on the chair back, you can work incrementally through the body — from the grounded leg to the lifted heel — without being destabilised by the balance challenge.
- Place the chair near the front of your mat, angled slightly so the seat faces inward. Begin in a wide stance with the left heel to the wall and right leg forward.
- Position your left forearm on the seat of the chair, palm down. Bring your right hand to the chair back, palm down, elbow lifted.
- Raise the left leg to hip height and press the left foot firmly into the wall. Adjust so that the right heel is directly under the right hip and the left leg is fully straight.
- Begin the twist by turning the left inner groin upward and drawing the left buttock away from the right.
- Rotate the pubic bone across to the right and use the arms to stabilise and lengthen the spine — the forearm pressing down and the top hand gripping the chair to encourage length and rotation through the waist and ribs.
- As the left back ribs descend and turn, allow the right shoulder to lift and the chest to rotate upward.
- Turn the head last, looking toward the ceiling without disturbing the alignment of the pelvis or spine.
Pose 13 – Virabhadrasana I (Warrior I)
This supported version of Virabhadrasana I shifts the challenge from muscular stamina to precise alignment. With the front leg resting on the chair, the pose becomes a study in directional action — anchoring through the feet while lifting through the spine and opening the chest.
- Sit facing forward with the right thigh supported by the chair seat and the left leg extended back through the frame of the chair, heel grounded.
- Ensure that the right foot is fully planted, and the left leg is straight, with the heel pressing firmly down and back.
- Place your hands on your hips and square the pelvis and chest toward the front edge of your mat.
- Press the right heel down and use that resistance to draw the right hip in, while pressing the left heel back to activate the left leg and move the left hip forward.
- Rather than letting the lumbar spine collapse forward, direct the action into the back of the left hip, keeping the pelvis lifted and spine tall.
- Allow the chest to open and shoulders to roll back, finding vertical lift without sacrificing grounding.
- Hold here, focusing on how the opposing directions of the legs create space in the spine and stability in the pelvis.
Pose 14 – Parivrtta Parsvakonasana (Revolved Side Angle Pose)
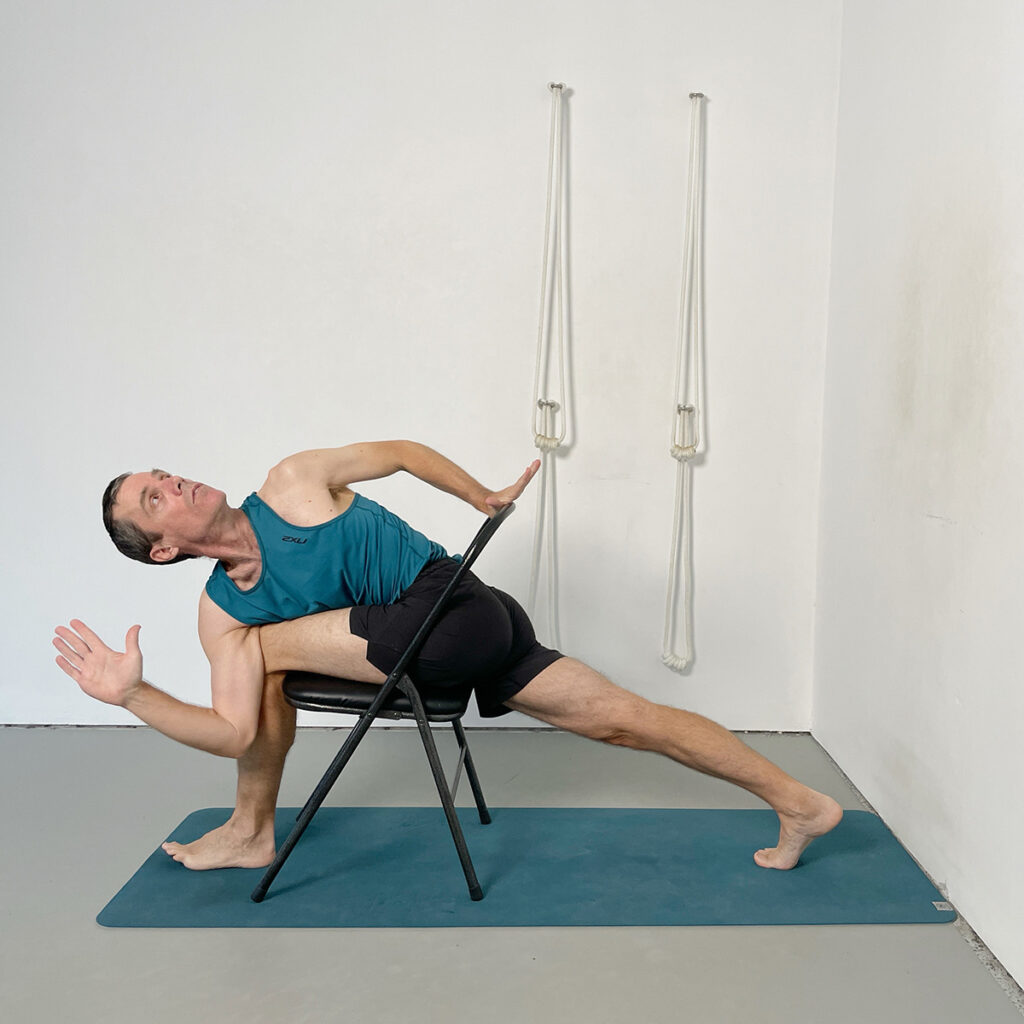
In this variation of Parivrtta Parsvakonasana, the chair anchors the front leg and provides structure that allows the spine to lengthen and twist without collapsing. The rotational effort can be sustained longer and refined more deeply, making the pose especially useful as a preparatory step toward the full classical version.
- Begin seated in the Virabhadrasana I setup, with the right thigh supported by the chair seat and the left leg extended back through the chair frame, heel grounded.
- Place your left shoulder past the right knee, and bring your left elbow to the outer right thigh, palm facing outward.
- Place your right hand on the top of the chair back, gripping firmly for support and leverage.
- Press the left arm into the thigh to help initiate the twist from the lower abdomen and pubic bone, turning the torso toward the right.
- As the left waist lengthens and the left back ribs descend, deepen the twist through the mid-spine and shoulders.
- Walk the right hand further back along the chair, and use a steering wheel-like action to help rotate the upper chest open.
- Keep the right knee aligned above the ankle, the left leg strong and extended, and the right elbow lifted as you turn the head and look upward.
Pose 15 – Malasana (Garland Pose)
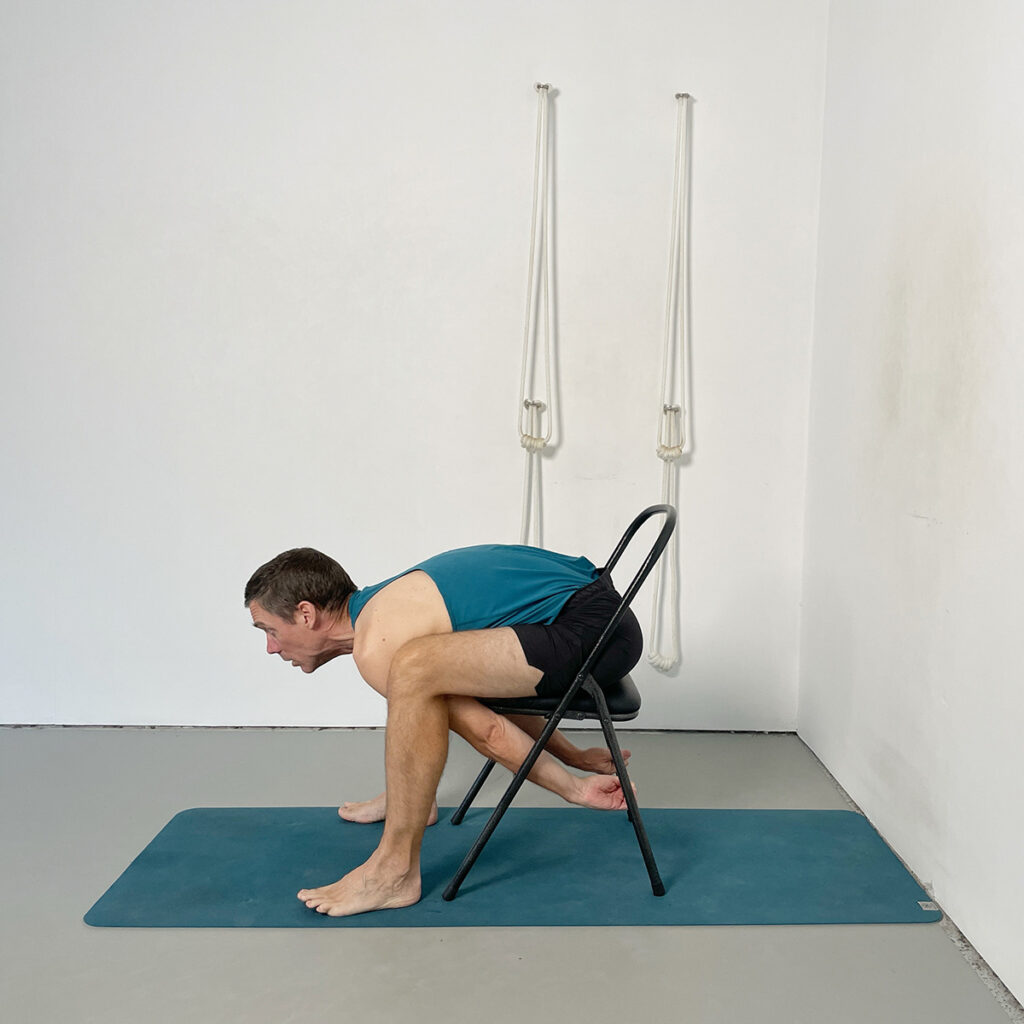
This variation of Malasana uses the chair to support the hips while you fold forward between the legs. The support invites a deeper settling into the pose while offering the opportunity to lengthen the spine and release the lower back — often difficult in the unsupported version.
- Sit on the front edge of the chair, with your feet wider than the chair legs and turned slightly outward.
- Bend forward and bring your hands to the floor or reach through the legs to hold the crossbar between the back legs of the chair.
- If holding the bar, gently draw your torso forward and down, allowing the arms to extend and the head to lift.
- Press down through the outer edges of the feet, keeping the knees tracking over the toes.
- Broaden the sitting bones and feel the root of each thigh descend, releasing the hips downward into gravity.
- At the same time, create lift in the pose by lengthening through the chest, extending the spine forward.
- The chair support reduces strain, allowing for a more even release in the hips, lower back, and groins.
For more targeted support, explore this article on lower back care.
Pose 16 – Savasana (Corpse Pose) with Chair

This supported version of Savasana uses the chair to elevate the lower legs and release tension from the lumbar spine. The simple setup provides deep relief to the back body and allows the breath to settle naturally — an ideal way to close a sequence of standing poses.
- Lie back with your calves resting on the seat of the chair, ensuring the back of the knees make full contact with the chair edge.
- Place a folded blanket under the head, adjusting the height so that the forehead is slightly higher than the chin.
- If needed, slide a half-fold blanket under the pelvis to help the lower back relax more fully into the floor.
- Rest the arms slightly away from the sides, palms facing up. Allow the shoulders to settle evenly into the floor.
- Let the thighs drop passively, and feel the shin bones descend into the calves, softening the lower legs.
- Bring awareness to the weight of the pelvis, the release of the abdomen, and the quietening of the breath.
- With each exhalation, allow the eyes to sink inward, the jaw to soften, and the back body to settle more deeply into the floor.
Conclusion: Deepening Awareness Through Chair-Assisted Standing Poses
The use of a yoga chair in standing poses offers more than just physical support — it provides a framework for precision, awareness, and transformation. By stabilising the foundation and creating space in key areas of the body, the chair allows for deeper observation and more refined action. Subtle asymmetries and habitual misalignments become more visible, and you gain the time and clarity to address them consciously.
This approach exemplifies the Iyengar method: working with structure to access freedom, and using props not to bypass effort, but to illuminate the inner work of each pose.
Whether you are consolidating your understanding of familiar asanas or refining subtler aspects of alignment, this sequence encourages you to move beyond external form and work with clarity, precision, and depth.
Join Yoga Selection Today
Unlock full access to Yoga Selection’s complete video library, featuring expertly taught Iyengar Yoga classes and structured learning paths.
Start Free TrialFull access. Cancel anytime.